Managing UPS Shipping
This user guide will walk you through the process of integrating your website with United Parcel Service (UPS) and managing its services through the admin area.
Follow the steps below to get started:
Step 1: Installation
1. Access the admin area of your website.
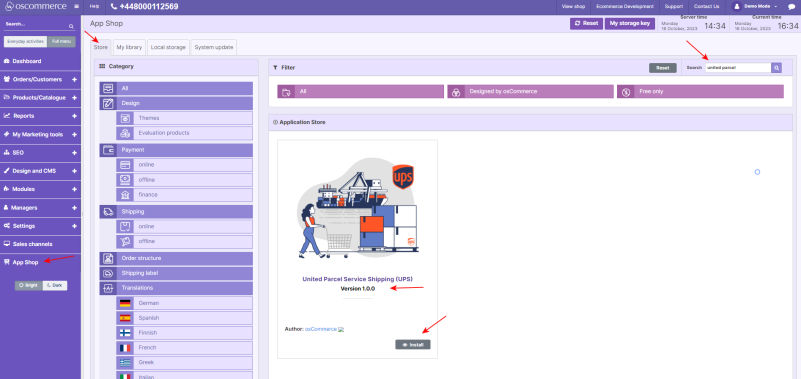
2. Navigate to the "App Shop" and "Store" tabs.
3. Use the search function to find the UPS Shipping module (UPS) version 1.0.0.
4. Install the UPS Shipping module on your website.
5. Follow any on-screen prompts or instructions to complete the installation process.
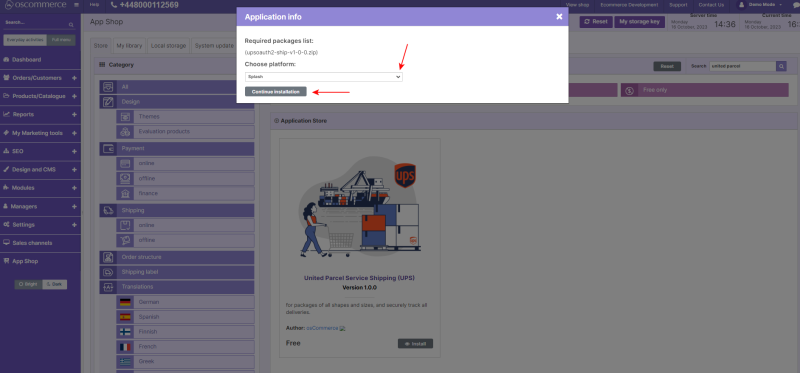
During installation, you can choose to apply the UPS Shipping module to specific sales channels or all channels at once:
- Choose your preferred sales channel(s).
- Click the "Continue installation" button.
Step 2: Accessing Module Settings
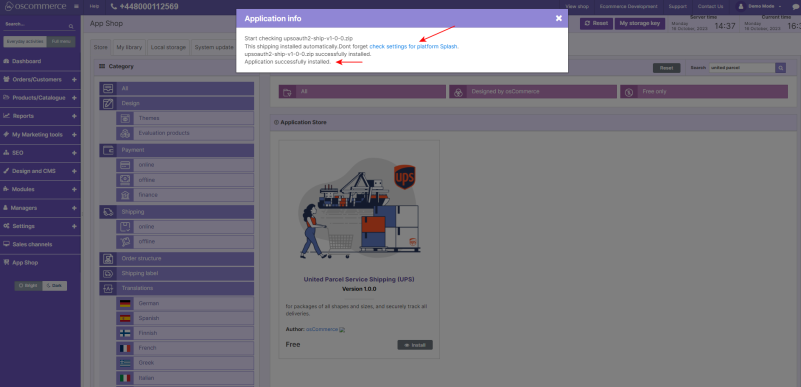
Once the module is installed, a success page will confirm its integration. To proceed, click on the "Check settings for the required platform" link.
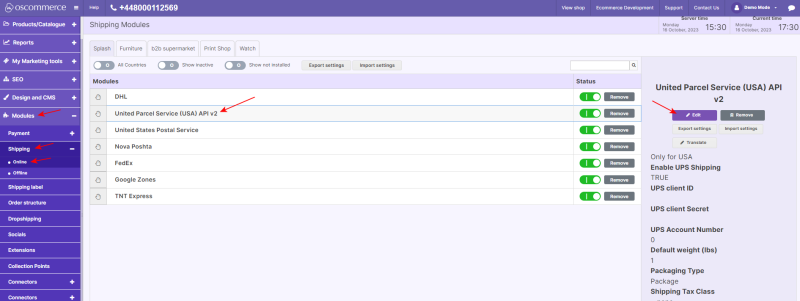
Alternatively, you can find the module under the Modules, Shipping, and Online tabs. Locate the
"United Parcel Service (USA) API v2” module and click on the “Edit” button to access its settings.
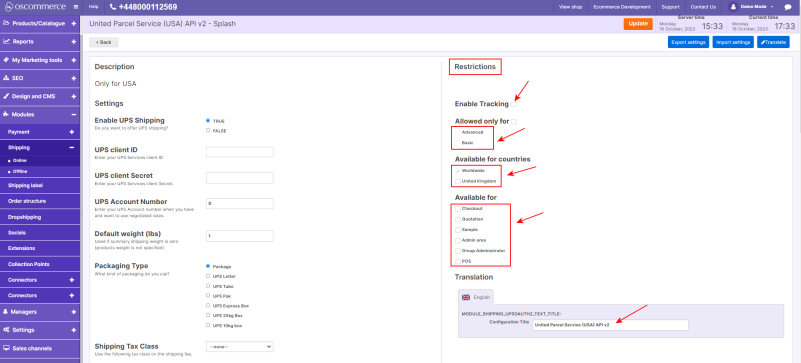
Step 3: Customizing Restrictions
- In the "Restrictions" section, tailor UPS Shipping to your specific needs.
- You can restrict UPS shipping to specific customer groups, countries, and website pages.
- Specify the shipping module name for both the backend and frontend in your desired language.
- Enable tracking to provide better shipment visibility to your customers.
Step 4: Configuring UPS Shipping Options
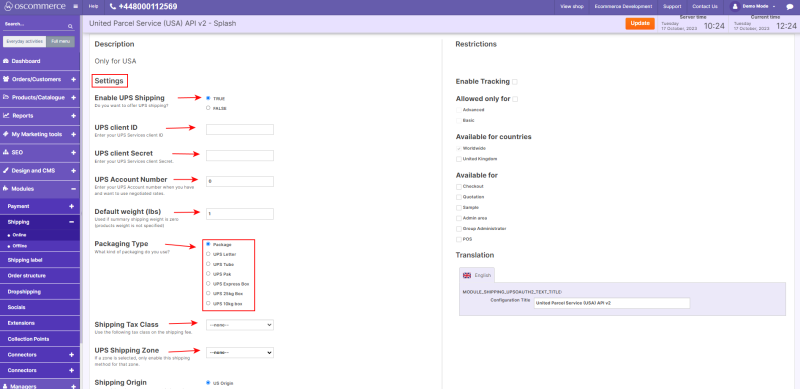
In the "Settings" section, configure the United Parcel Service Shipping options:
1. Toggle the UPS shipping option to make it available on your website.
2. Provide your UPS client ID, client secret, and UPS account number if you have negotiated rates.
3. Specify a default weight value for products without specified weights.
4. Choose from various UPS packaging options such as Package, UPS Letter, UPS Tube, UPS Pack, UPS Express Box, UPS 25 kg Box, UPS 10 kg Box
5. Utilize tax classes for shipping fees by selecting from the available drop-down list.
6. Define the shipping zones (All World, USA, EU) where you want to offer UPS shipping services.
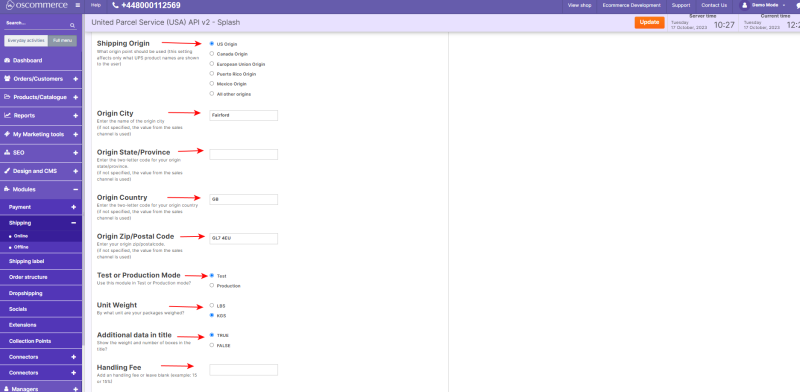
7. Select the required shipping origin from the following options: US Origin, Canada Origin, European Union Origin, Puerto Rico Origin, Mexico Origin, All other origins.
8. Specify the shipping origin details including city, state/province, country, and zip/postal code.
9. Decide between test or production module mode based on your requirements.
10. Indicate whether your parcels are weighed in pounds (LBS) or kilograms (KGS).
11. Enable the Additional data in title option to display weight and box count in the title.
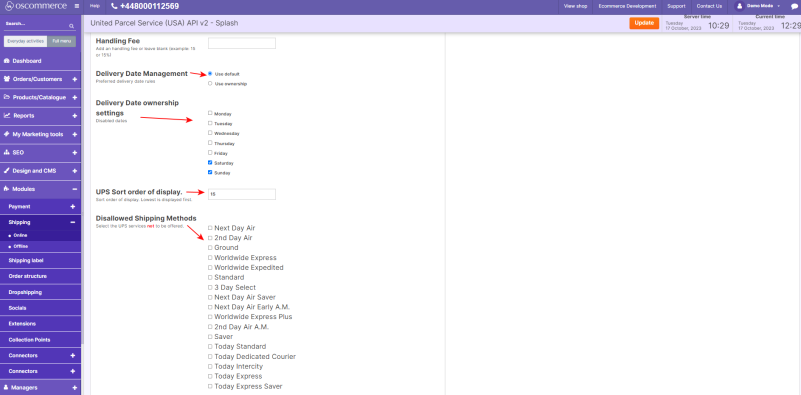
12. Set a handling fee value to cover additional packaging and processing costs.
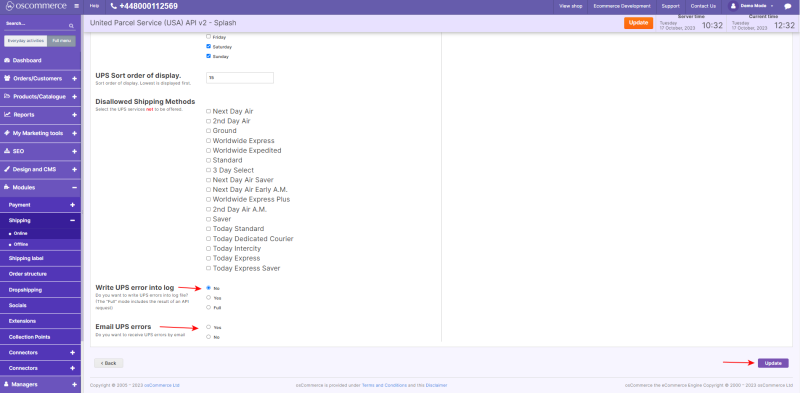
13. Manage delivery dates and ownership settings for better control over shipments. Choose between "Use default" and "Use ownership" options for preferred delivery date rules. Disable required days by checking the box next to the preferred day(s) of the week.
14. Control the order of UPS Shipping's display during checkout by assigning a numerical value in the corresponding field. Lower values prioritize UPS Shipping over other methods.
15. Select specific UPS services you don’t want to offer from the available options (e.g., Next Day Air, Ground, Today Standard, and more).
16. Opt to write UPS errors into a log file and receive error notifications via email for efficient issue resolution.
17. Click the Update button to save your customization.
By carefully configuring these UPS shipping options, you ensure a reliable and streamlined shipping process for your online store.
NOTE: To obtain UPS client ID, client secret, and UPS account number mentioned in Step 4 of this user guide, follow these steps:
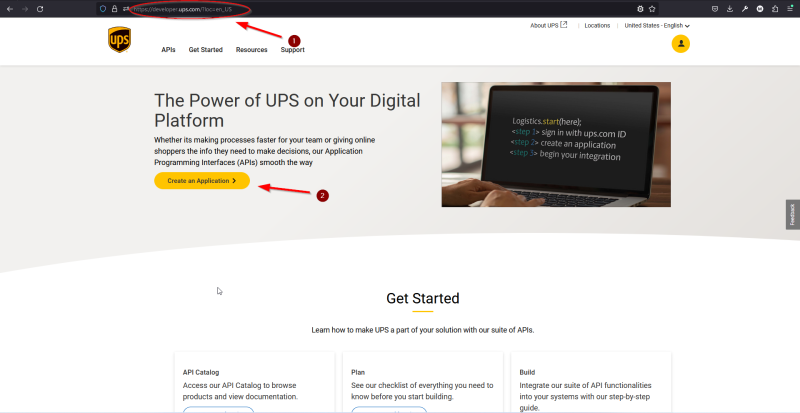
1. Go to UPS Developer Portal https://developer.ups.com/?loc=en_US and click “Create an Application”.
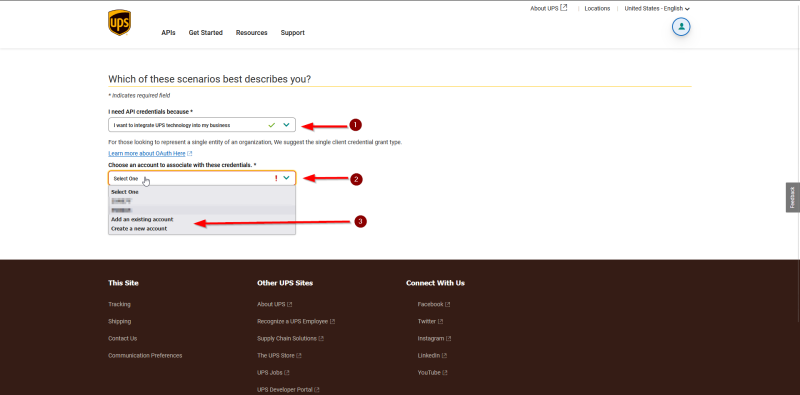
2. Choose “I want to integrate UPS technology into my business” from the drop-down menu and select an account to associate with these credentials - you can add an existing account or create a new one.
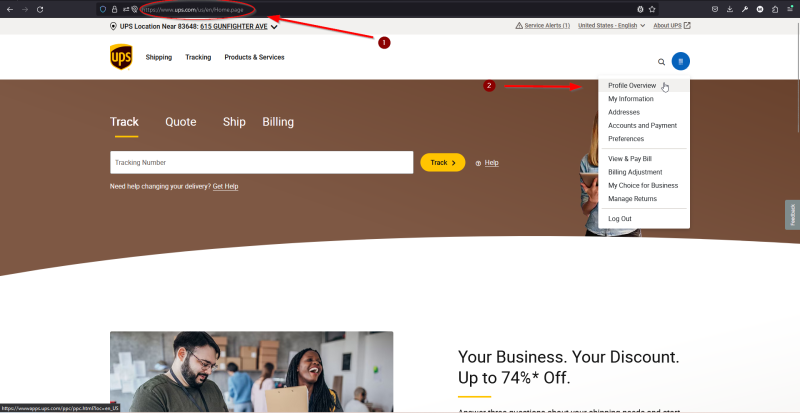
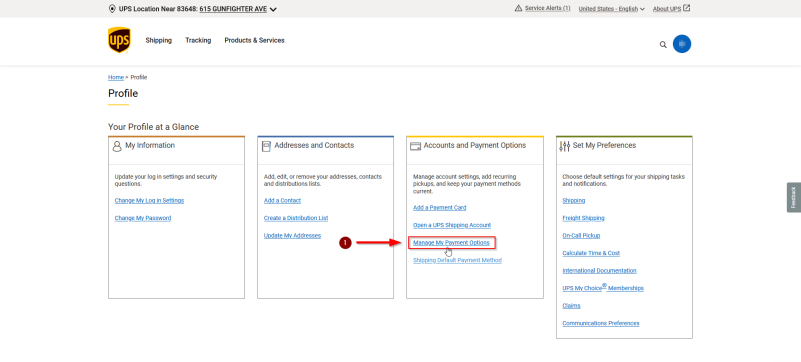
3. Access your UPS account at UPS Profile Overview https://www.ups.com/us/en/Home.page
4. Select “Manage My Payment Options” under the Accounts and Payment Options section.
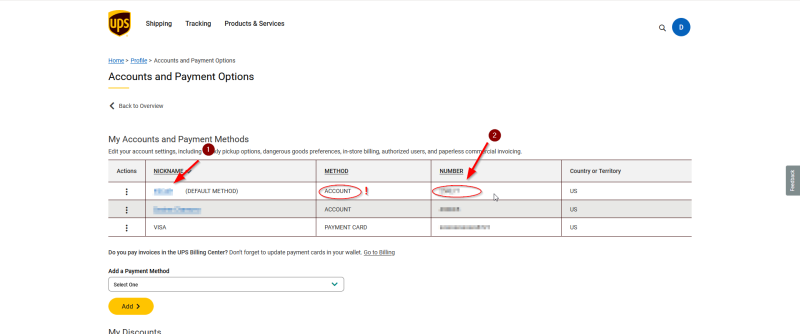
5. Find your nickname and account number under the Accounts and Payment Methods table - ensure "Account" is indicated as the method.
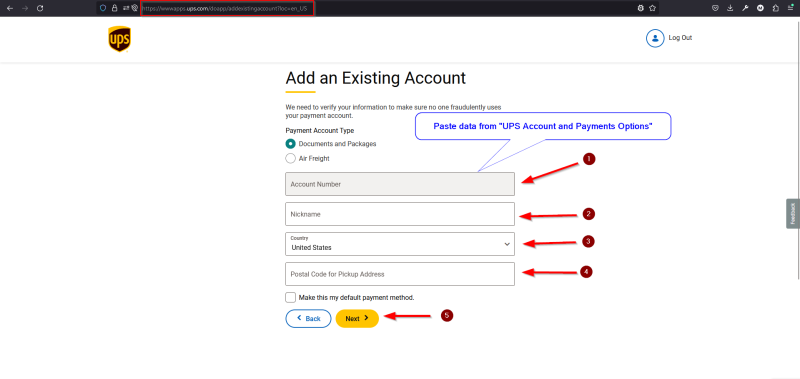
6. Create your UPS application using this link: https://wwwapps.ups.com/doapp/addexistingaccount?loc=en_US. Fill in the “Account Number”, “Nickname”, “Country”, and “Postal Code for Pickup Address” fields, then click Next.
7. On the “My Apps” page, find and click on your App link for editing.
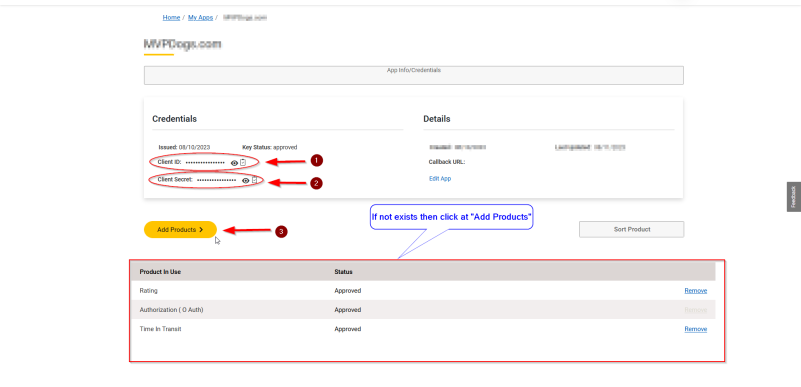
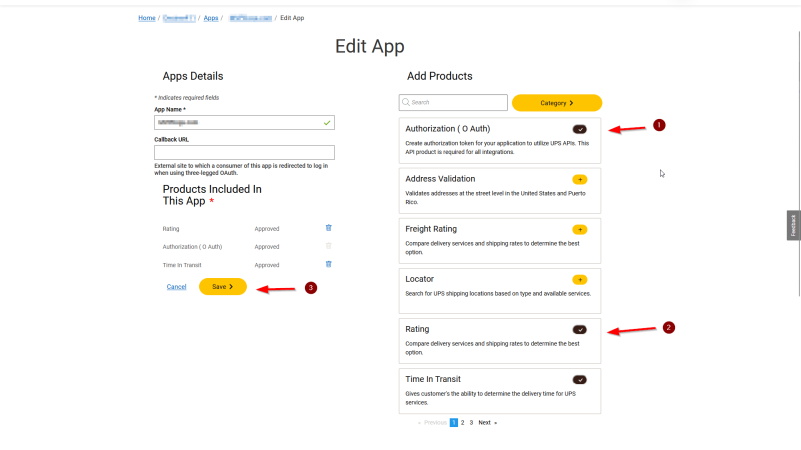
8. In the “Credentials” section, you'll find your Client ID and Client Secret. Below “Credentials”, check if your product is listed. If not, click “Add Products”.
9. On the “Edit App” page, in the “Add Products” section, select “Authorization”, “Rating”, and “Time In Transit”, then click Save.
Congratulations! You have now successfully integrated UPS shipping service with your website and customized its settings to meet your specific needs.
For any additional assistance or support, please refer to the documentation provided with the UPS Shipping module.
Thank you for selecting UPS Shipping as your preferred shipping solution!
