Managing Recovery Cart: Difference between revisions
No edit summary Tag: Manual revert |
No edit summary |
||
| Line 1: | Line 1: | ||
This functionality is used to remind the customer who put some products in his shopping cart but never completed the purchase that he can still do it. To encourage him to purchase these products you can set up the system that will send him emails including the images of the products he wanted to purchase as well as different coupons to get the extra discounts for this purchase. | |||
To start working with recovery carts, access the admin area of your website, then move to the '''App Shop''' and '''Store''' tabs. Find the '''Recover Shopping Cart module''' using Quick search, and install it on your website. | |||
[[File:1333 App Shop.jpg|none|thumb|800x800px]] | |||
[[File: | Once installed, go to the '''Modules''' and '''Extensions''' tabs. Select '''Recover Shopping Cart''' from the Extension Modules list and click the '''Edit''' button | ||
To make a coupon available in the coupon drop down lists click on '''Marketing tools, Coupons''' and '''Coupon Admin''' tabs. Then click on the '''required''' coupon and on '''Edit''' button. | |||
[[File: | to work with '''Recover Shopping Cart''' and '''Platform''' settings and options. | ||
Under '''Main details''' tab you can switch on/off '''Coupon for Recovery Cart'''. | [[File:1334 Extension modules list.jpg|none|thumb|800x800px]] | ||
[[File: | For your convenience each setting is followed by its short description. | ||
To edit the recovery cart emails click on '''Design and CMS''' and '''E-mail templates''' tabs. Under the required '''template group''' click on the | [[File:1335 Settings 1.jpg|none|thumb|801x801px]] | ||
[[File: | [[File:1336 Settings 2.jpg|none|thumb|800x800px]] | ||
Choose the required '''front end''' by clicking on | [[File:1337 Settings 3.jpg|none|thumb|802x802px]] | ||
[[File: | |||
In the '''Platform settings''' section you can select the required '''sales channel''' by clicking on its tab, set up '''email delivery intervals''' from drop down lists for 3 emails and choose '''available coupons''' from drop down lists for each email (if you choose '''Not''' to send any coupons, leave '''Select coupon''' option as is). | |||
[[File:1338 Platform Settings.jpg|alt=|none|thumb|801x801px]] | |||
To make a coupon available in the coupon drop down lists, click on the '''Marketing tools, Coupons''' and '''Coupon Admin''' tabs. Then click on the '''required''' coupon and on the '''Edit''' button. | |||
[[File:1339 Coupon Admin.jpg|alt=|none|thumb|801x801px]] | |||
Under the '''Main details''' tab you can switch on/off '''Coupon for Recovery Cart'''. | |||
[[File:1340 Main details tab.jpg|alt=|none|thumb|800x800px]] | |||
To edit the recovery cart emails, click on the '''Design and CMS''' and '''E-mail templates''' tabs. | |||
Under the required '''template group''' click on the appropriate '''template''' and then on the '''Edit''' button. | |||
Use '''Quick Search''' to find the template you need. | |||
[[File:1341 Email templates.jpg|alt=|none|thumb|800x800px]] | |||
Choose the required '''front end''' by clicking on its tab, select the required '''design template''' from the drop down list, choose between the required '''format''' by clicking on the tabs and '''edit''' the required fields. | |||
[[File:1342 Email templates edit.jpg|alt=|none|thumb|800x800px]] | |||
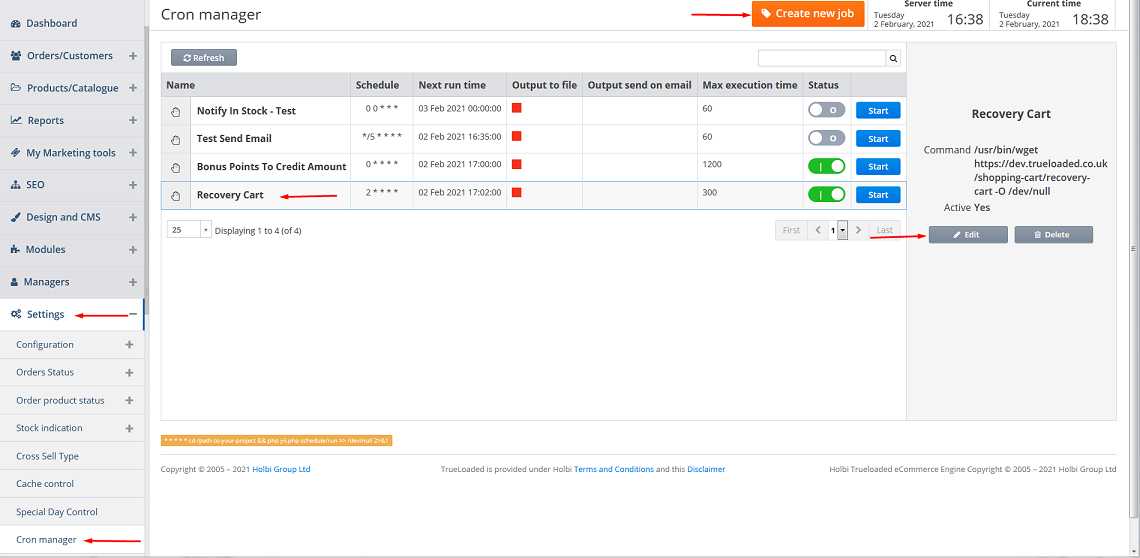
To set up/edit the corresponding cron for the recovery cart click on '''Settings''' and '''Cron manager''' tabs. Click on '''Recovery Cart''' and then on '''Edit''' button or click on '''Create new job''' button. | To set up/edit the corresponding cron for the recovery cart click on '''Settings''' and '''Cron manager''' tabs. Click on '''Recovery Cart''' and then on '''Edit''' button or click on '''Create new job''' button. | ||
[[File:Image 484.png|alt=|none|frame]] | [[File:Image 484.png|alt=|none|frame]] | ||
| Line 19: | Line 41: | ||
'''Note''': Make sure you install the following command on your server as well (2****/usr/bin/wget <nowiki>https://..../shopping-cart/recovery-cart-O/dev/null</nowiki>) | '''Note''': Make sure you install the following command on your server as well (2****/usr/bin/wget <nowiki>https://..../shopping-cart/recovery-cart-O/dev/null</nowiki>) | ||
[[File:Image 485.png|alt=|none|frame]] | [[File:Image 485.png|alt=|none|frame]] | ||
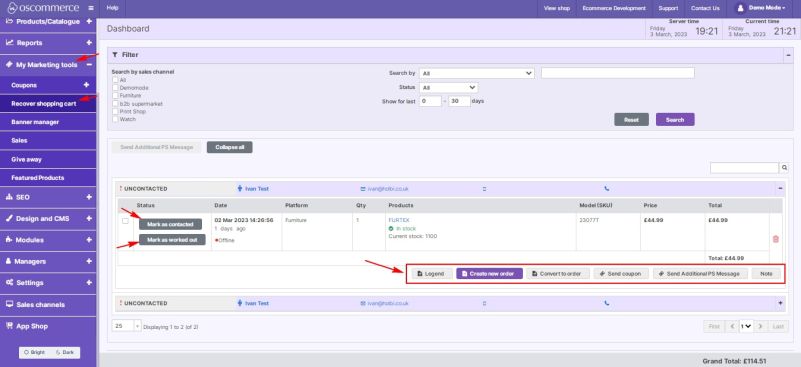
Click on the '''Marketing tools''' and '''Recover Shopping Cart''' tabs. Here you can see the information about the clients’ shopping carts as well as '''mark as contacted''' and '''mark as worked out''' by clicking on the corresponding buttons. You can also click on the '''Legend, Create new order, Convert to order, Send coupon, Send Additional PS Message''' and '''Note''' buttons to take further actions on a shopping cart. | |||
[[File:1343 Recover shopping cart page.jpg|alt=|none|thumb|801x801px]] | |||
[[File: | |||
Revision as of 12:24, 6 March 2023
This functionality is used to remind the customer who put some products in his shopping cart but never completed the purchase that he can still do it. To encourage him to purchase these products you can set up the system that will send him emails including the images of the products he wanted to purchase as well as different coupons to get the extra discounts for this purchase.
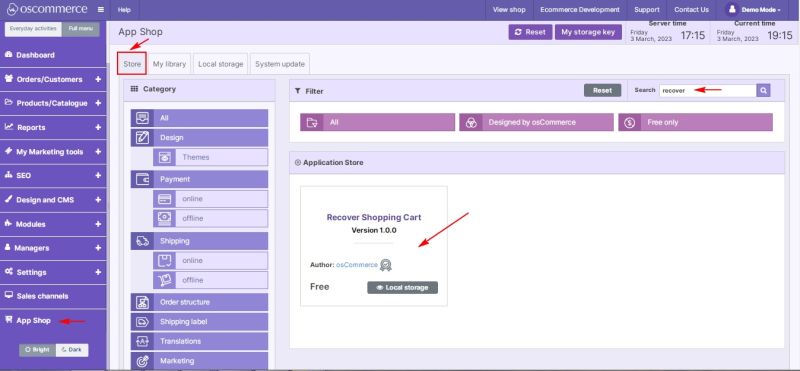
To start working with recovery carts, access the admin area of your website, then move to the App Shop and Store tabs. Find the Recover Shopping Cart module using Quick search, and install it on your website.
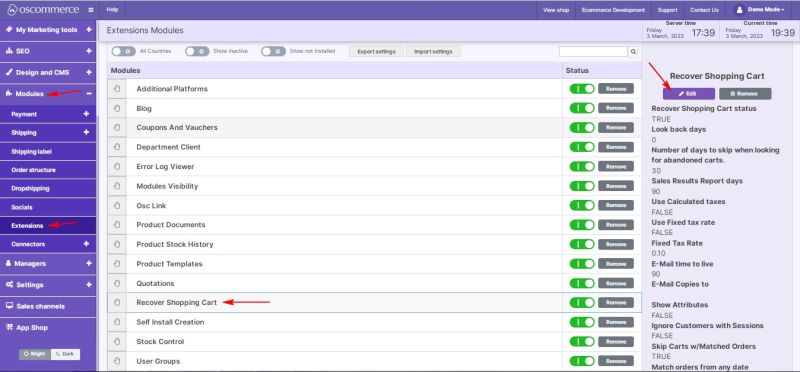
Once installed, go to the Modules and Extensions tabs. Select Recover Shopping Cart from the Extension Modules list and click the Edit button
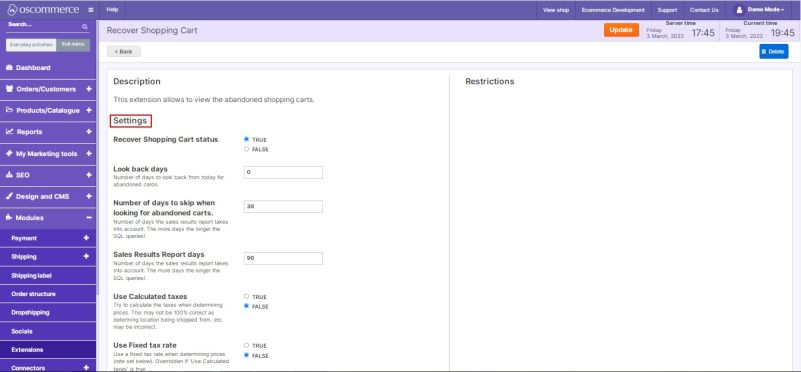
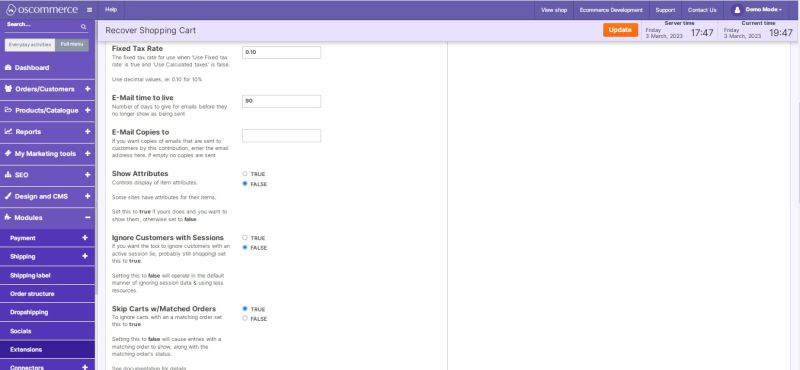
to work with Recover Shopping Cart and Platform settings and options.
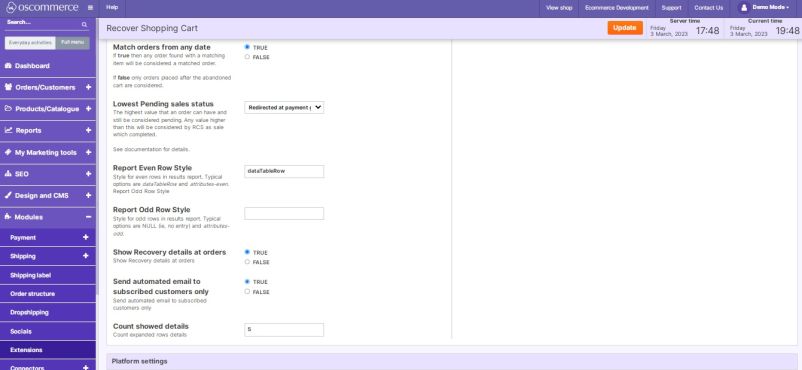
For your convenience each setting is followed by its short description.
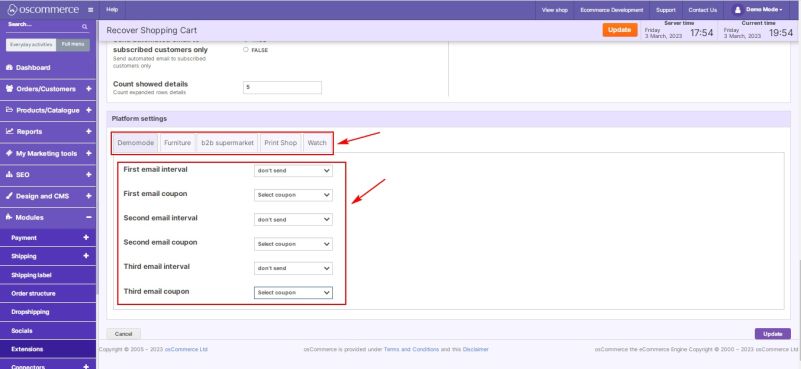
In the Platform settings section you can select the required sales channel by clicking on its tab, set up email delivery intervals from drop down lists for 3 emails and choose available coupons from drop down lists for each email (if you choose Not to send any coupons, leave Select coupon option as is).
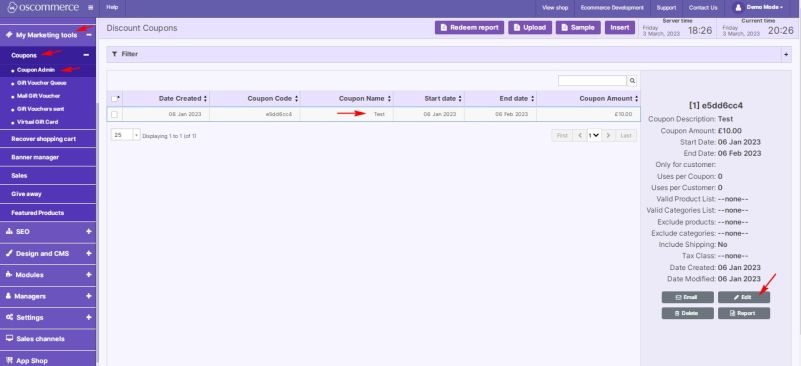
To make a coupon available in the coupon drop down lists, click on the Marketing tools, Coupons and Coupon Admin tabs. Then click on the required coupon and on the Edit button.
Under the Main details tab you can switch on/off Coupon for Recovery Cart.
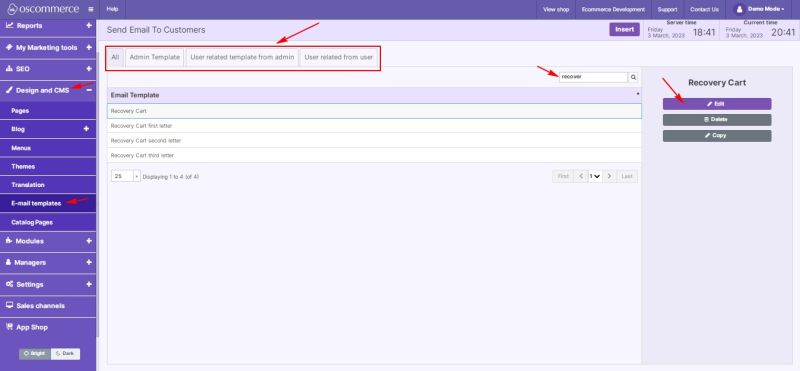
To edit the recovery cart emails, click on the Design and CMS and E-mail templates tabs.
Under the required template group click on the appropriate template and then on the Edit button.
Use Quick Search to find the template you need.
Choose the required front end by clicking on its tab, select the required design template from the drop down list, choose between the required format by clicking on the tabs and edit the required fields.
To set up/edit the corresponding cron for the recovery cart click on Settings and Cron manager tabs. Click on Recovery Cart and then on Edit button or click on Create new job button.
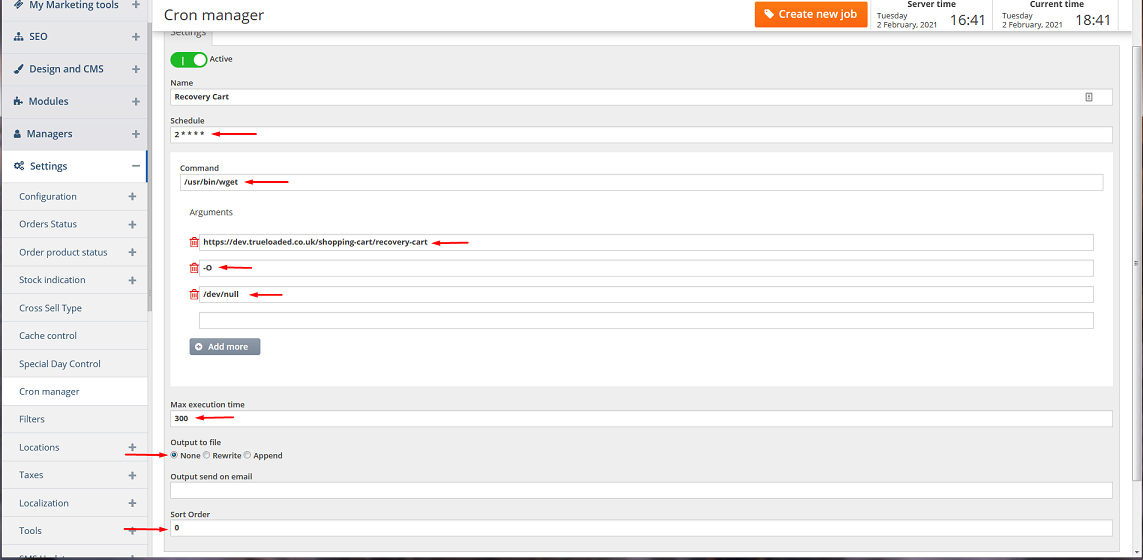
Fill in the fields with the required values.
Note: Make sure you install the following command on your server as well (2****/usr/bin/wget https://..../shopping-cart/recovery-cart-O/dev/null)
Click on the Marketing tools and Recover Shopping Cart tabs. Here you can see the information about the clients’ shopping carts as well as mark as contacted and mark as worked out by clicking on the corresponding buttons. You can also click on the Legend, Create new order, Convert to order, Send coupon, Send Additional PS Message and Note buttons to take further actions on a shopping cart.
