Installing New PayPal module (Latest API 2.0) for osCommerce Version 2.2 Manually
Are you one of the many shop owners still using osCommerce 2 for your online store? We understand that not everyone has migrated to the latest osCommerce 4.x version yet. To cater to your needs, we have developed a new PayPal module that supports Express and APM (Alternative Payment Method) methods specifically for osCommerce 2 systems. In this guide, we'll walk you through the step-by-step process of manually installing the latest PayPal module for osCommerce Version 2.2.
Before You Begin: Back Up Your Files
Before proceeding with the installation, it's crucial to back up certain files to ensure the safety of your store's data. Please make a backup copy of the following files if they have been customized:
admin/modules.php
includes/column_right.php
includes/classes/payment.php
login.php
shopping_cart.php
You can create a backup using SSH access with the following command:
tar -cpzf `date +%y%m%d%H%M`_paypal_rest_bk.tar.gz admin/modules.php includes/column_right.php includes/classes/payment.php login.php shopping_cart.php
Installing the New PayPal Module
|
1. Download the zip file containing the customized PayPal module backup from the following link: |
 |
|
|
2. Unzip the downloaded file to the required folder on your server. |
|
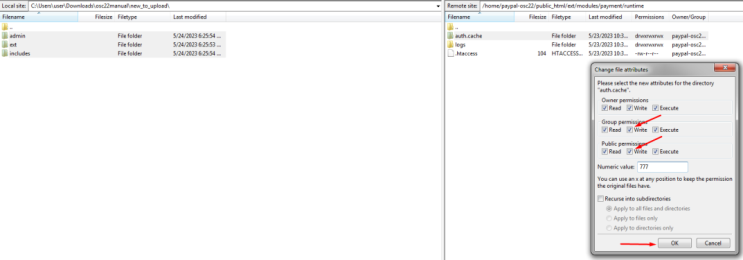
3. Using your preferred FTP client, upload the contents of the 'new_to_upload' folder to the 'public_html' folder on your web server. For reference and comparison purposes, check the '*_compare.php' files in the 'to_modify' folder. Additionally, read the installation instructions provided in the 'install.txt' file. |
|
|
|
4. Set write permissions for the following folders:
Note: Ensure that direct access to files in these folders is denied. If needed, an appropriate .htaccess file is available in the 'runtime' folder. For users with custom web server configurations, update the settings accordingly. |
Editing the Core Files
The next step involves editing the five core files mentioned earlier to integrate the new PayPal module into your osCommerce 2 system. Follow the comprehensive guide provided at the following link:
Setup in the Admin Area
|
After the installation is complete, it's time to setup the PayPal module in the admin area. Navigate to the admin section of your osCommerce website and locate the Modules and Payment tabs. Look for the PayPal Quick Setup button, which will allow you to access the module's configuration settings. |
 |
Watch Tutorial Videos
For a more visual walkthrough of the installation process, we have prepared a series of tutorial videos. These videos demonstrate the integration of the new PayPal module with osCommerce 2-based systems. Feel free to check them out on our YouTube playlist:
https://www.youtube.com/playlist?list=PLHN7KfrDE8gMtPCprNISvqK2ZWTQdFVVH
By following these instructions, you can manually install the latest PayPal module (API 2.0) for your osCommerce Version 2.2-based online store. This updated module will enable you to offer Express and APM payment methods to your customers, enhancing their shopping experience. As always, it's essential to back up your files and follow the installation guide carefully to ensure a smooth and successful integration. If you have any questions or need further assistance, don't hesitate to reach out to our support team.
Happy selling with the new PayPal module for osCommerce!


