Managing Shipping and Payment Modules: Difference between revisions
No edit summary |
No edit summary |
||
| Line 12: | Line 12: | ||
* ''enable a shipping module for:'' | * ''enable a shipping module for:'' | ||
** customer groups | ** customer groups | ||
** countries | ** countries | ||
** | ** web site pages | ||
* ''change module title'' | * ''change module title'' | ||
* ''use translation'' | * ''use translation'' | ||
| Line 30: | Line 30: | ||
* ''enable a payment module for:'' | * ''enable a payment module for:'' | ||
** customer groups | ** customer groups | ||
** countries | ** countries | ||
** | ** web site pages | ||
* ''change module title'' | * ''change module title'' | ||
* ''use translation'' | * ''use translation'' | ||
[[File:1222 Payment module edit.jpg|alt=|none|thumb|800x800px]] | [[File:1222 Payment module edit.jpg|alt=|none|thumb|800x800px]] | ||
Latest revision as of 13:49, 8 November 2023
Managing Shipping Modules
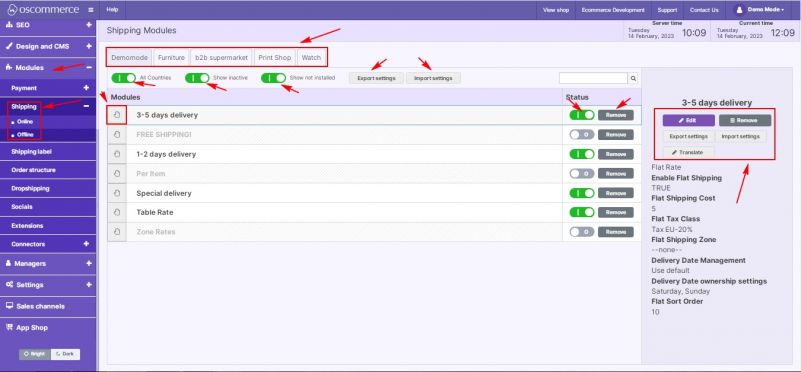
After you accessed the admin area of your website, click on the Modules and Shipping tabs. Click on the required front end tab and, if necessary, switch on all the options - All Countries, Show inactive and Show not installed modules to see all the available options. Then you view all the available shipping modules, or remove them by clicking on the corresponding buttons, switch their statuses on/off, move them from top to bottom or the other way around using the hand tool, and edit/remove/translate a required module by clicking on it and then on the corresponding buttons. You can also export and import module settings.
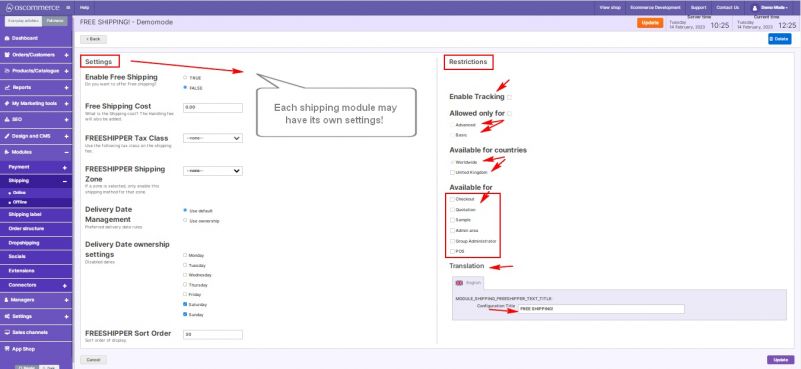
If you click on the Edit button, you can further set up the selected module according to your requirements in the Settings and Restrictions sections.
Note: Each shipping module may have its own settings, so each module should be set up individually.
In the Restrictions section you can:
- enable tracking option
- enable a shipping module for:
- customer groups
- countries
- web site pages
- change module title
- use translation
Managing Payment Modules
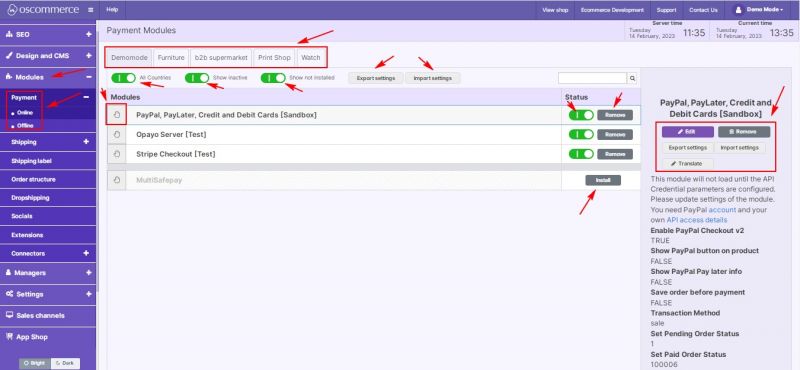
Click on the Modules and Payment, then either on the Online or Offline tabs. Click on the required front end tab and, if necessary, switch on all the options - All Countries, Show inactive and Show not installed modules to see all the available options. Then you view all the available payment modules, install or remove them by clicking on the corresponding buttons, switch their statuses on/off, move them from top to bottom or the other way around using the hand tool, and edit/remove/translate a required module by clicking on it and then on the corresponding buttons.
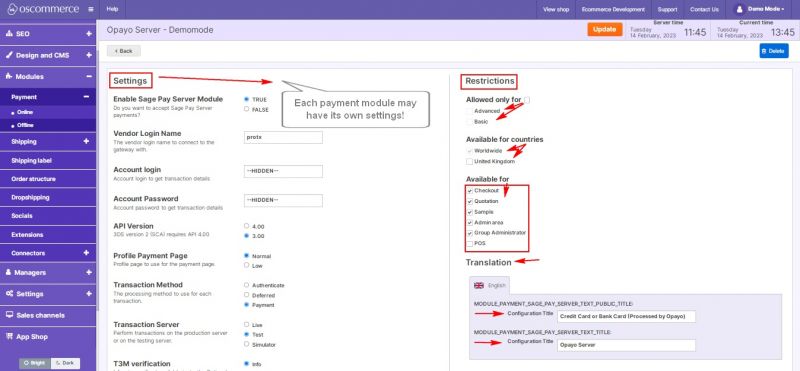
After a module is installed and if you click on the edit button, you can further set it up according to your requirements in the Settings and Restrictions sections.
Note: Each payment module may have its own settings so each module should be set up individually.
In the Restrictions section you can:
- enable a payment module for:
- customer groups
- countries
- web site pages
- change module title
- use translation


