Managing Opayo Pi Module: Difference between revisions
(Created page with "Welcome to the user guide for managing the Opayo Pi Module, which allows you to seamlessly integrate your website with the Opayo Pi payment gateway and efficiently manage its services. Follow the steps below to successfully install and configure the module for your specific needs. '''1. Installation Process''' To integrate your website with the Opayo Pi payment gateway, follow these steps: # Access the admin area of your website. # Navigate to the "App Shop" and "Stor...") |
m (Protected "Managing Opayo Pi Module" ([Edit=Allow only administrators] (indefinite) [Move=Allow only administrators] (indefinite)) [cascading]) |
(No difference)
| |
Revision as of 16:45, 8 August 2023
Welcome to the user guide for managing the Opayo Pi Module, which allows you to seamlessly integrate your website with the Opayo Pi payment gateway and efficiently manage its services. Follow the steps below to successfully install and configure the module for your specific needs.
1. Installation Process
To integrate your website with the Opayo Pi payment gateway, follow these steps:
- Access the admin area of your website.
- Navigate to the "App Shop" and "Store" tabs.
- Use the search function to locate the Opayo Pi module.
- Install the module on your website.
Follow on-screen prompts to complete the installation.
During installation, you'll have the choice to apply the Opayo Pi module to specific sales channels or all channels at once. To make your selection:
- Choose your preferred sales channel(s).
- Click the "Continue installation" button.
2. Accessing Module Settings
Once the module is installed, a success page will confirm its integration. To proceed:
Click on the "Check settings for the required platform" link.
NOTE: you can also find the module under the Modules, Payment and Online tabs. Locate the "Opayo” module and click on the “Edit” button to access its settings.
3. Configuring the Opayo Pi Module
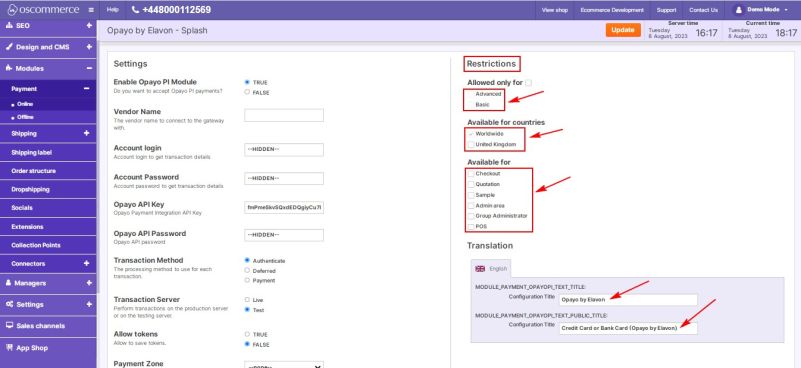
3.1. Customizing Restrictions
In the "Restrictions" section, tailor the Opayo Pi module to your needs:
- Define specific customer groups, countries, and website pages for module application.
- Customize the module name for both backend and frontend, using your desired language.
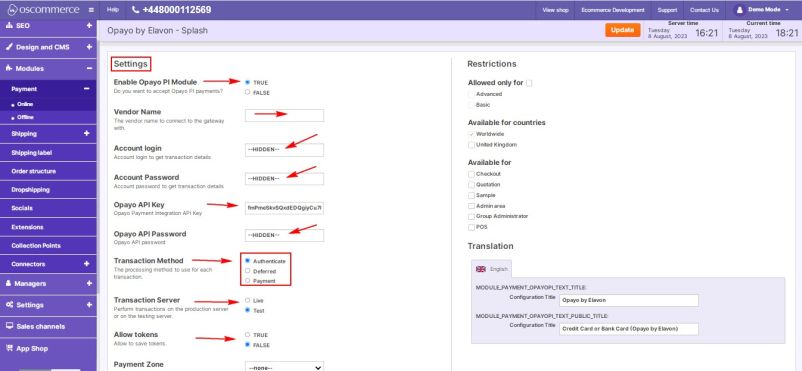
3.2. Adjusting General Settings
In the "Settings" section, configure the Opayo Pi module options:
- Toggle the module's enable/disable option for your website.
- Enter your vendor login name for gateway connection.
- Provide account login and password for transaction details.
- Input Opayo integration API key and API password.
- Choose transaction processing methods: Authenticate, Deferred, or Payment.
- Opt for live or test server transactions.
- Save tokens for future use by selecting the "True" option.
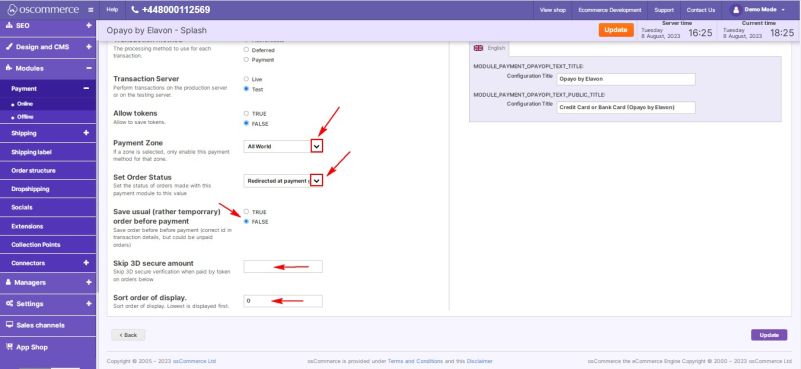
- Select payment zones: All world, EU, USA.
- Set order statuses for Opayo Pi orders.
- Save orders before payment by choosing the "True" option.
- Skip 3D secure verification for token payments under a specific amount.
- Prioritize Opayo Pi in payment options by setting payment priority. Enter a value in the corresponding field. Lower values will prioritize Opayo Pi over other payment methods.
Congratulations! You've successfully installed and configured the Opayo Pi module, enhancing your website's payment capabilities. If you encounter any issues or need further assistance, please refer to the documentation provided with the Opayo Pi module. Your seamless payment experience starts now!


