Managing Catalog pages: Difference between revisions
No edit summary |
No edit summary |
||
| (3 intermediate revisions by the same user not shown) | |||
| Line 1: | Line 1: | ||
Catalog pages allow you to insert blocks of information into pages that link to other Info Pages. For example, you have several Info Pages with events this month and several Info Pages with events next month. You can create two Catalog Pages, assign corresponding Info Pages and use Catalog Pages widget to display these blocks on any page. | |||
After you accessed the admin area of your website, click on the '''Design and CMS''' and '''Catalog pages''' tabs. | |||
After you accessed the admin area of your website click on '''Design and CMS''' and '''Catalog pages''' tabs. Under this tab you can '''create Catalog pages''' and '''assign''' them to the required sales channels. | Under this tab, you can '''create Catalog pages''' and '''assign''' them to the required sales channels. | ||
[[File:1081 Create page.jpg|none|thumb|800x800px]] | [[File:1081 Create page.jpg|none|thumb|800x800px]] | ||
While adding a new catalog page it is possible to '''set its name, create description''' and '''short description''' under '''Name and description''' tab. | While adding a new catalog page, it is possible to '''set its name, create description''' and '''short description''' under the '''Name and description''' tab. | ||
[[File:1082 Name and descr.jpg|none|thumb|800x800px]] | [[File:1082 Name and descr.jpg|none|thumb|800x800px]] | ||
To '''add an image''' to your catalog page, '''set its status''' and '''date added''' move to '''Main''' tab. | To '''add an image''' to your catalog page, '''set its status''' and '''date added''' move to the '''Main''' tab. | ||
[[File:1083 Main.jpg|none|thumb|800x800px]] | [[File:1083 Main.jpg|none|thumb|800x800px]] | ||
'''SEO''' tab allows you to '''set SEO page name, page title''' and '''description, add keywords''' and '''set H tags''' (H1, H2, H3) '''Multiple H2''' and '''H3''' can be added. | The '''SEO''' tab allows you to '''set SEO page name, page title''' and '''description, add keywords''' and '''set H tags''' (H1, H2, H3) '''Multiple H2''' and '''H3''' can be added. | ||
[[File:1084 SEO.jpg|none|thumb|800x800px]] | [[File:1084 SEO.jpg|none|thumb|800x800px]] | ||
If you move to the '''Information''' tab, you can search by info pages in the '''Find Info Pages''' section, choose the required ones, and '''assign''' them to the corresponding catalog pages. | |||
If you move to '''Information''' tab you can search by info pages in '''Find Info Pages''' section, choose the required ones, and '''assign''' them to the corresponding catalog pages. | |||
[[File:1085 Information.jpg|none|thumb|800x800px]] | [[File:1085 Information.jpg|none|thumb|800x800px]] | ||
Latest revision as of 10:36, 25 October 2023
Catalog pages allow you to insert blocks of information into pages that link to other Info Pages. For example, you have several Info Pages with events this month and several Info Pages with events next month. You can create two Catalog Pages, assign corresponding Info Pages and use Catalog Pages widget to display these blocks on any page.
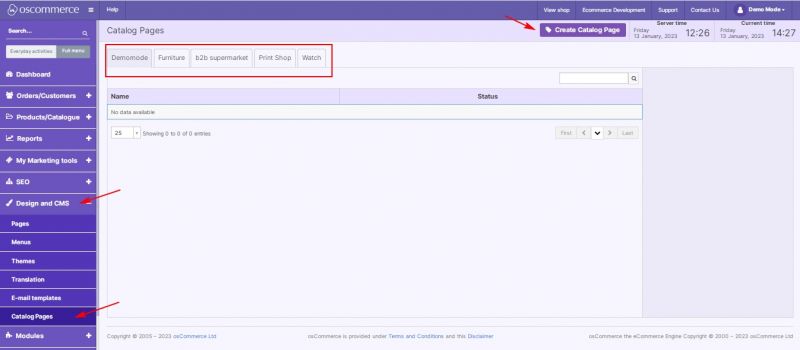
After you accessed the admin area of your website, click on the Design and CMS and Catalog pages tabs. Under this tab, you can create Catalog pages and assign them to the required sales channels.
While adding a new catalog page, it is possible to set its name, create description and short description under the Name and description tab.
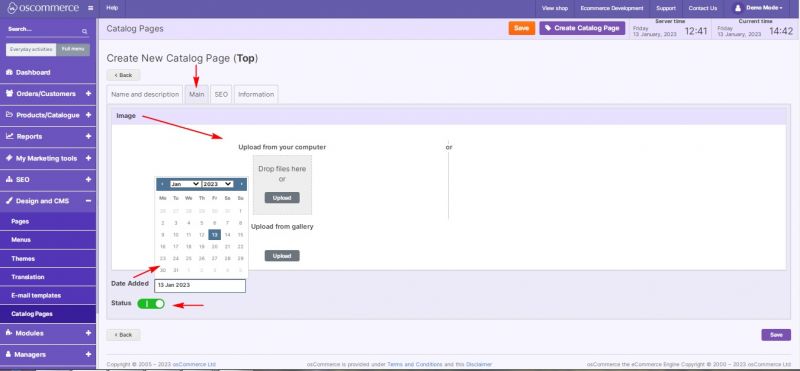
To add an image to your catalog page, set its status and date added move to the Main tab.
The SEO tab allows you to set SEO page name, page title and description, add keywords and set H tags (H1, H2, H3) Multiple H2 and H3 can be added.
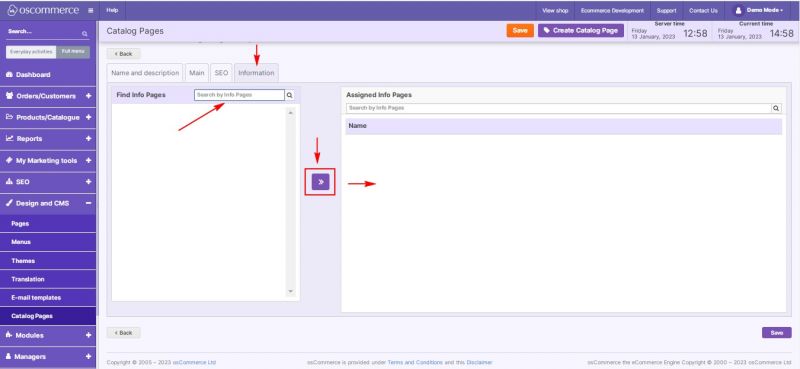
If you move to the Information tab, you can search by info pages in the Find Info Pages section, choose the required ones, and assign them to the corresponding catalog pages.


