Generating Mailchimp API and Adding a List of Subscribers: Difference between revisions
Jump to navigation
Jump to search
No edit summary Tag: Reverted |
No edit summary Tag: Manual revert |
||
| Line 1: | Line 1: | ||
'''Note: This manual is for osCommerce v4.''' | |||
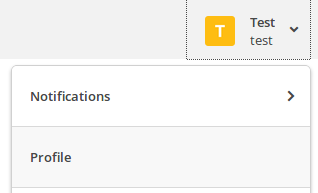
After you accessed your Mailchimp account click on '''Profile''' option. | |||
[[File:Image 84.png|none|frame]] | [[File:Image 84.png|none|frame]] | ||
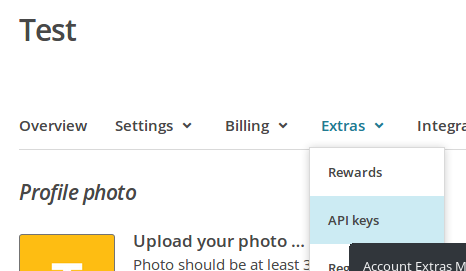
Click on '''Extras''' drop down list and then on '''API key''' option. | |||
[[File:Image 85.png|none|frame]] | [[File:Image 85.png|none|frame]] | ||
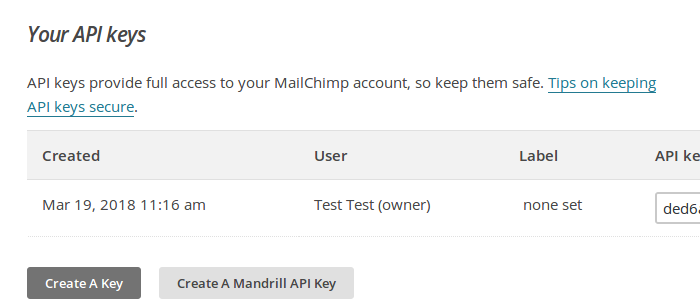
Click on '''Create A Key''' button (by default there is none). | Click on '''Create A Key''' button (by default there is none). | ||
[[File:Image 86.png|none|frame]] | [[File:Image 86.png|none|frame]] | ||
If there is not a single '''list of subscribers''' add one according to the following actions. | If there is not a single '''list of subscribers''' add one according to the following actions. | ||
'''Admin > Marketing > Newsletter''' | |||
'''Add key > Save''' | |||
'''Select list > Save''' | |||
'''Select store''' (it is added on the fly if there is none on Mailchimp) '''> Save''' | |||
There is the link under the client’s email that needs to be sent. | |||
Latest revision as of 17:07, 24 February 2023
Note: This manual is for osCommerce v4.
After you accessed your Mailchimp account click on Profile option.

Click on Extras drop down list and then on API key option.

Click on Create A Key button (by default there is none).

If there is not a single list of subscribers add one according to the following actions.
Admin > Marketing > Newsletter
Add key > Save
Select list > Save
Select store (it is added on the fly if there is none on Mailchimp) > Save
There is the link under the client’s email that needs to be sent.