Creating Theme from Scratch: Difference between revisions
No edit summary Tag: Manual revert |
No edit summary |
||
| (One intermediate revision by the same user not shown) | |||
| Line 1: | Line 1: | ||
After you accessed the admin area of your website click on '''Design and CMS''' and '''Themes''' tabs. From this page you can add '''theme group, import theme and add theme''' by clicking on the corresponding buttons. You can also '''backup, move to group, copy or customize''' your existing themes by clicking on the corresponding buttons as well as '''change theme title, switch between information and image theme views''' and '''delete''' the theme by clicking on the corresponding icons. It will be much easier to create your '''own''' theme based on the '''existing''' one so we would recommend to '''copy''' the | After you accessed the admin area of your website, click on the '''Design and CMS''' and '''Themes''' tabs. From this page you can add '''theme group, import theme and add theme''' by clicking on the corresponding buttons. You can also '''backup, move to group, copy or customize''' your existing themes by clicking on the corresponding buttons as well as '''change theme title, switch between information and image theme views,''' and '''delete''' the theme by clicking on the corresponding icons. It will be much easier to create your '''own''' theme based on the '''existing''' one, so we would recommend to '''copy''' the existing theme in order to '''create''' your own one. | ||
[[File:Image 787.png|none|thumb|800x800px]] | [[File:Image 787.png|none|thumb|800x800px]] | ||
| Line 5: | Line 5: | ||
After the theme is copied (it may take some time), click on '''Customize''' button within this theme. Widgets can be added by | After the theme is copied (it may take some time), click on the '''Customize''' button within this theme. Widgets can be added by pointing the mouse to the required place and clicking on the '''Add widget''' option. After that click on '''Widgets''' button, '''find''' the required widget and click on it. '''Or''' the widget can be '''dragged and dropped''' to the required place without clicking on '''Add widget''' option. The existing widget can be '''edited''', '''dragged and dropped, exported''' or '''deleted''' by clicking on the corresponding icons. | ||
[[File:Image 789.png|none|thumb|800x800px]] | [[File:Image 789.png|none|thumb|800x800px]] | ||
Widgets settings differ from one widget to another. For example, widget styles ('''font, background, padding''') can be set up for the external widget div unless they are | Widgets settings differ from one widget to another. For example, widget styles ('''font, background, padding''') can be set up for the external widget div unless they are overridden by the styles within the widget. | ||
[[File:Image 790.png|none|thumb|800x800px]] | [[File:Image 790.png|none|thumb|800x800px]] | ||
| Line 17: | Line 17: | ||
[[File:Image 792.png|none|thumb|800x800px]] | [[File:Image 792.png|none|thumb|800x800px]] | ||
If a widget group is '''exported''' it is '''automatically''' added to the widget list and appears in the list under '''Widget groups''' tab. You can also add the new group by clicking on '''Add''' button and '''view/edit''' the '''name''' and '''page type''' or '''delete''' the | If a widget group is '''exported,''' it is '''automatically''' added to the widget list and appears in the list under the '''Widget groups''' tab. You can also add the new group by clicking on the '''Add''' button and '''view/edit''' the '''name''' and '''page type''' or '''delete''' the existing group. | ||
[[File:Image 793.png|none|thumb|800x800px]]If you click on '''Pages''' button you can find the required page, '''go''' to it by clicking on it or '''copy''' this page, '''edit''' its settings or '''delete''' it. You can also '''go''' to the required page by filling in its '''URL'''. | [[File:Image 793.png|none|thumb|800x800px]]If you click on the '''Pages''' button, you can find the required page, '''go''' to it by clicking on it or '''copy''' this page, '''edit''' its settings or '''delete''' it. You can also '''go''' to the required page by filling in its '''URL'''. | ||
[[File:Image 794.png|none|thumb|800x800px]]If you click on '''Edit Texts''' button, direct your mouse and click on the required text link, you can edit it in the theme via translation tool | [[File:Image 794.png|none|thumb|800x800px]]If you click on the '''Edit Texts''' button, direct your mouse and click on the required text link, you can edit it in the theme via translation tool. | ||
[[File:Image 795.png|none|thumb|800x800px]] | [[File:Image 795.png|none|thumb|800x800px]] | ||
[[File:Image 797.png|none|thumb|800x800px]] | [[File:Image 797.png|none|thumb|800x800px]] | ||
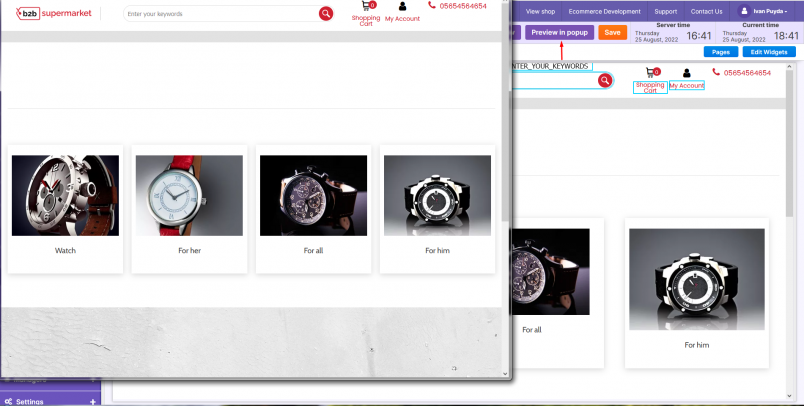
Before you save the changes you can click on '''Preview in popup''' button to make sure everything meets your requirements. | Before you save the changes, you can click on the '''Preview in popup''' button to make sure everything meets your requirements. | ||
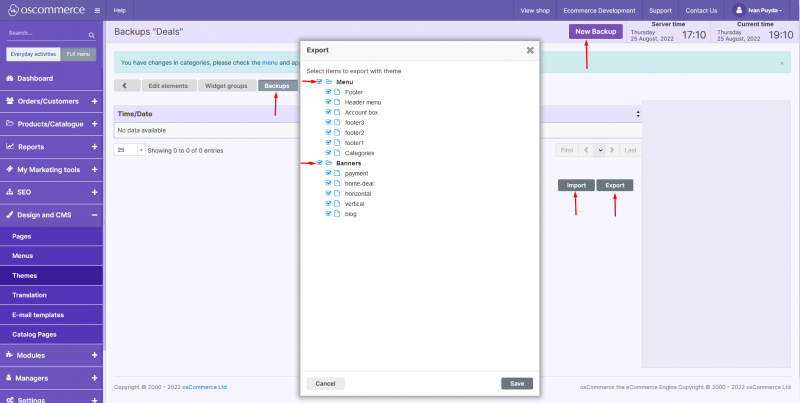
[[File:Image 798.png|none|thumb|804x804px]]Under '''Backups''' tab the theme backups are done '''automatically''' or you can do it '''manually''' by clicking on '''New Backup''' button. You can also '''import''' or '''export''' a theme by clicking on the | [[File:Image 798.png|none|thumb|804x804px]]Under the '''Backups''' tab, the theme backups are done '''automatically''' or you can do it '''manually''' by clicking on the '''New Backup''' button. You can also '''import''' or '''export''' a theme by clicking on the corresponding buttons. While '''exporting''' a theme, it is possible to export '''menus''' or '''banners''' with a theme by checking the corresponding boxes. | ||
[[File:Image 799.png|none|thumb|800x800px]] | [[File:Image 799.png|none|thumb|800x800px]] | ||
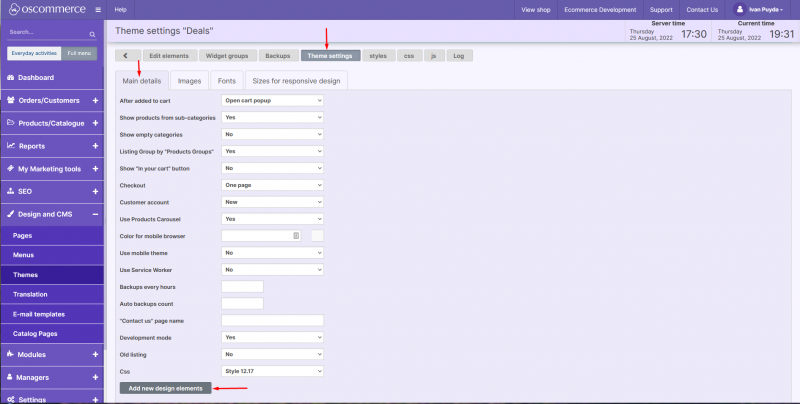
Under '''Theme settings''' and '''Main details''' tabs you can '''view/update''' the ''' | Under the '''Theme settings''' and '''Main details''' tabs, you can '''view/update''' the '''existing''' settings or '''add''' the new ones by clicking on the corresponding button. | ||
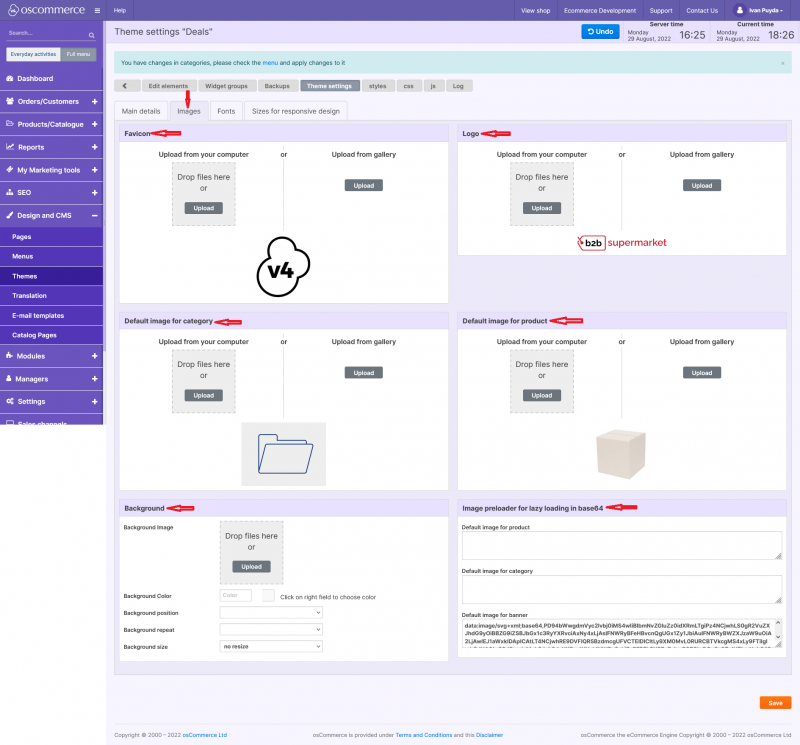
[[File:Image 800.png|none|thumb|800x800px]]Under '''Images''' tab you can upload the images for '''favicon, logo, background, default image for categories and products''' (if no image is uploaded for a category or a product) and '''image preloader for lazy loading'''. | [[File:Image 800.png|none|thumb|800x800px]]Under the '''Images''' tab, you can upload the images for '''favicon, logo, background, default image for categories and products''' (if no image is uploaded for a category or a product) and '''image preloader for lazy loading'''. | ||
[[File:Image 801.png|none|thumb|800x800px]] | [[File:Image 801.png|none|thumb|800x800px]] | ||
Under '''Font''' tab you can '''view''' the ''' | Under the '''Font''' tab, you can '''view''' the '''existing''' fonts and '''add''' the '''new''' ones by clicking on the corresponding button. | ||
[[File:Image 802.png|none|thumb|800x800px]] | [[File:Image 802.png|none|thumb|800x800px]] | ||
In order to add a '''Google font''', go to '''fonts.google.com''', '''choose''' the required font, click on '''Link''' radio button and copy the '''highlighted''' link. | In order to add a '''Google font''', go to '''fonts.google.com''', '''choose''' the required font, click on the '''Link''' radio button and copy the '''highlighted''' link. | ||
[[File:Image 803.png|none|thumb|800x800px]] | [[File:Image 803.png|none|thumb|800x800px]] | ||
| Line 48: | Line 48: | ||
Click on '''Add font''' button and '''paste''' the '''code''' in the new field. | Click on the '''Add font''' button and '''paste''' the '''code''' in the new field. | ||
[[File:Image 805.png|none|thumb|800x800px]] | [[File:Image 805.png|none|thumb|800x800px]] | ||
Under '''Sizes for responsive design''' tab you can '''view/add''' the required settings for '''min-width''' and '''max-width'''. | Under the '''Sizes for responsive design''' tab, you can '''view/add''' the required settings for '''min-width''' and '''max-width'''. | ||
[[File:Image 806.png|none|thumb|800x800px]] | [[File:Image 806.png|none|thumb|800x800px]] | ||
. | . | ||
Under '''Styles''' tab you can '''view/update''' styles for different blocks by clicking on '''+''' icon and then on '''pencil''' icon. You can also change '''font, background and border''' colors as well as '''font family''' by choosing the options in '''From''' and '''To''' fields and clicking on '''Change''' button. | Under the '''Styles''' tab, you can '''view/update''' styles for different blocks by clicking on '''+''' icon and then on '''pencil''' icon. You can also change '''font, background and border''' colors as well as '''font family''' by choosing the options in the '''From''' and '''To''' fields and clicking on the '''Change''' button. | ||
[[File:Image 808.png|none|thumb|800x800px]] | [[File:Image 808.png|none|thumb|800x800px]] | ||
Under '''CSS''' tab you can choose '''widget or page css class''' (options beginning with b means '''blocks''', with p - '''pages''' and with w - '''widgets'''). You can also add a '''new widget''' by clicking on '''Add''' button. | Under the '''CSS''' tab, you can choose '''widget or page css class''' (options beginning with b means '''blocks''', with p - '''pages''' and with w - '''widgets'''). You can also add a '''new widget''' by clicking on the '''Add''' button. | ||
[[File:Image 809.png|none|thumb|800x800px]]Under '''js''' tab you can add the required js to all the pages if | [[File:Image 809.png|none|thumb|800x800px]]Under the '''js''' tab, you can add the required js to all the pages if necessary. | ||
[[File:Image 810.png|none|thumb|800x800px]] | [[File:Image 810.png|none|thumb|800x800px]] | ||
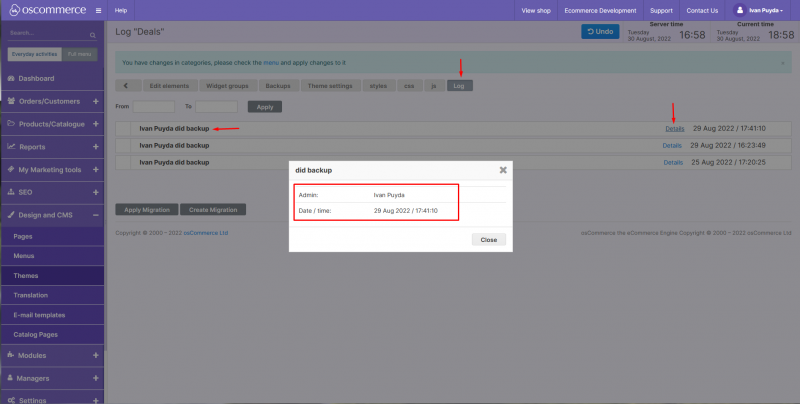
Under '''Log''' tab you can see what changes were made to the theme. By clicking on '''Details''' link you can find more detailed information about them. | Under the '''Log''' tab, you can see what changes were made to the theme. By clicking on the '''Details''' link, you can find more detailed information about them. | ||
[[File:Image 811.png|none|thumb|800x800px]] | [[File:Image 811.png|none|thumb|800x800px]] | ||
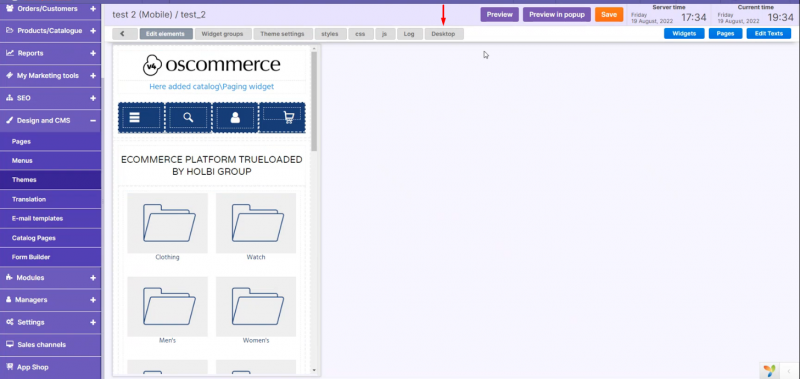
By clicking on '''Mobile''' and '''Desktop''' tabs you can switch to the corresponding | By clicking on the '''Mobile''' and '''Desktop''' tabs, you can switch to the corresponding versions. | ||
[[File:Image 812.png|none|thumb|800x800px]] | [[File:Image 812.png|none|thumb|800x800px]] | ||
Latest revision as of 12:35, 23 October 2023
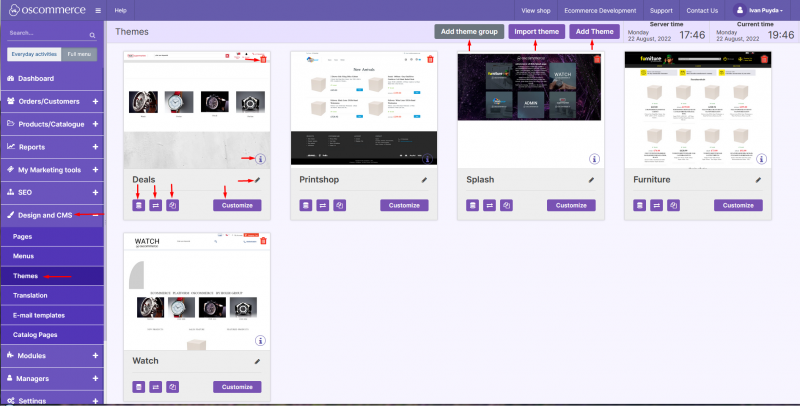
After you accessed the admin area of your website, click on the Design and CMS and Themes tabs. From this page you can add theme group, import theme and add theme by clicking on the corresponding buttons. You can also backup, move to group, copy or customize your existing themes by clicking on the corresponding buttons as well as change theme title, switch between information and image theme views, and delete the theme by clicking on the corresponding icons. It will be much easier to create your own theme based on the existing one, so we would recommend to copy the existing theme in order to create your own one.
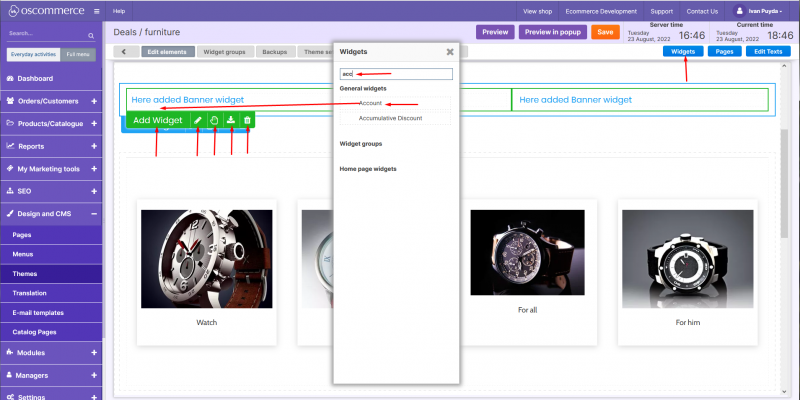
After the theme is copied (it may take some time), click on the Customize button within this theme. Widgets can be added by pointing the mouse to the required place and clicking on the Add widget option. After that click on Widgets button, find the required widget and click on it. Or the widget can be dragged and dropped to the required place without clicking on Add widget option. The existing widget can be edited, dragged and dropped, exported or deleted by clicking on the corresponding icons.
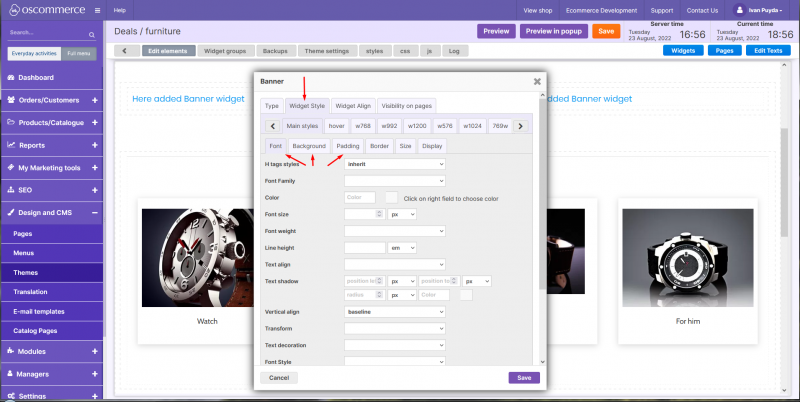
Widgets settings differ from one widget to another. For example, widget styles (font, background, padding) can be set up for the external widget div unless they are overridden by the styles within the widget.
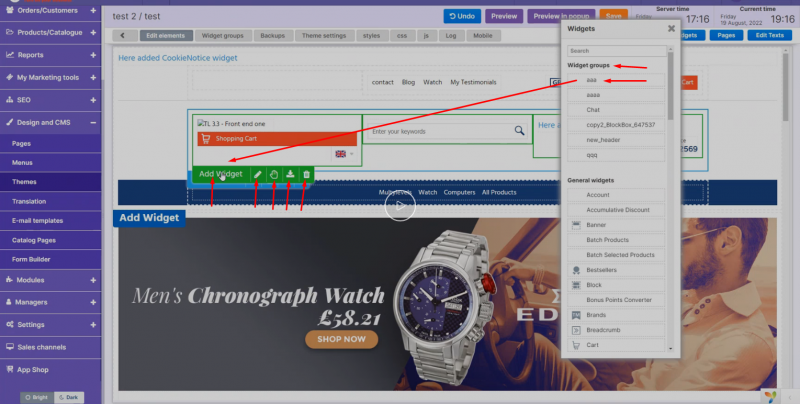
In the same way as widgets, widget groups can be added to the theme and managed.
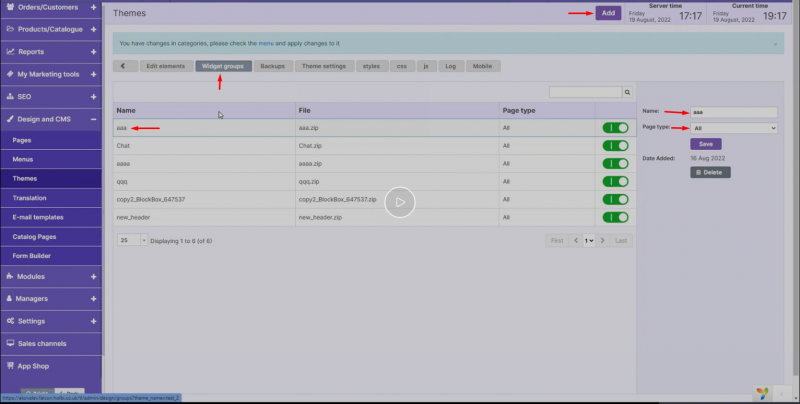
If a widget group is exported, it is automatically added to the widget list and appears in the list under the Widget groups tab. You can also add the new group by clicking on the Add button and view/edit the name and page type or delete the existing group.
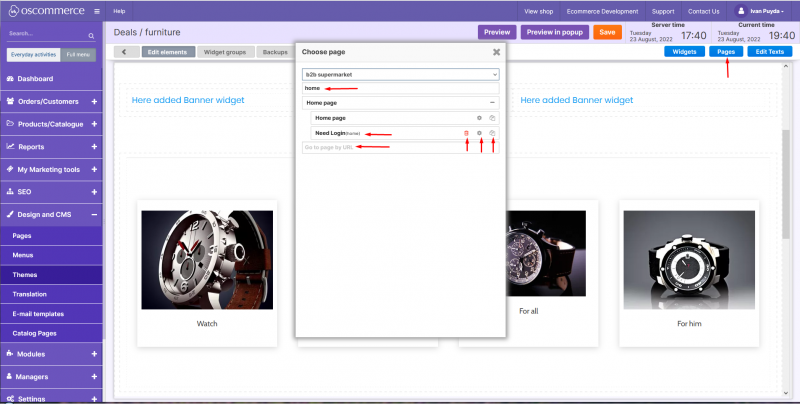
If you click on the Pages button, you can find the required page, go to it by clicking on it or copy this page, edit its settings or delete it. You can also go to the required page by filling in its URL.
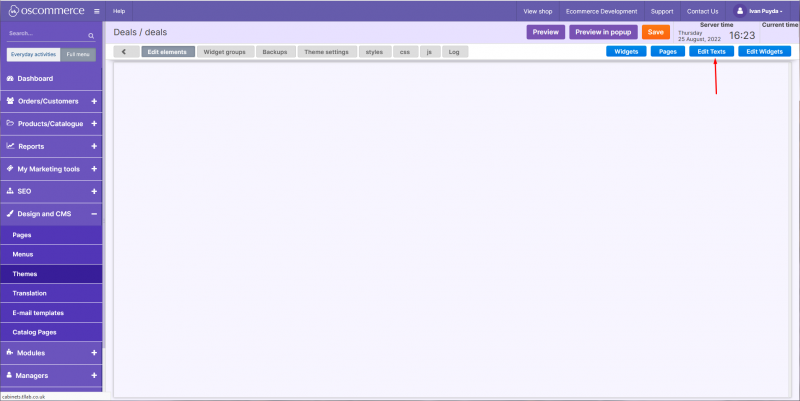
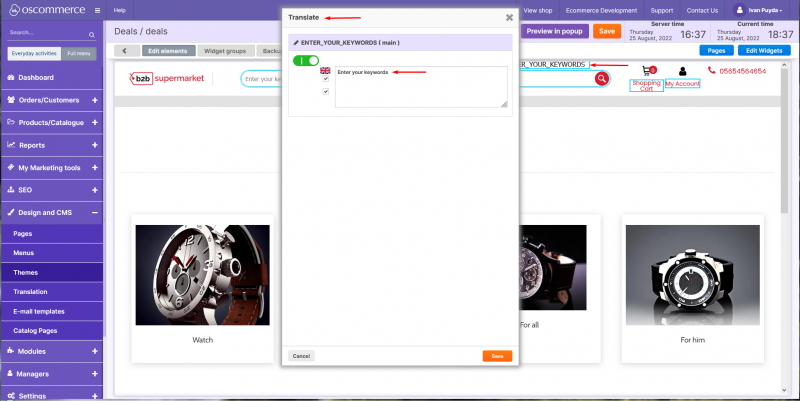
If you click on the Edit Texts button, direct your mouse and click on the required text link, you can edit it in the theme via translation tool.
Before you save the changes, you can click on the Preview in popup button to make sure everything meets your requirements.
Under the Backups tab, the theme backups are done automatically or you can do it manually by clicking on the New Backup button. You can also import or export a theme by clicking on the corresponding buttons. While exporting a theme, it is possible to export menus or banners with a theme by checking the corresponding boxes.
Under the Theme settings and Main details tabs, you can view/update the existing settings or add the new ones by clicking on the corresponding button.
Under the Images tab, you can upload the images for favicon, logo, background, default image for categories and products (if no image is uploaded for a category or a product) and image preloader for lazy loading.
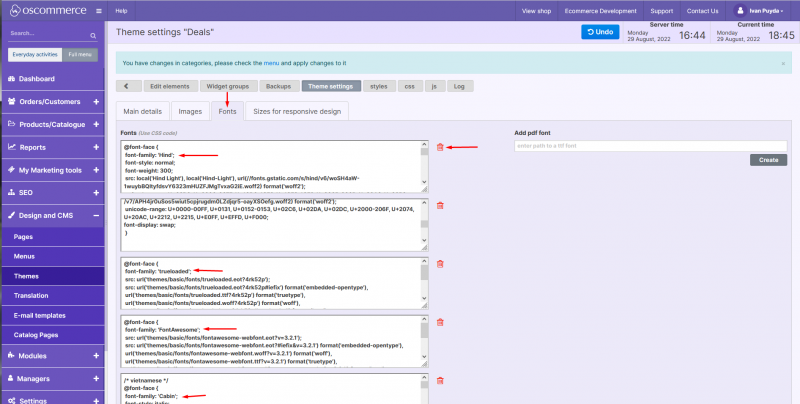
Under the Font tab, you can view the existing fonts and add the new ones by clicking on the corresponding button.
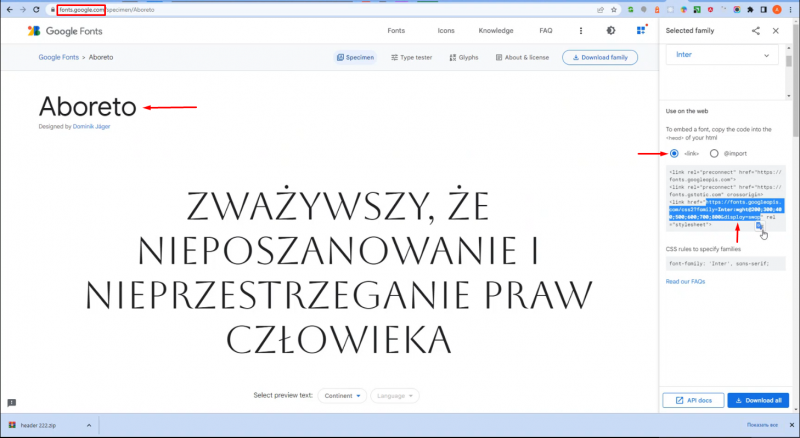
In order to add a Google font, go to fonts.google.com, choose the required font, click on the Link radio button and copy the highlighted link.
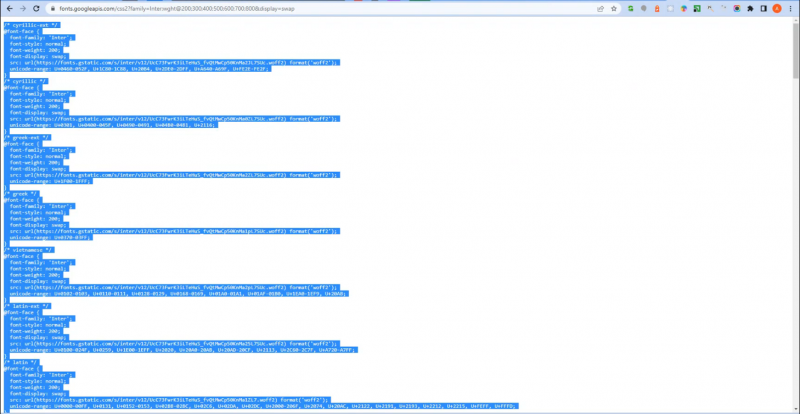
Paste this link into a new browser and copy the code from there.
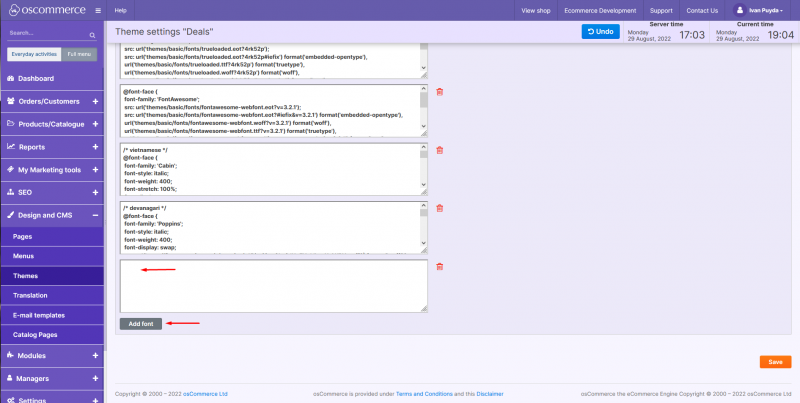
Click on the Add font button and paste the code in the new field.
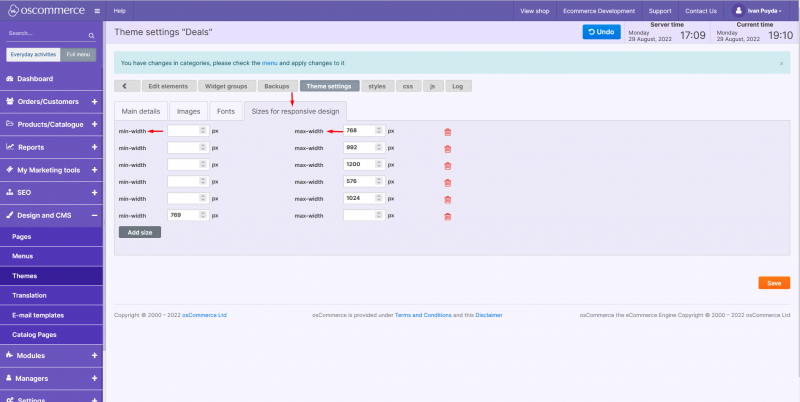
Under the Sizes for responsive design tab, you can view/add the required settings for min-width and max-width.
.
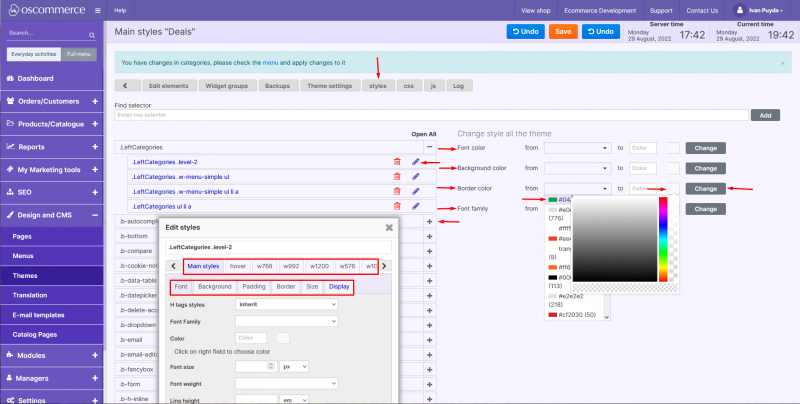
Under the Styles tab, you can view/update styles for different blocks by clicking on + icon and then on pencil icon. You can also change font, background and border colors as well as font family by choosing the options in the From and To fields and clicking on the Change button.
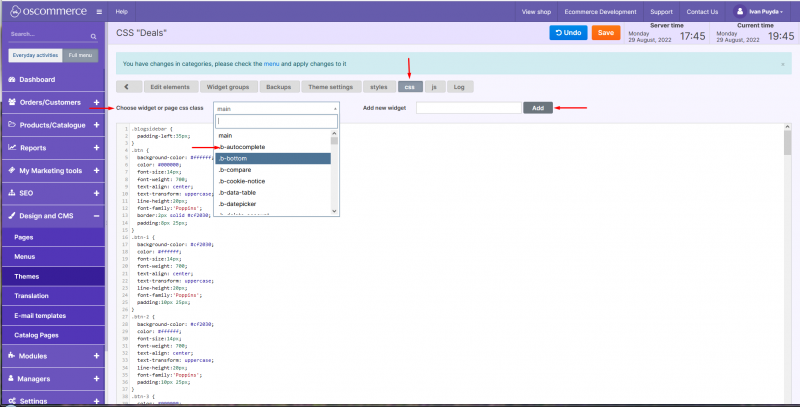
Under the CSS tab, you can choose widget or page css class (options beginning with b means blocks, with p - pages and with w - widgets). You can also add a new widget by clicking on the Add button.
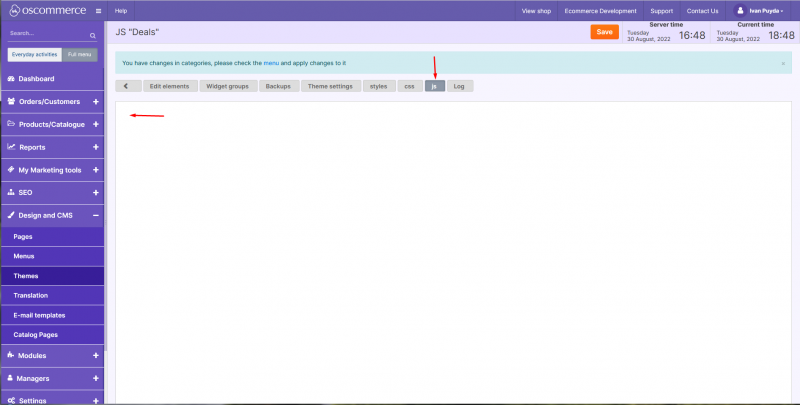
Under the js tab, you can add the required js to all the pages if necessary.
Under the Log tab, you can see what changes were made to the theme. By clicking on the Details link, you can find more detailed information about them.
By clicking on the Mobile and Desktop tabs, you can switch to the corresponding versions.
