osCommerce News
Recent posts
post item
Configuring Opayo Server by Elavon Module for osCommerce 2.3
May 01, 2024
Configuring Opayo Server by Elavon Module for osCommerce 2.3 ...
post item
Configuring Opayo by Elavon Module for osCommerce 2.3
April 30, 2024
Configuring Opayo by Elavon Module for osCommerce 2.3 ...
post item
Installing Opayo Server by Elavon and Opayo by Elavon Modules for osCommerce 2.3 via Zip File
April 29, 2024
Installing Opayo Server by Elavon and Opayo by Elavon Modules for osCommerce 2.3 via Zip File ...
post item
Installing Opayo Server by Elavon and Opayo by Elavon Modules for osCommerce 2.3 via Installer
April 26, 2024
Installing Opayo Server by Elavon and Opayo by Elavon Modules for osCommerce 2.3 via Installer ...
post item
Testing Opayo Server by Elavon Module for osCommerce 2.2 on Front End
April 25, 2024
Testing Opayo Server by Elavon Module for osCommerce 2.2 on Front End ...
post item
Testing Opayo by Elavon Module for osCommerce 2.2 on Front End
April 24, 2024
Testing Opayo by Elavon Module for osCommerce 2.2 on Front End ...
post item
Configuring Opayo Server by Elavon Module for osCommerce 2.2
April 23, 2024
Configuring Opayo Server by Elavon Module for osCommerce 2.2 ...
post item
Configuring Opayo by Elavon Module for osCommerce 2.2
April 22, 2024
Configuring Opayo by Elavon Module for osCommerce 2.2 ...
post item
Managing Click & Collect Shipping
April 19, 2024
Managing Click & Collect Shipping ...
post item
Installing Opayo Server by Elavon and Opayo by Elavon Modules for osCommerce 2.2 via Zip File
April 18, 2024
Installing Opayo Server by Elavon and Opayo by Elavon Modules for osCommerce 2.2 via Zip File ...
Products
Tags

Management

Ecommerce

Integrations

newsite

launch

grant

fund

replatforming

osCommerce 4.x

shopping cart

hosting

Installation

New PayPal Module (Latest API 2.0)

osCommerce 2.2

osCommerce 2.3

Shopping cart customizations

Manually

PayPal Express

APM (Alternative Payment Method)

Standard Variant

Advanced Variant

Configuration

Testing

Front End

Install osCommerce for Me

Let me install myself

Multiple sales channels

Single active sales channel

Installation on your own server

Assigning theme to sales channel

Deleting sales channel

Connect

App Shop

Adding Free Module

Admin Area

Adding Paid Module

Installing Module

Opayo Pi Module

Development Mode

Email Verification Before Registration

Managing Languages

Managing phpMussel

Managing Orders

oscommerce.com account

Creating Manual Orders

Managing Customers

Managing Customer Groups

Managing Brands

Managing Categories

Managing Filters on Categories

Managing Products

Managing Stock

Assigning Products and Categories to Front Ends

Assigning and Moving Products to Categories

Managing Default Sort Order on Product Listing and Category

Managing Cross-Sell and UPSell

Managing Reviews

Managing Attributes

Managing Product Groups

Managing Properties

Managing Suppliers

Managing Warehouses

Managing Sales Statistics and Purchase Report

Managing Stocktaking Costs

Managing Deleted Orders

Managing Coupons

Managing Virtual Gift Cards

Managing Sales Price

Managing Giveaways

Managing Featured Products

Managing SEO

Managing Meta Tags

Managing XML Sitemap

Settings of E-commerce Tracking for Google Tag Manager

Setting up GA4

Managing Pages

Managing Menus

Assigning Theme to Sales Channels

Deleting Sales Channels

Managing Translations

Managing Email Templates

Managing Catalog Pages

Managing Shipping Modules

Managing Payment Modules

Managing Order Structure

Managing Socials

Managing Extensions

Managing Managers

Managing Access Levels

Managing Back End Menu

Managing Configuration

Mail Sending via SMTP

Setting up SMTP

Status Groups

Order Statuses

Comment Templates

Stock Indication

Notify Me when in Stock

Stock Delivery Terms

Cross Sell Type

Cache Control

Filters

Managing Countries

Managing Counties and States

Geo Zones

Managing Cities

city settings

Postal Codes

Managing Taxes

Managing Currencies

Backups

Viewing Who is Online

Managing IP Restriction

Error Log Viewer

Creating Installation

Address Formats

Image Settings

Sales Tags

Managing Front Ends

Managing App Shop

Going Live with osCommerce

Affiliate Module

Awin Module

B2B Module

Business To Business module

Bazaarvoice Module

Managing Blog

Collection Points

Managing Competitors

Customer Code Module

Customer Modules Module

Customer Multi Emails Module

Customer Products Module

Delayed Despatch Module

Delivery Options Module

Fraud Address Module

Frontend Session Module

Invoice Number Format Module

Maximum Order Quantity

Merge Customers Module

Merge Orders Module

Minimum Order Quantity

Neighbour Module

One Trust Module

Order Flags and Markers

Pack Units

Covered by Coupon Module

Klarna Module

LiqPay Module

Mollie Pay

Pay360 by Capita Module

pxPay Module

RBS WorldPay Module

Tyl by NatWest Module

Personal Catalog

Personal Discount Module

Product Bundles

Product Collections

Product Easy View

Product Global Sort

Product Ignored Payment Methods

Product Ignored Shipping Methods

Product Press Reviews

Product Relocation

Managing Refer Friend

Bookkeeping Detail Report

Changes History Report

Compare Report

Deficit Product Report

Emails History Report

Report by Email Module

Expected Products Report

Managing Freeze Stock

In Cart Stock Report

Low Stock Report

Manufacturer Sales Report

Ordered Products Report

Purchase Report

Stock by Manufacturer Report

Summary Report

Updating Opayo Pi Module

Updating Opayo Server Module

Temporary Stock Report

Universal Log Report

Managing Search Plus

Managing DHL Shipping

Managing FedEx Shipping

Managing German Post Shipping

Managing Google Zones Shipping

Managing Nova Poshta Shipping

Managing Personal Rate UPS Shipping

Managing TNT Express Shipping

Managing UPS Shipping

Managing United States Postal Service Shipping

Managing USPS Shipping

Opayo Server Module

Managing Support System

Managing Trustpilot Module

Managing VAT On Order

Zero Price Module

User Group Extra Discounts

Installing Opayo Server by Elavon for osCommerce 2.2 via Installer

Installing Opayo by Elavon for osCommerce 2.2 via Installer

Installing Opayo Server for osc2.2 via Zip File

Installing Opayo for osc2.2 via Zip File

Click & Collect Shipping

Configuring Opayo by Elavon Module for osc 2.2

Configuring Opayo Server for osc 2.2

Testing Opayo Module for osc 2.2 on Front End

Testing Opayo Server for osc 2.2 on Front End

Installing Opayo Server for osc 2.3 via Installer

Installing Opayo for osc 2.3 via Installer

Installing Opayo Server for osc 2.3 via Zip File

Installing Opayo for osc 2.3 via Zip File

Configuring Opayo for osс 2.3

Configuring Opayo Server for osc 2.3

osCommerce version 4.x installation on your own server for single active sales channel

Are you looking to set up osCommerce 4.x on your server with a single active sales channel? This guide will walk you through the process of installing osCommerce version 4.x for a single active sales channel on your own server. If you need multiple sales channels, don't forget to check out our other installation guide or watch the corresponding video:

https://www.oscommerce.com/wiki/OsCommerce_version_4.x_installation_on_your_own_server_for_multiple_sales_channels

https://www.youtube.com/watch?v=gg2cZaa-bWU&list=PLHN7KfrDE8gOOTgXVSeFEo4L15Y98IURB&index=3


Step 1: Choosing the Single Active Sales Channel

During the installation process, you'll have the option to select a single active sales channel. To do this, follow these steps:

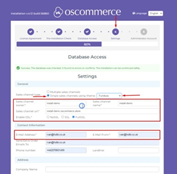
1. Start the installation process and proceed to the "Settings" step (Step 4 of the “osCommerce version 4.x installation on your own server for multiple sales channels” guide).

2. In the "Settings" step, you will find a drop-down list with sales channels. Select the desired sales channel from the list. For example, let's choose the "Furniture" theme for your single sales channel.

3. Fill in all the required fields.

4. Click on the "Update Database" button to save your settings.


Step 2: Creating the Administrator Account

Now, it's time to set up your administrator account. Follow these steps:

1. Move on to the "Administrator Account" step (Step 5).

2. Fill in all the necessary fields to create your administrator account.

3. Click on the "Create Access" button to finalize the account setup.

4. Check your specified email inbox for a message containing the login details and a link to the administrator area.


Step 3: Accessing the Administrator Area

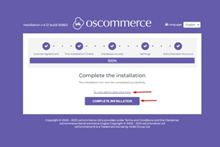
Once you have received the email with your login details, you can access the administrator area by clicking on the "To visit admin area click here" link or click on the "Complete Installation" button.

If you click on the "Complete Installation" button, you can see the sales channel with the corresponding theme you have chosen - that is the Furniture theme.


Step 4: Removing the Installation Directory
When you access the administrator area for the first time, you'll see a warning advising you to remove the installation directory for security purposes. Follow these steps:

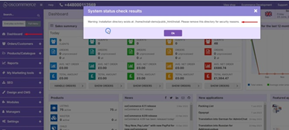
1. Click on the "Dashboard" tab.

2. Locate and remove the installation directory from your server as directed in the warning message.

3. Refresh the page to ensure the warning no longer appears.


Step 5: Confirming the Sales Channel and Theme

To ensure that your chosen sales channel and theme are active, follow these steps:

1. Click on the "Sales channels" tab.

2. Confirm that your selected sales channel is the only one active, while the other sales channels remain inactive for future reference if needed.


Step 6: Checking Installed Themes

To confirm that the Furniture theme or any other installed themes are properly set up, follow these steps:

1. Click on the "Design and CMS" and then the "Themes" tab.

2. You'll see a list of installed themes. Verify that the Furniture theme is among them and ready for use.


Step 7: Configuration and Beyond

Congratulations! You've successfully installed osCommerce version 4.x with a single active sales channel and a chosen theme. Now, you can start configuring your website further to suit your business needs and preferences.

Enjoy your new osCommerce-powered online store and explore all the possibilities it offers for your e-commerce success!

Remember, this guide is specifically for setting up a single active sales channel. If you ever need multiple sales channels, refer to our other installation guide for detailed instructions:

https://www.oscommerce.com/wiki/OsCommerce_version_4.x_installation_on_your_own_server_for_multiple_sales_channels

Also, see the link to the playlist below demonstrating the osCommerce version 4.x installation on your own server, Install osCommerce for me and Let me install myself options:

https://www.youtube.com/watch?v=XivAKdQTni8&list=PLHN7KfrDE8gOOTgXVSeFEo4L15Y98IURB

Happy selling!

You can further discuss it on our Forum