osCommerce News
Recent posts
post item
Configuring Opayo Server by Elavon Module for osCommerce 2.3
May 01, 2024
Configuring Opayo Server by Elavon Module for osCommerce 2.3 ...
post item
Configuring Opayo by Elavon Module for osCommerce 2.3
April 30, 2024
Configuring Opayo by Elavon Module for osCommerce 2.3 ...
post item
Installing Opayo Server by Elavon and Opayo by Elavon Modules for osCommerce 2.3 via Zip File
April 29, 2024
Installing Opayo Server by Elavon and Opayo by Elavon Modules for osCommerce 2.3 via Zip File ...
post item
Installing Opayo Server by Elavon and Opayo by Elavon Modules for osCommerce 2.3 via Installer
April 26, 2024
Installing Opayo Server by Elavon and Opayo by Elavon Modules for osCommerce 2.3 via Installer ...
post item
Testing Opayo Server by Elavon Module for osCommerce 2.2 on Front End
April 25, 2024
Testing Opayo Server by Elavon Module for osCommerce 2.2 on Front End ...
post item
Testing Opayo by Elavon Module for osCommerce 2.2 on Front End
April 24, 2024
Testing Opayo by Elavon Module for osCommerce 2.2 on Front End ...
post item
Configuring Opayo Server by Elavon Module for osCommerce 2.2
April 23, 2024
Configuring Opayo Server by Elavon Module for osCommerce 2.2 ...
post item
Configuring Opayo by Elavon Module for osCommerce 2.2
April 22, 2024
Configuring Opayo by Elavon Module for osCommerce 2.2 ...
post item
Managing Click & Collect Shipping
April 19, 2024
Managing Click & Collect Shipping ...
post item
Installing Opayo Server by Elavon and Opayo by Elavon Modules for osCommerce 2.2 via Zip File
April 18, 2024
Installing Opayo Server by Elavon and Opayo by Elavon Modules for osCommerce 2.2 via Zip File ...
Products
Tags

Management

Ecommerce

Integrations

newsite

launch

grant

fund

replatforming

osCommerce 4.x

shopping cart

hosting

Installation

New PayPal Module (Latest API 2.0)

osCommerce 2.2

osCommerce 2.3

Shopping cart customizations

Manually

PayPal Express

APM (Alternative Payment Method)

Standard Variant

Advanced Variant

Configuration

Testing

Front End

Install osCommerce for Me

Let me install myself

Multiple sales channels

Single active sales channel

Installation on your own server

Assigning theme to sales channel

Deleting sales channel

Connect

App Shop

Adding Free Module

Admin Area

Adding Paid Module

Installing Module

Opayo Pi Module

Development Mode

Email Verification Before Registration

Managing Languages

Managing phpMussel

Managing Orders

oscommerce.com account

Creating Manual Orders

Managing Customers

Managing Customer Groups

Managing Brands

Managing Categories

Managing Filters on Categories

Managing Products

Managing Stock

Assigning Products and Categories to Front Ends

Assigning and Moving Products to Categories

Managing Default Sort Order on Product Listing and Category

Managing Cross-Sell and UPSell

Managing Reviews

Managing Attributes

Managing Product Groups

Managing Properties

Managing Suppliers

Managing Warehouses

Managing Sales Statistics and Purchase Report

Managing Stocktaking Costs

Managing Deleted Orders

Managing Coupons

Managing Virtual Gift Cards

Managing Sales Price

Managing Giveaways

Managing Featured Products

Managing SEO

Managing Meta Tags

Managing XML Sitemap

Settings of E-commerce Tracking for Google Tag Manager

Setting up GA4

Managing Pages

Managing Menus

Assigning Theme to Sales Channels

Deleting Sales Channels

Managing Translations

Managing Email Templates

Managing Catalog Pages

Managing Shipping Modules

Managing Payment Modules

Managing Order Structure

Managing Socials

Managing Extensions

Managing Managers

Managing Access Levels

Managing Back End Menu

Managing Configuration

Mail Sending via SMTP

Setting up SMTP

Status Groups

Order Statuses

Comment Templates

Stock Indication

Notify Me when in Stock

Stock Delivery Terms

Cross Sell Type

Cache Control

Filters

Managing Countries

Managing Counties and States

Geo Zones

Managing Cities

city settings

Postal Codes

Managing Taxes

Managing Currencies

Backups

Viewing Who is Online

Managing IP Restriction

Error Log Viewer

Creating Installation

Address Formats

Image Settings

Sales Tags

Managing Front Ends

Managing App Shop

Going Live with osCommerce

Affiliate Module

Awin Module

B2B Module

Business To Business module

Bazaarvoice Module

Managing Blog

Collection Points

Managing Competitors

Customer Code Module

Customer Modules Module

Customer Multi Emails Module

Customer Products Module

Delayed Despatch Module

Delivery Options Module

Fraud Address Module

Frontend Session Module

Invoice Number Format Module

Maximum Order Quantity

Merge Customers Module

Merge Orders Module

Minimum Order Quantity

Neighbour Module

One Trust Module

Order Flags and Markers

Pack Units

Covered by Coupon Module

Klarna Module

LiqPay Module

Mollie Pay

Pay360 by Capita Module

pxPay Module

RBS WorldPay Module

Tyl by NatWest Module

Personal Catalog

Personal Discount Module

Product Bundles

Product Collections

Product Easy View

Product Global Sort

Product Ignored Payment Methods

Product Ignored Shipping Methods

Product Press Reviews

Product Relocation

Managing Refer Friend

Bookkeeping Detail Report

Changes History Report

Compare Report

Deficit Product Report

Emails History Report

Report by Email Module

Expected Products Report

Managing Freeze Stock

In Cart Stock Report

Low Stock Report

Manufacturer Sales Report

Ordered Products Report

Purchase Report

Stock by Manufacturer Report

Summary Report

Updating Opayo Pi Module

Updating Opayo Server Module

Temporary Stock Report

Universal Log Report

Managing Search Plus

Managing DHL Shipping

Managing FedEx Shipping

Managing German Post Shipping

Managing Google Zones Shipping

Managing Nova Poshta Shipping

Managing Personal Rate UPS Shipping

Managing TNT Express Shipping

Managing UPS Shipping

Managing United States Postal Service Shipping

Managing USPS Shipping

Opayo Server Module

Managing Support System

Managing Trustpilot Module

Managing VAT On Order

Zero Price Module

User Group Extra Discounts

Installing Opayo Server by Elavon for osCommerce 2.2 via Installer

Installing Opayo by Elavon for osCommerce 2.2 via Installer

Installing Opayo Server for osc2.2 via Zip File

Installing Opayo for osc2.2 via Zip File

Click & Collect Shipping

Configuring Opayo by Elavon Module for osc 2.2

Configuring Opayo Server for osc 2.2

Testing Opayo Module for osc 2.2 on Front End

Testing Opayo Server for osc 2.2 on Front End

Installing Opayo Server for osc 2.3 via Installer

Installing Opayo for osc 2.3 via Installer

Installing Opayo Server for osc 2.3 via Zip File

Installing Opayo for osc 2.3 via Zip File

Configuring Opayo for osс 2.3

Configuring Opayo Server for osc 2.3

Installing Opayo Pi Module from oscommerce.com Account

Are you ready to supercharge your website's capabilities? Connecting it to the App Shop is your first step to unlocking a world of possibilities. If you haven't taken this step yet, be sure to refer to the detailed guide on "Connecting to App Shop"
or watch the corresponding video https://www.youtube.com/watch?v=XivAKdQTni8&list=PLHN7KfrDE8gOOTgXVSeFEo4L15Y98IURB before proceeding. Once you're all set, follow this user-friendly guide to seamlessly install the Opayo Pi module right from the oscommerce.com account.


Step 1: Accessing Your Account

Begin by logging into your account on oscommerce.com. This is your gateway to enhancing your website's functionality and user experience.

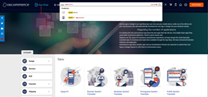
Step 2: Finding the Opayo Pi Module

Within your account, navigate to locate the coveted Opayo Pi module. This module is your ticket to streamlining payment processes and enhancing customer transactions

Step 3: Adding to Your Library

Once you've spotted the Opayo Pi module, take the next step by clicking on the enticing "Add to my library" button. This simple action paves the way for its seamless integration.

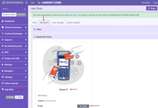
Step 4: The Installation Journey Begins

Navigate to the admin area of your website, where the magic happens. Click on the "App Shop" and "My Library" tabs. Here, you'll find the Opayo Pi module ready and waiting for installation. Embrace the transformation and hit the "Install" button to commence the installation process.

Step 5: Customizing Installation

Tailor the module's installation to your unique business needs. Opt for specific sales channels or decide to install it across all channels simultaneously. Once you've made your choice, click the "Continue Installation" button to keep the momentum going.

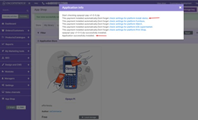
Step 6: Basking in Success

As the installation unfolds, a success page will greet you, confirming that the Opayo Pi module has been seamlessly integrated into your website. This achievement is a stepping stone towards refining your online operations.

Step 7: Ensuring Perfect Integration

To ensure a seamless experience, click on the "Check settings for the required platform" link. This step serves as a final check to ensure that the module's settings are aligned with your platform.

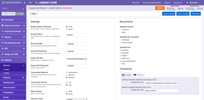
Step 8: Tailoring the Experience

With the installation complete, it's time to roll up your sleeves and dive into customization. Navigate through the configuration options and fine-tune the module's settings to perfectly align with your business objectives.


In conclusion, installing the Opayo Pi module directly from the front end is a straightforward process that promises to elevate your online business. By following these user-friendly steps, you're well on your way to optimizing payment processes and enhancing customer satisfaction. So, seize the opportunity, make the connection, and watch your website flourish!

Also see the link to the playlist below demonstrating how to install Opayo Pi module from admin area and from oscommerce.com account as well as how to configure Opayo Pi module and test it on the front end:

https://www.youtube.com/watch?v=0f-lyy7iMmc&list=PLHN7KfrDE8gPPQ_PTGC9YM36dHuYApHWz

You can further discuss it on our Forum