osCommerce News
Recent posts
post item
Installing Opayo Server by Elavon and Opayo by Elavon Modules for osCommerce 2.3 via Zip File
April 29, 2024
Installing Opayo Server by Elavon and Opayo by Elavon Modules for osCommerce 2.3 via Zip File ...
post item
Installing Opayo Server by Elavon and Opayo by Elavon Modules for osCommerce 2.3 via Installer
April 26, 2024
Installing Opayo Server by Elavon and Opayo by Elavon Modules for osCommerce 2.3 via Installer ...
post item
Testing Opayo Server by Elavon Module for osCommerce 2.2 on Front End
April 25, 2024
Testing Opayo Server by Elavon Module for osCommerce 2.2 on Front End ...
post item
Testing Opayo by Elavon Module for osCommerce 2.2 on Front End
April 24, 2024
Testing Opayo by Elavon Module for osCommerce 2.2 on Front End ...
post item
Configuring Opayo Server by Elavon Module for osCommerce 2.2
April 23, 2024
Configuring Opayo Server by Elavon Module for osCommerce 2.2 ...
post item
Configuring Opayo by Elavon Module for osCommerce 2.2
April 22, 2024
Configuring Opayo by Elavon Module for osCommerce 2.2 ...
post item
Managing Click & Collect Shipping
April 19, 2024
Managing Click & Collect Shipping ...
post item
Installing Opayo Server by Elavon and Opayo by Elavon Modules for osCommerce 2.2 via Zip File
April 18, 2024
Installing Opayo Server by Elavon and Opayo by Elavon Modules for osCommerce 2.2 via Zip File ...
post item
Installing Opayo Server by Elavon and Opayo by Elavon Modules for osCommerce 2.2 via Installer
April 17, 2024
Installing Opayo Server by Elavon and Opayo by Elavon Modules for osCommerce 2.2 via Installer ...
post item
Managing User Group Extra Discounts
April 16, 2024
Managing User Group Extra Discounts ...
Products
Tags

Management

Ecommerce

Integrations

newsite

launch

grant

fund

replatforming

osCommerce 4.x

shopping cart

hosting

Installation

New PayPal Module (Latest API 2.0)

osCommerce 2.2

osCommerce 2.3

Shopping cart customizations

Manually

PayPal Express

APM (Alternative Payment Method)

Standard Variant

Advanced Variant

Configuration

Testing

Front End

Install osCommerce for Me

Let me install myself

Multiple sales channels

Single active sales channel

Installation on your own server

Assigning theme to sales channel

Deleting sales channel

Connect

App Shop

Adding Free Module

Admin Area

Adding Paid Module

Installing Module

Opayo Pi Module

Development Mode

Email Verification Before Registration

Managing Languages

Managing phpMussel

Managing Orders

oscommerce.com account

Creating Manual Orders

Managing Customers

Managing Customer Groups

Managing Brands

Managing Categories

Managing Filters on Categories

Managing Products

Managing Stock

Assigning Products and Categories to Front Ends

Assigning and Moving Products to Categories

Managing Default Sort Order on Product Listing and Category

Managing Cross-Sell and UPSell

Managing Reviews

Managing Attributes

Managing Product Groups

Managing Properties

Managing Suppliers

Managing Warehouses

Managing Sales Statistics and Purchase Report

Managing Stocktaking Costs

Managing Deleted Orders

Managing Coupons

Managing Virtual Gift Cards

Managing Sales Price

Managing Giveaways

Managing Featured Products

Managing SEO

Managing Meta Tags

Managing XML Sitemap

Settings of E-commerce Tracking for Google Tag Manager

Setting up GA4

Managing Pages

Managing Menus

Assigning Theme to Sales Channels

Deleting Sales Channels

Managing Translations

Managing Email Templates

Managing Catalog Pages

Managing Shipping Modules

Managing Payment Modules

Managing Order Structure

Managing Socials

Managing Extensions

Managing Managers

Managing Access Levels

Managing Back End Menu

Managing Configuration

Mail Sending via SMTP

Setting up SMTP

Status Groups

Order Statuses

Comment Templates

Stock Indication

Notify Me when in Stock

Stock Delivery Terms

Cross Sell Type

Cache Control

Filters

Managing Countries

Managing Counties and States

Geo Zones

Managing Cities

city settings

Postal Codes

Managing Taxes

Managing Currencies

Backups

Viewing Who is Online

Managing IP Restriction

Error Log Viewer

Creating Installation

Address Formats

Image Settings

Sales Tags

Managing Front Ends

Managing App Shop

Going Live with osCommerce

Affiliate Module

Awin Module

B2B Module

Business To Business module

Bazaarvoice Module

Managing Blog

Collection Points

Managing Competitors

Customer Code Module

Customer Modules Module

Customer Multi Emails Module

Customer Products Module

Delayed Despatch Module

Delivery Options Module

Fraud Address Module

Frontend Session Module

Invoice Number Format Module

Maximum Order Quantity

Merge Customers Module

Merge Orders Module

Minimum Order Quantity

Neighbour Module

One Trust Module

Order Flags and Markers

Pack Units

Covered by Coupon Module

Klarna Module

LiqPay Module

Mollie Pay

Pay360 by Capita Module

pxPay Module

RBS WorldPay Module

Tyl by NatWest Module

Personal Catalog

Personal Discount Module

Product Bundles

Product Collections

Product Easy View

Product Global Sort

Product Ignored Payment Methods

Product Ignored Shipping Methods

Product Press Reviews

Product Relocation

Managing Refer Friend

Bookkeeping Detail Report

Changes History Report

Compare Report

Deficit Product Report

Emails History Report

Report by Email Module

Expected Products Report

Managing Freeze Stock

In Cart Stock Report

Low Stock Report

Manufacturer Sales Report

Ordered Products Report

Purchase Report

Stock by Manufacturer Report

Summary Report

Updating Opayo Pi Module

Updating Opayo Server Module

Temporary Stock Report

Universal Log Report

Managing Search Plus

Managing DHL Shipping

Managing FedEx Shipping

Managing German Post Shipping

Managing Google Zones Shipping

Managing Nova Poshta Shipping

Managing Personal Rate UPS Shipping

Managing TNT Express Shipping

Managing UPS Shipping

Managing United States Postal Service Shipping

Managing USPS Shipping

Opayo Server Module

Managing Support System

Managing Trustpilot Module

Managing VAT On Order

Zero Price Module

User Group Extra Discounts

Installing Opayo Server by Elavon for osCommerce 2.2 via Installer

Installing Opayo by Elavon for osCommerce 2.2 via Installer

Installing Opayo Server for osc2.2 via Zip File

Installing Opayo for osc2.2 via Zip File

Click & Collect Shipping

Configuring Opayo by Elavon Module for osc 2.2

Configuring Opayo Server for osc 2.2

Testing Opayo Module for osc 2.2 on Front End

Testing Opayo Server for osc 2.2 on Front End

Installing Opayo Server for osc 2.3 via Installer

Installing Opayo for osc 2.3 via Installer

Installing Opayo Server for osc 2.3 via Zip File

Installing Opayo for osc 2.3 via Zip File

Managing UPS Shipping

Are you looking to streamline your shipping process and provide reliable delivery options to your customers? Look no further than United Parcel Service (UPS). In this comprehensive guide, we'll walk you through the steps to seamlessly integrate UPS shipping into your website's admin area, empowering you to manage shipping services effortlessly.

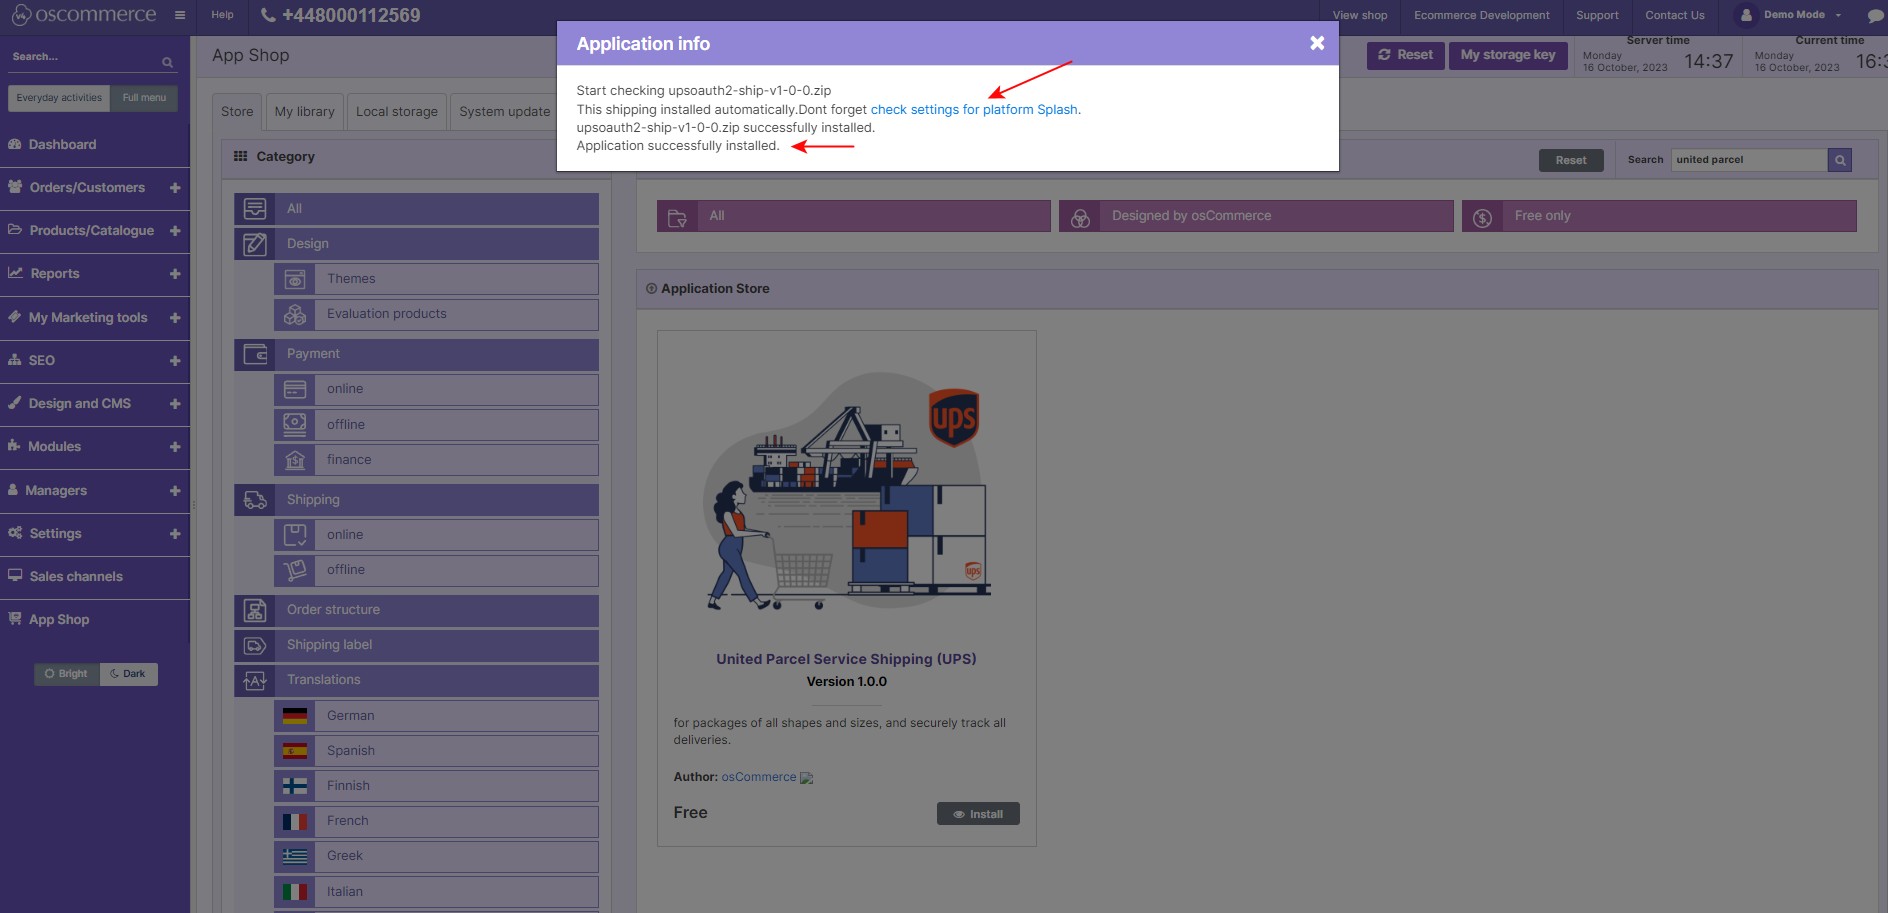
Step 1: Installation

First things first, access the admin area of your website. Navigate to the "App Shop" or "Store" tabs and search for the UPS Shipping module (version 1.0.0).

Install the module and follow any on-screen prompts to complete the installation process. During installation, you can choose to apply the UPS Shipping module to specific sales channels or all channels at once.


Step 2: Accessing Module Settings

Once the module is installed, a success page will confirm its integration. To proceed, click on the "Check settings for the required platform" link.


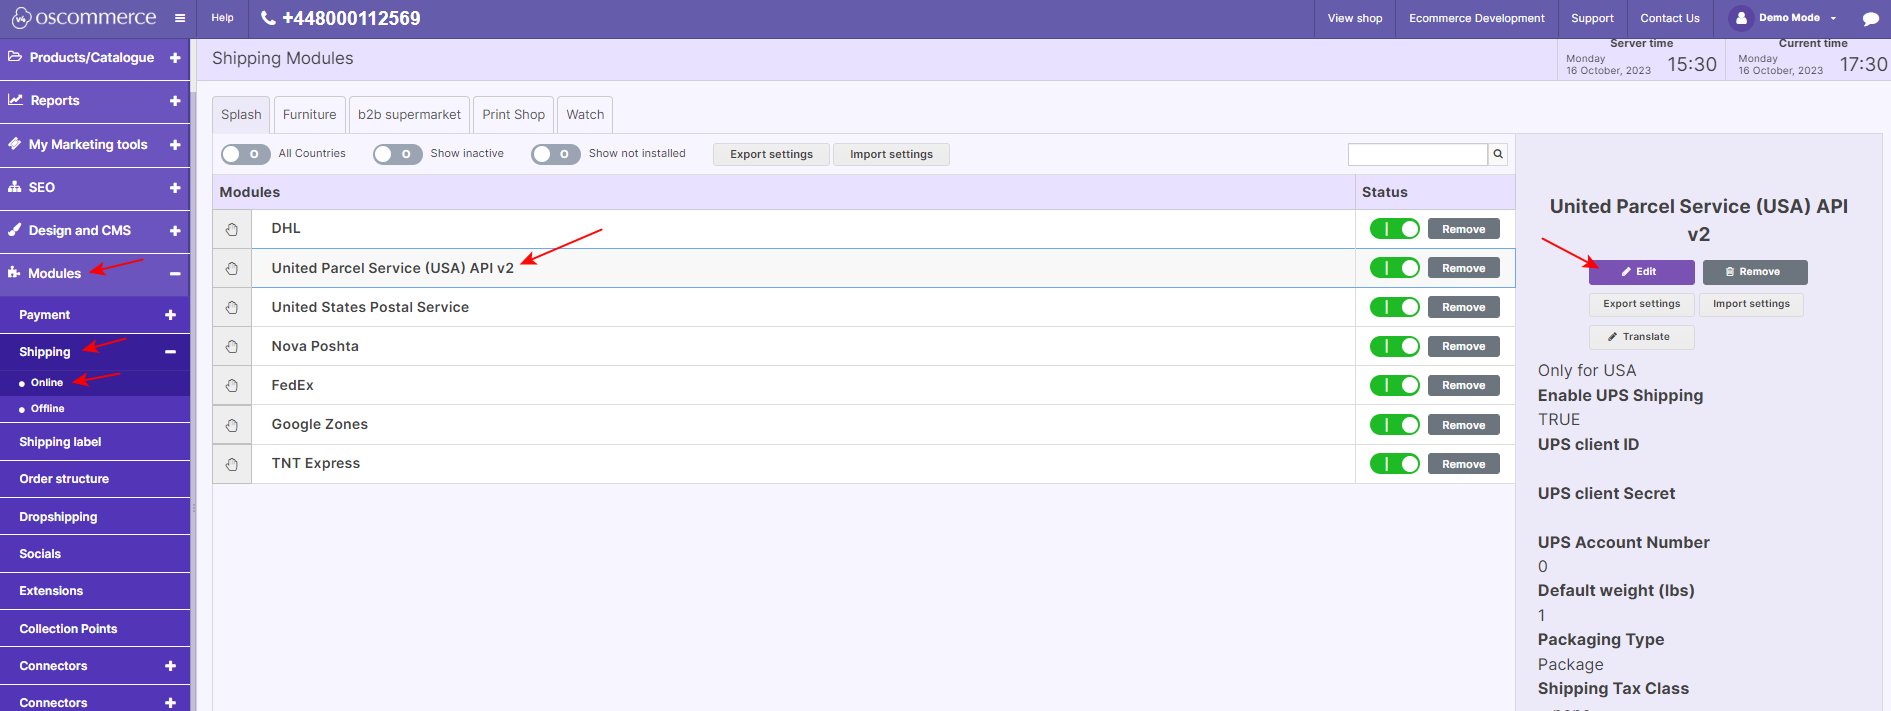
Alternatively, you can find the module under the Modules, Shipping, and Online tabs. Locate the

"United Parcel Service (USA) API v2” module and click on the “Edit” button to access its settings.


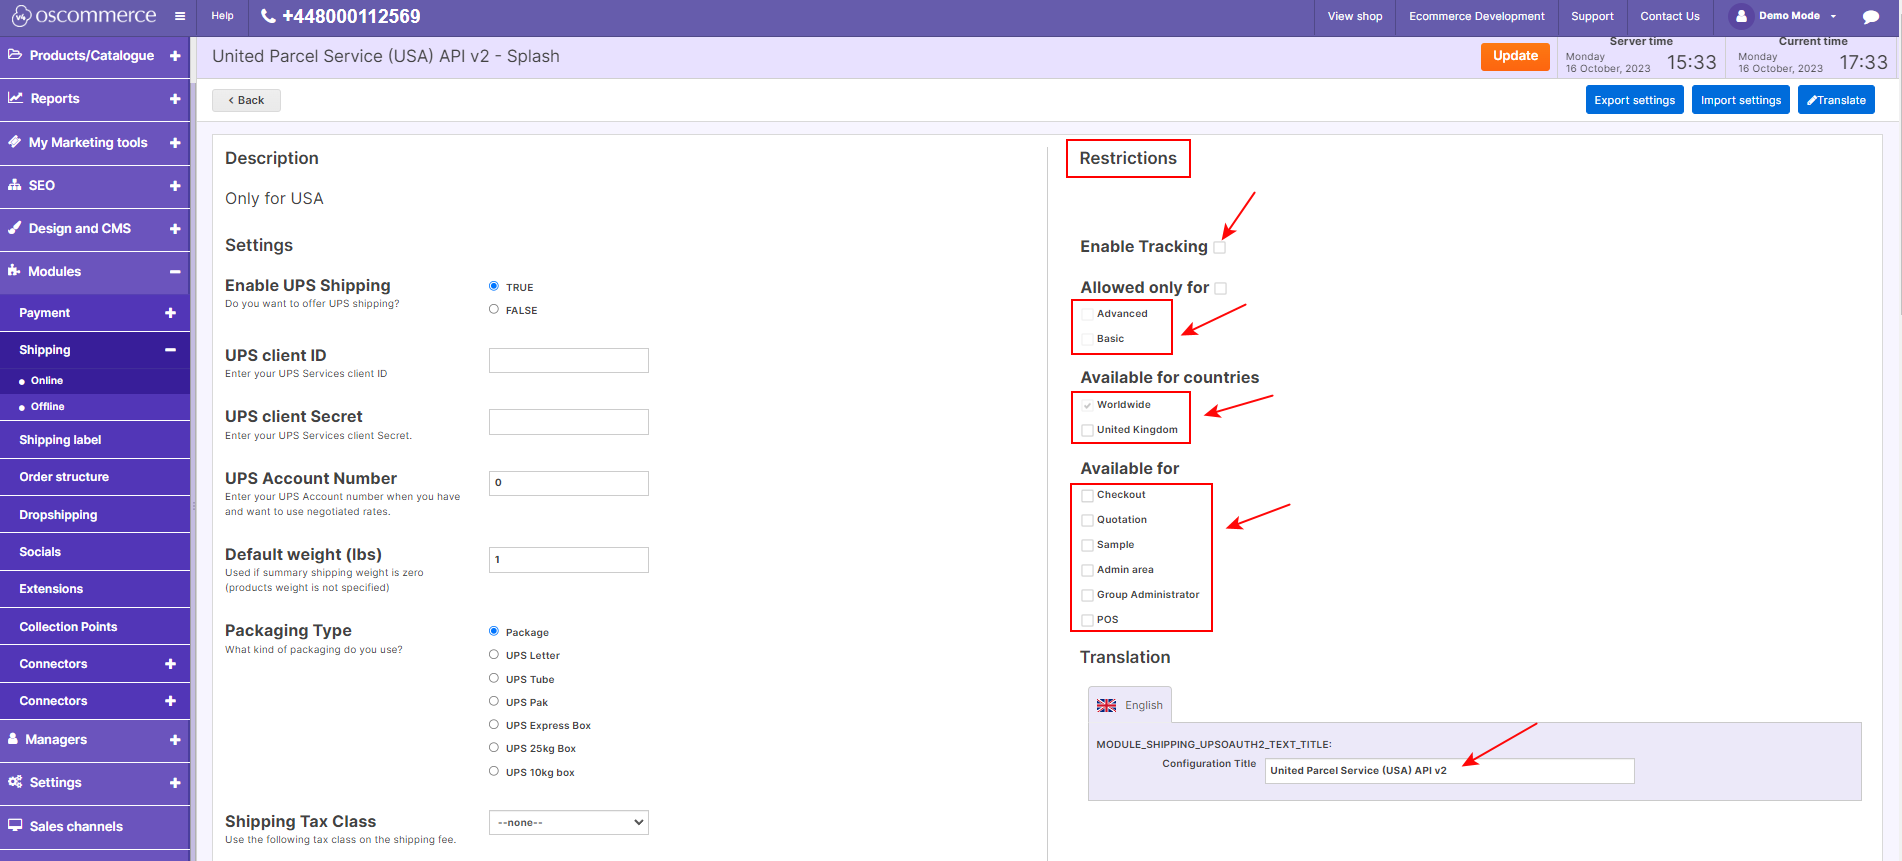
Step 3: Customizing Restrictions

Tailor UPS Shipping to meet your specific needs by customizing restrictions. You can restrict UPS shipping to specific customer groups, countries, and website pages. Specify the shipping module name for both the backend and frontend in your desired language, and enable tracking to provide better shipment visibility to your customers.


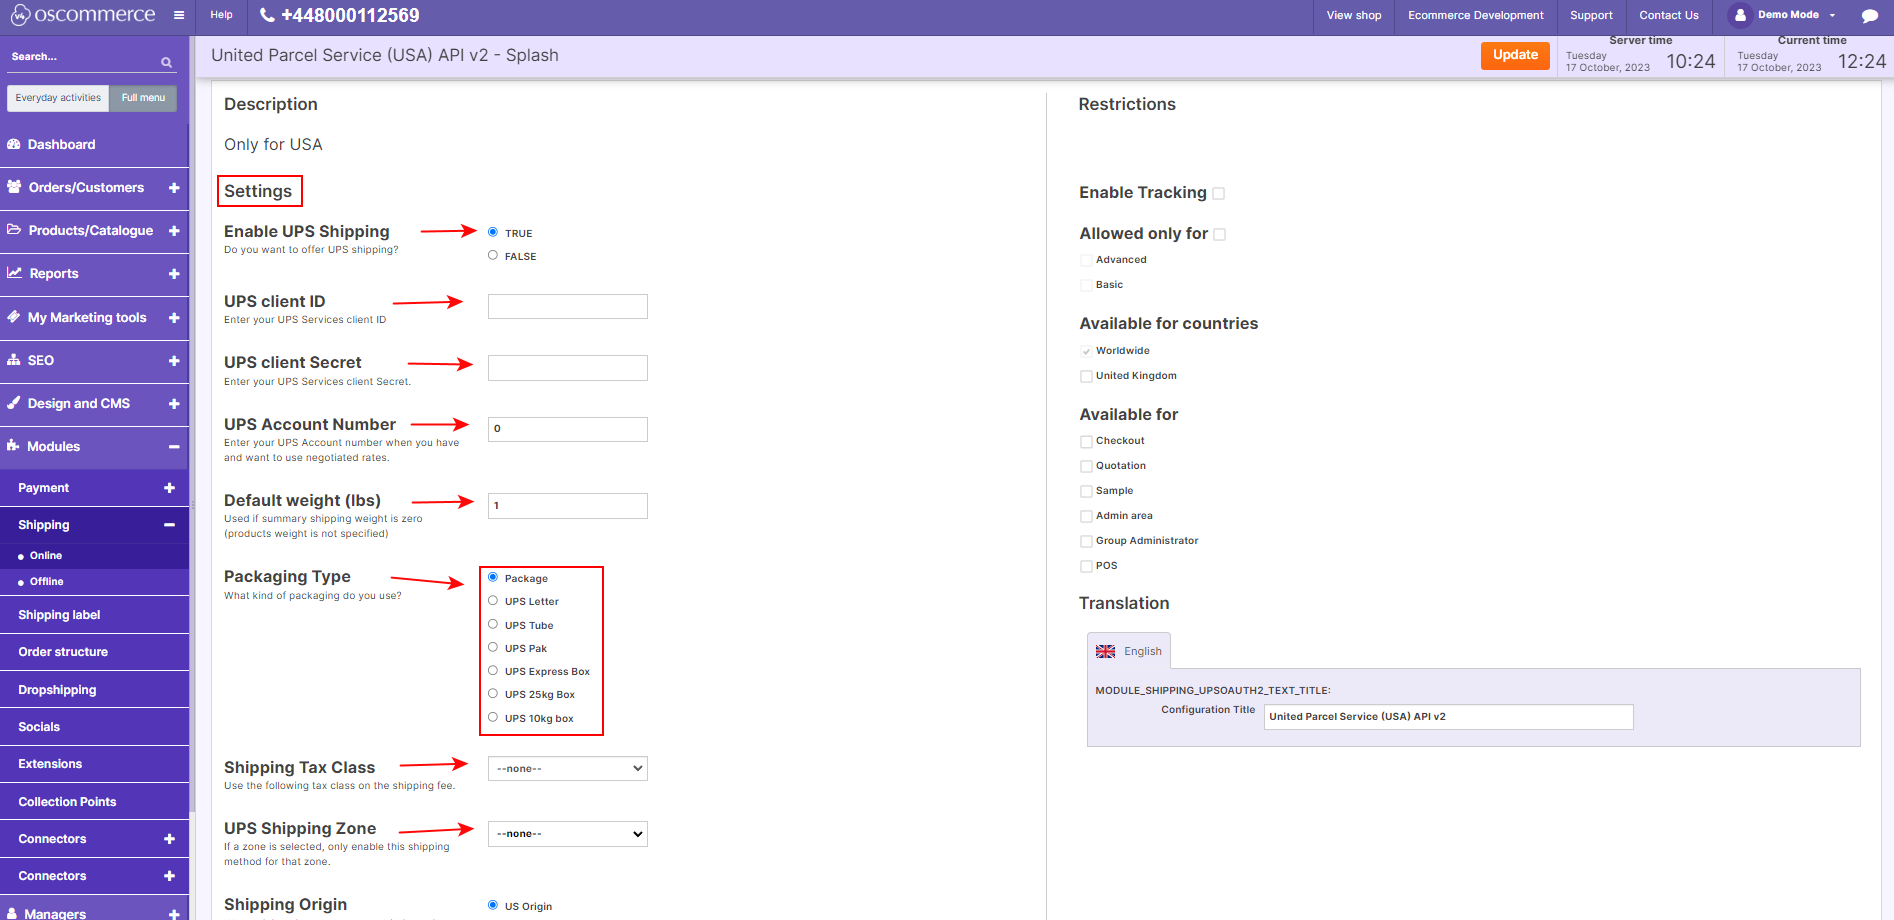
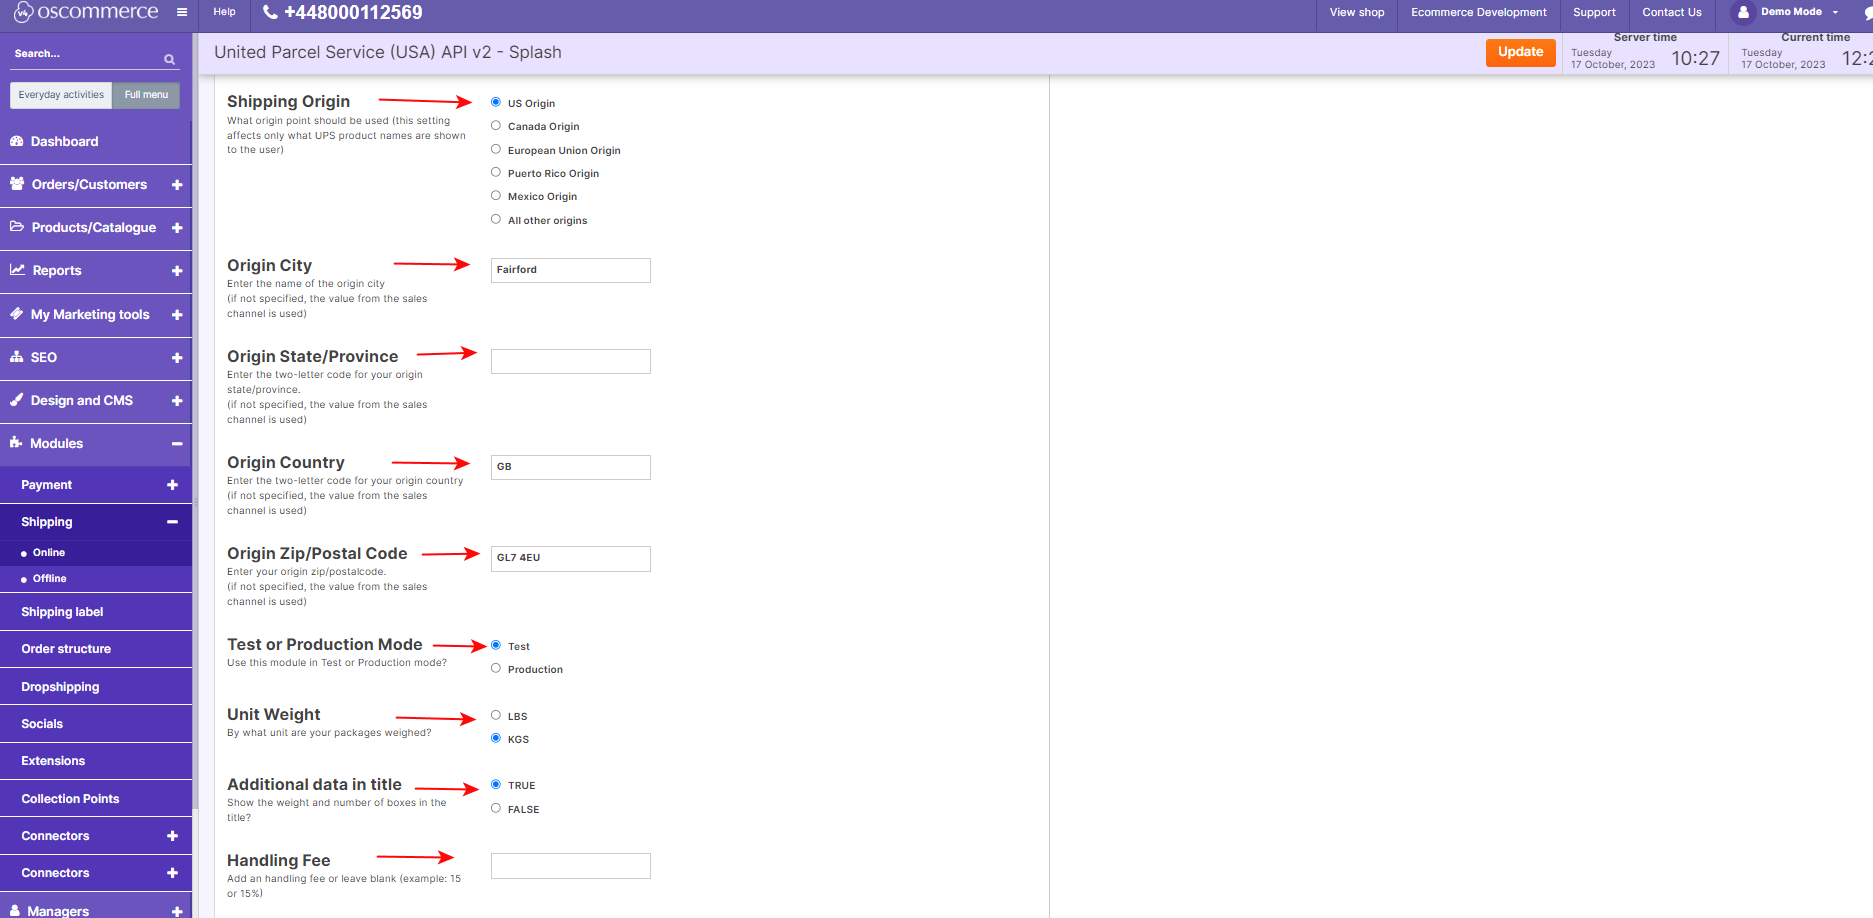
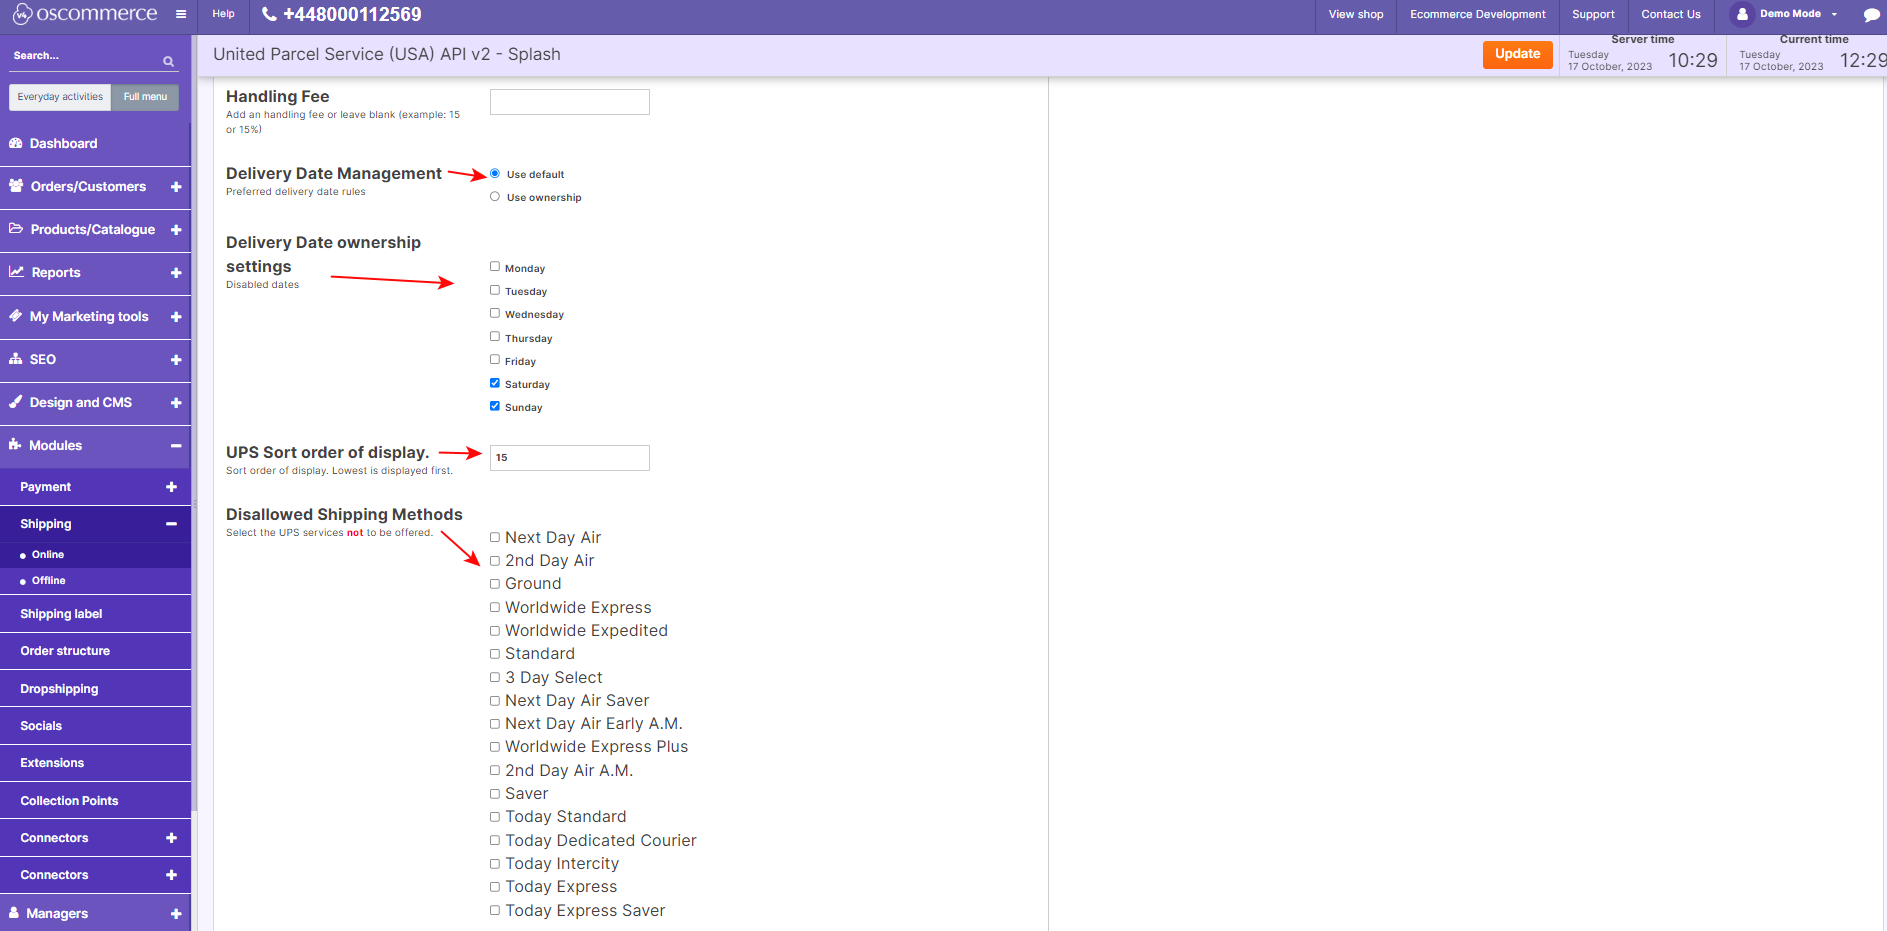
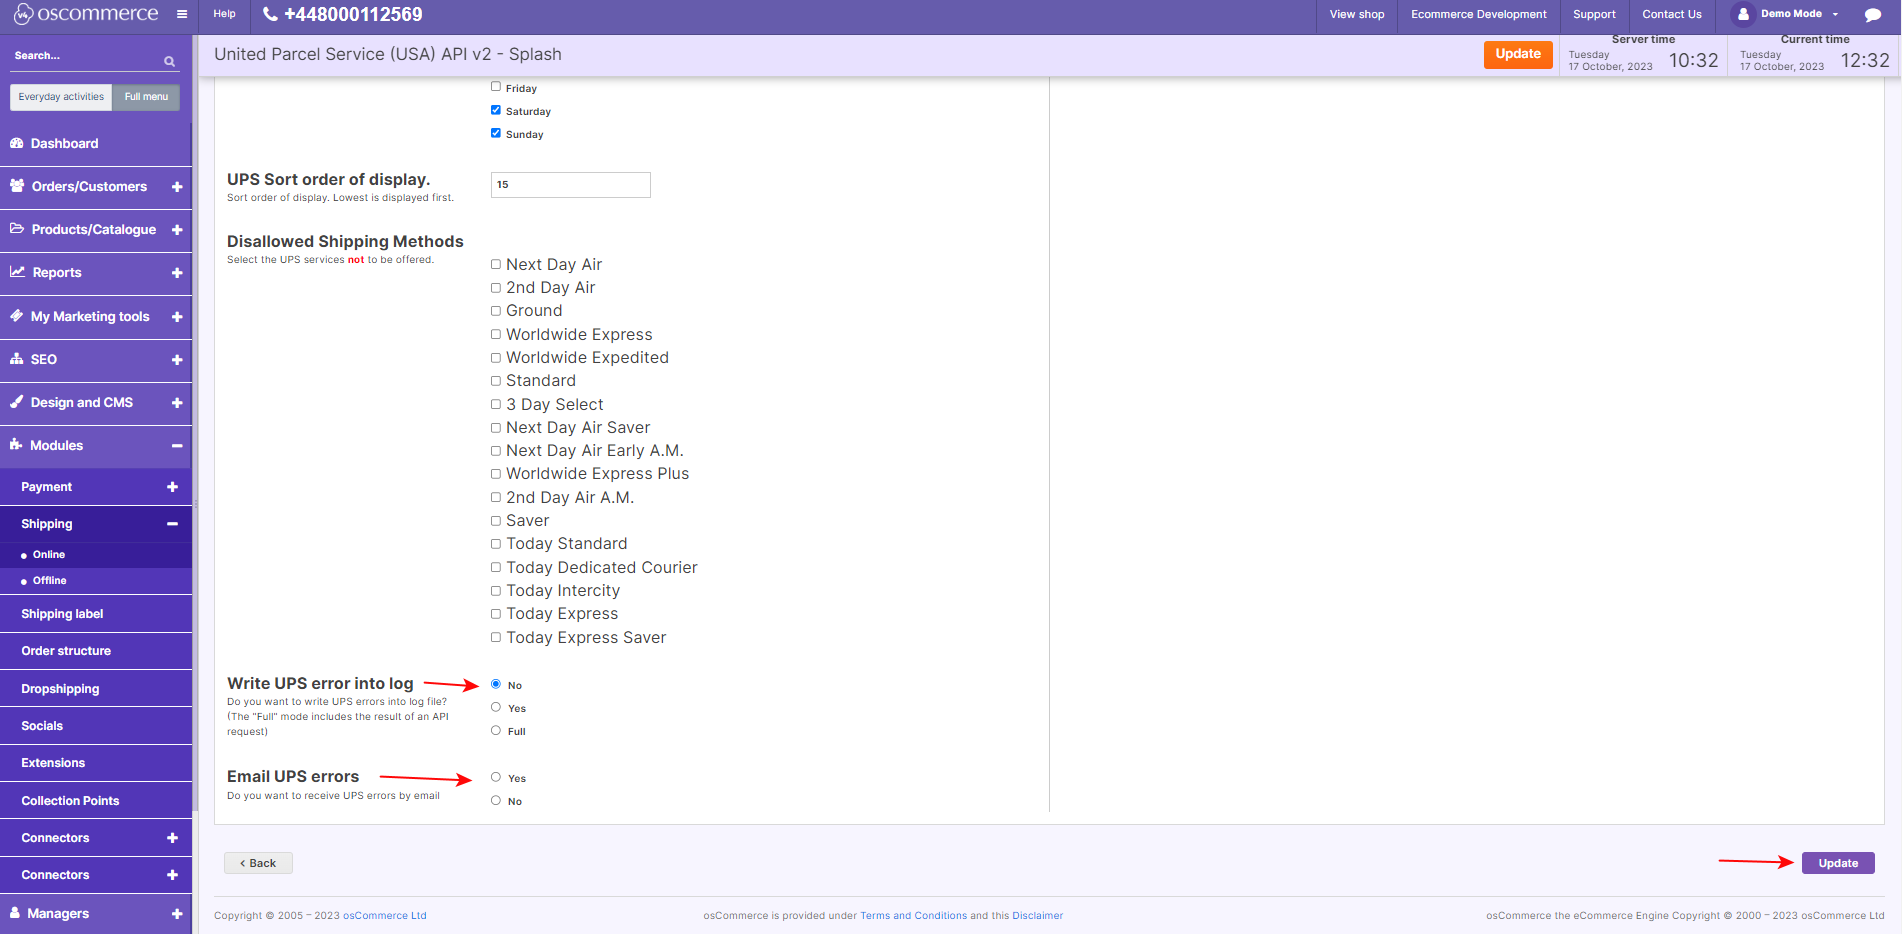
Step 4: Configuring UPS Shipping Options

In the settings section, configure the UPS Shipping options to optimize your shipping process:

  • Toggle UPS shipping on for your website.
  • Provide UPS client ID, client secret, and account number for negotiated rates.
  • Specify default weight values, packaging options, and tax classes for shipping fees.
  • Define shipping zones.


  • Indicate origin details.
  • Choose between test or production mode.
  • Indicate weight measurement preference.
  • Enable additional data display options and set handling fees.


  • Manage delivery dates and ownership settings for better control over shipments.
  • Control the order of UPS Shipping's display during checkout.
  • Select specific UPS services you want to offer.


  • Opt for error logging and notifications.


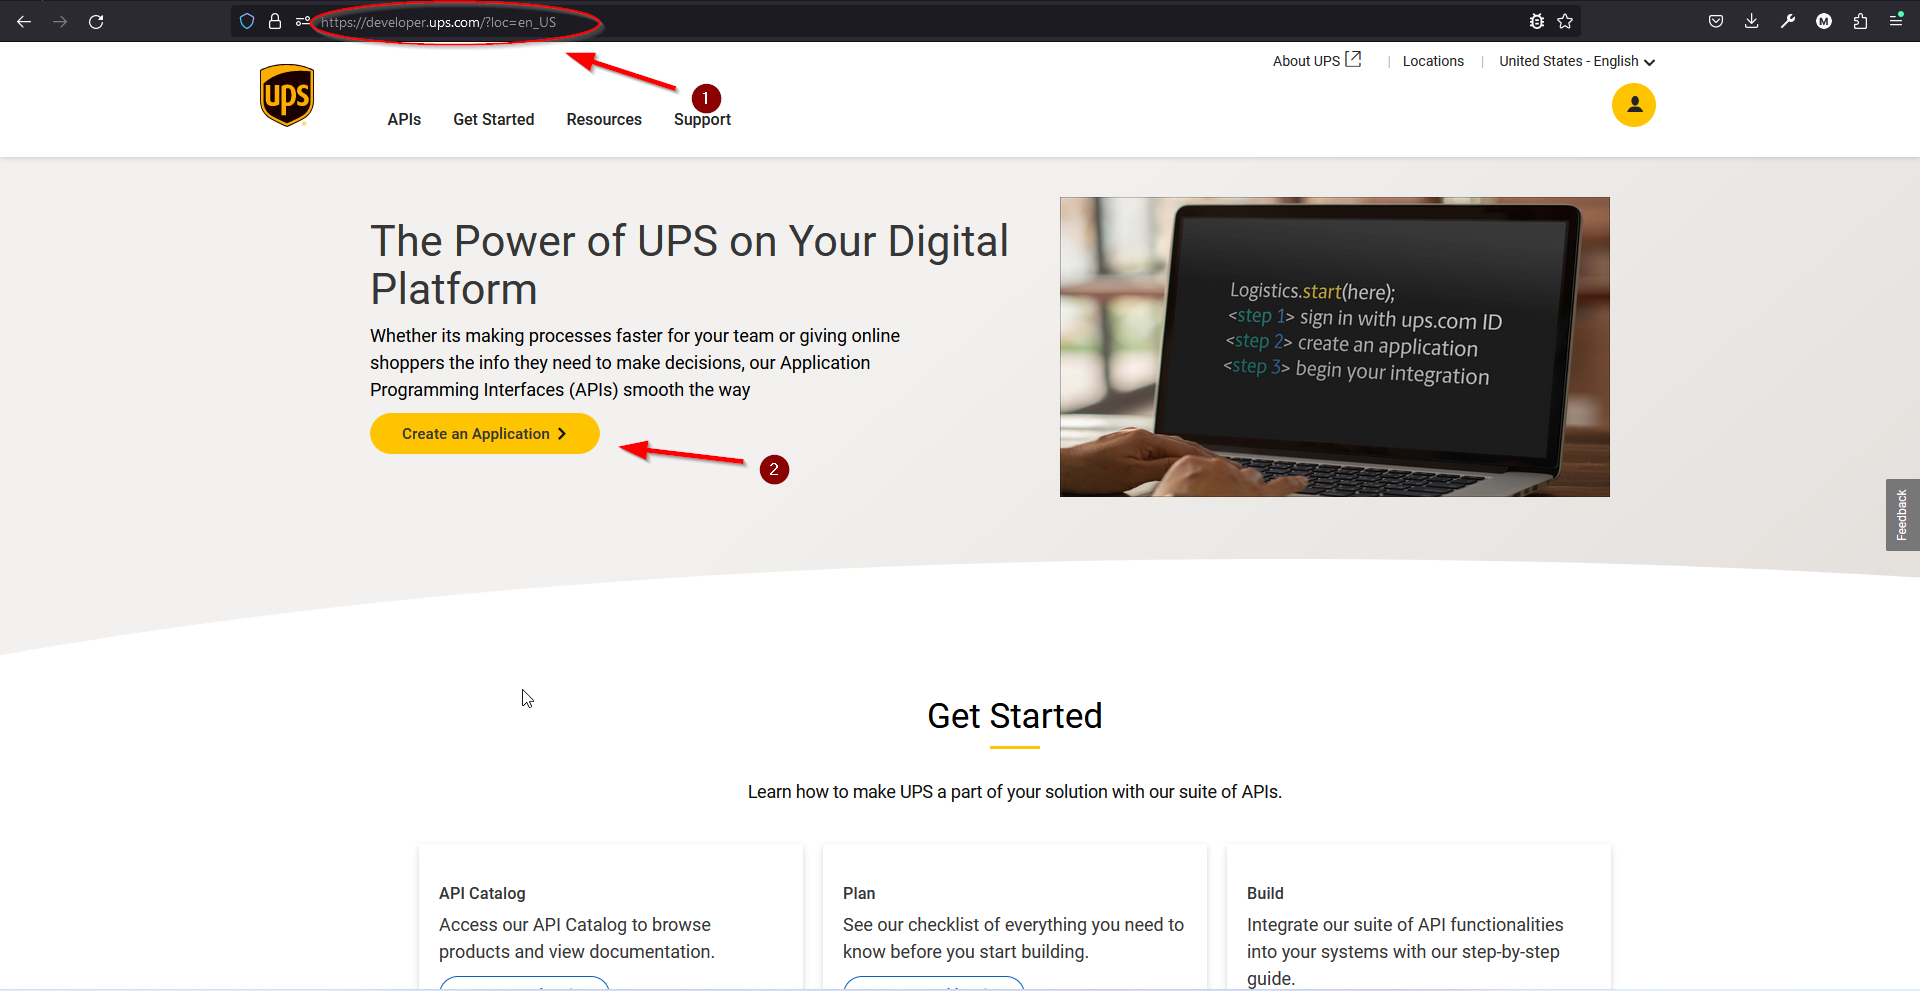
Obtaining UPS Credentials

To access UPS client ID, client secret, and UPS account number, follow these outlined steps:

1. Access UPS Developer Portal: Visit the UPS Developer Portal at developer.ups.com/?loc=en_US and click on "Create an Application."


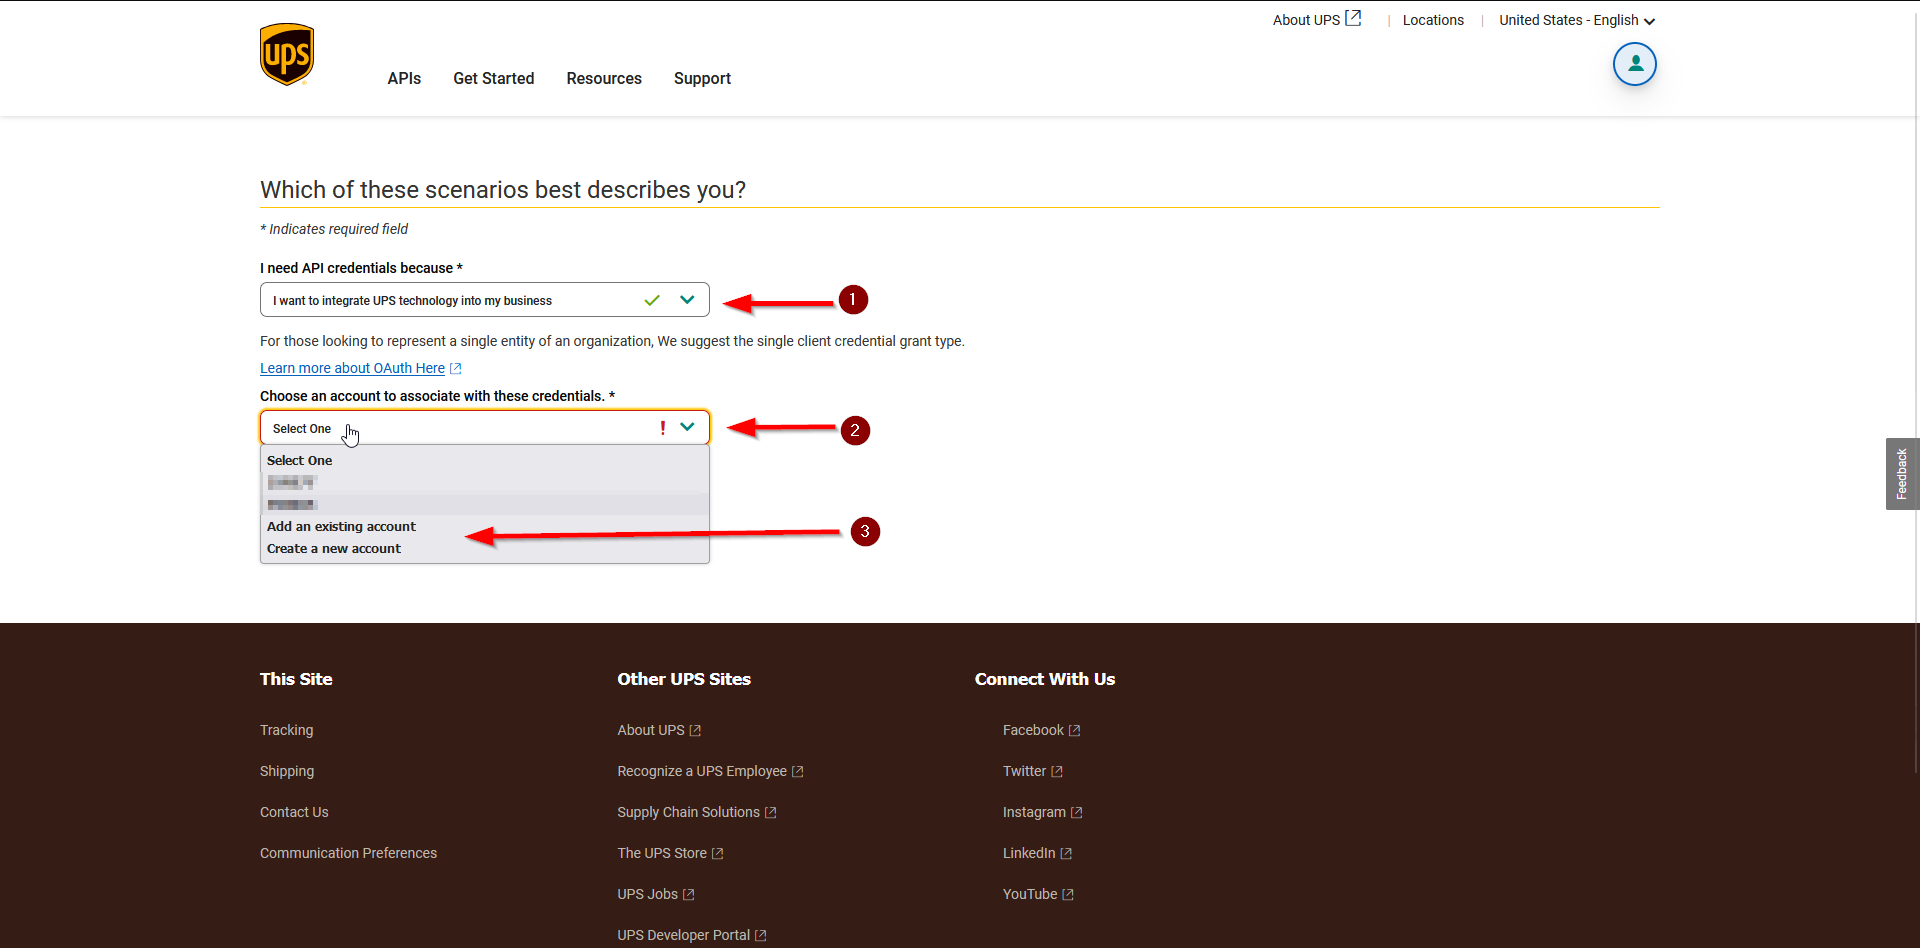
2. Select Integration Type: Choose "I want to integrate UPS technology into my business" from the drop-down menu. Then, select an account to associate with these credentials. You can either add an existing account or create a new one.


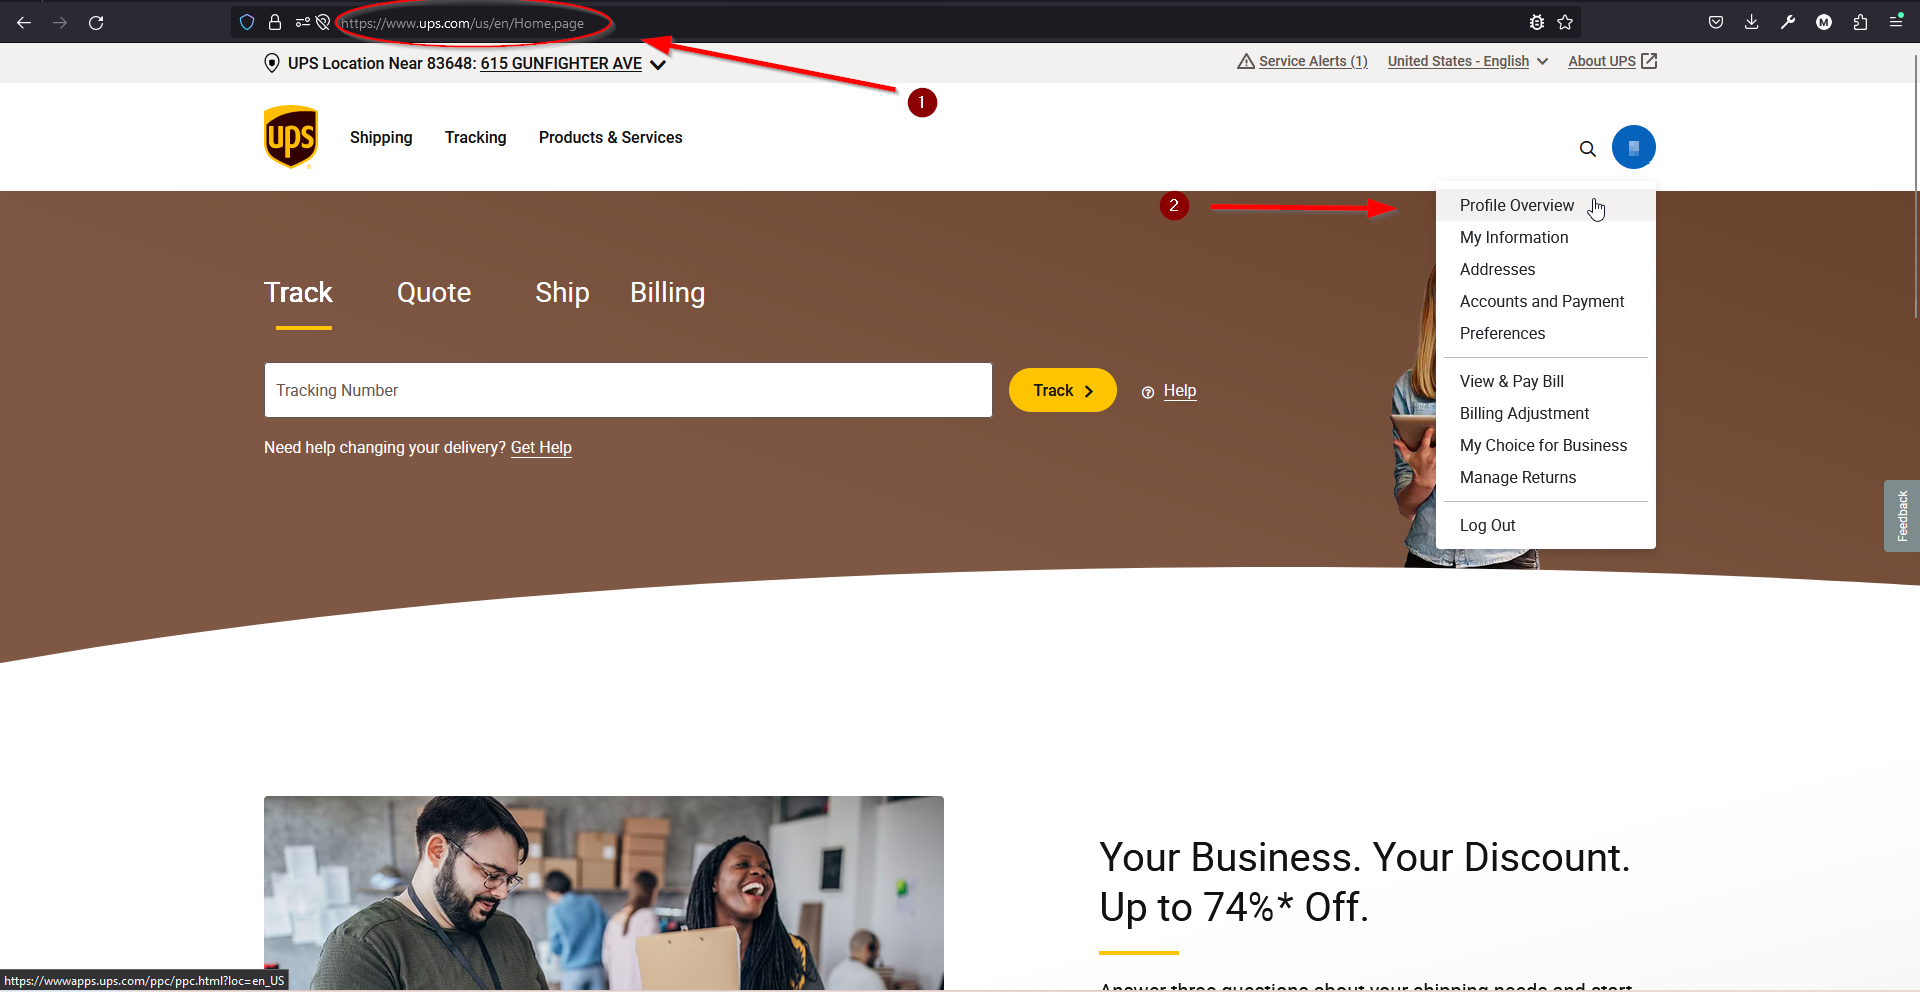
3. Access UPS Profile Overview: Log in to your UPS account at https://www.ups.com/us/en/Home.page


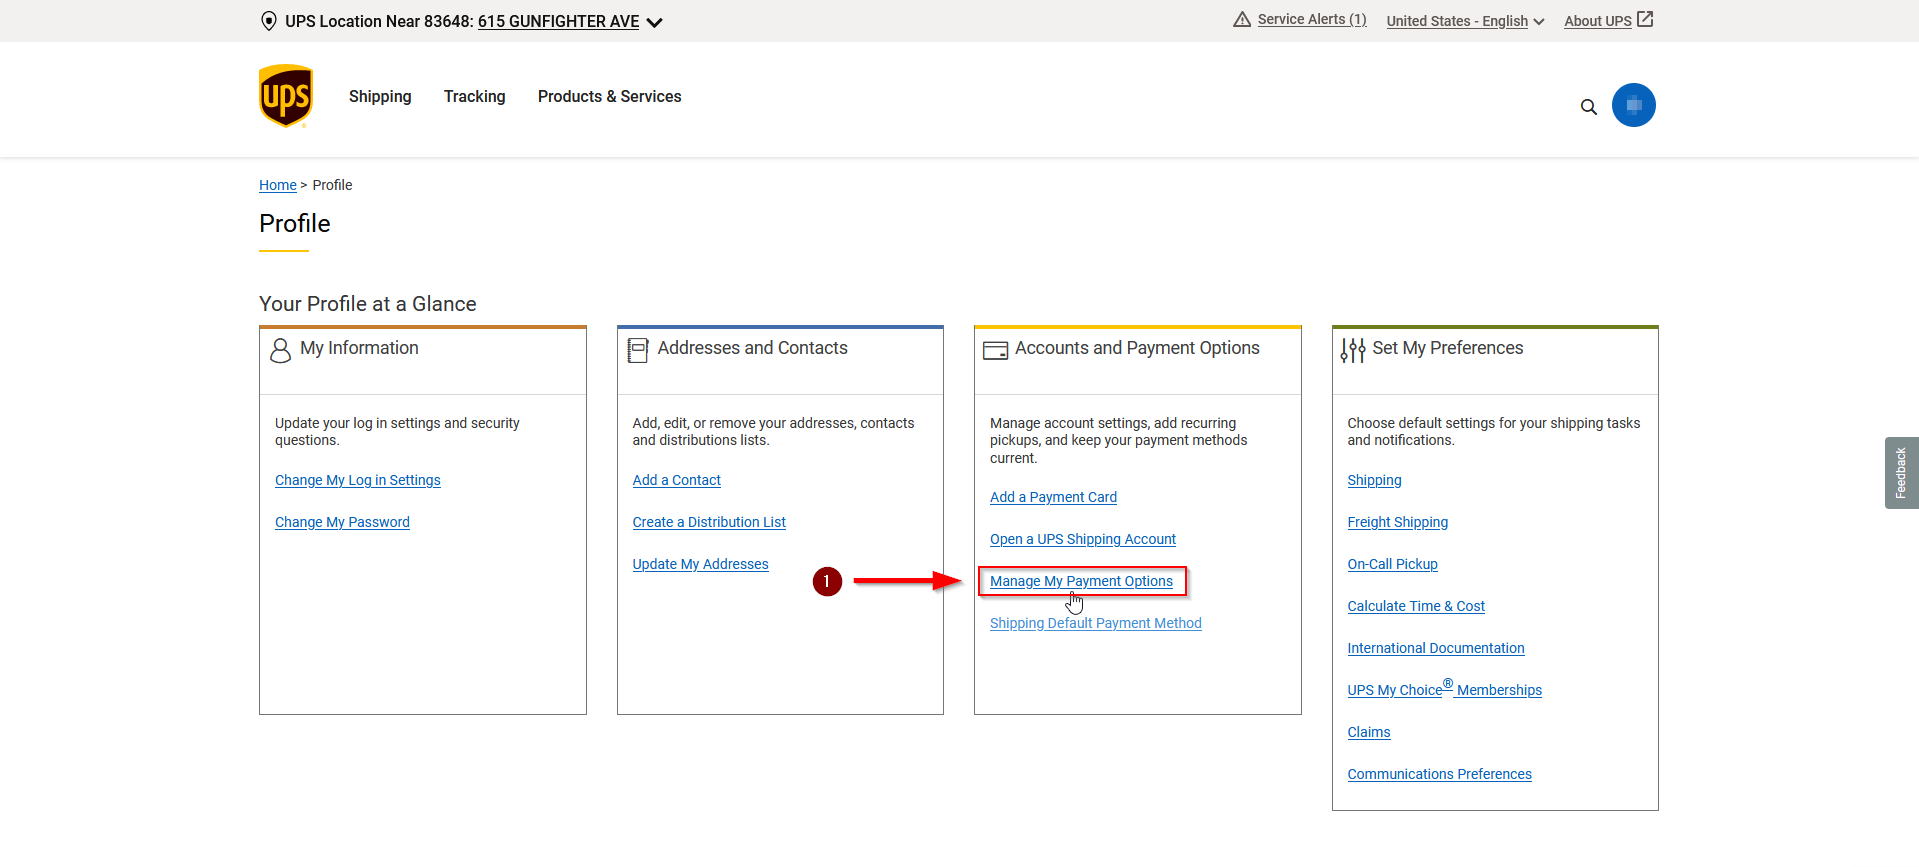
4. Manage Payment Options: Under the "Accounts and Payment Options" section, select "Manage My Payment Options."


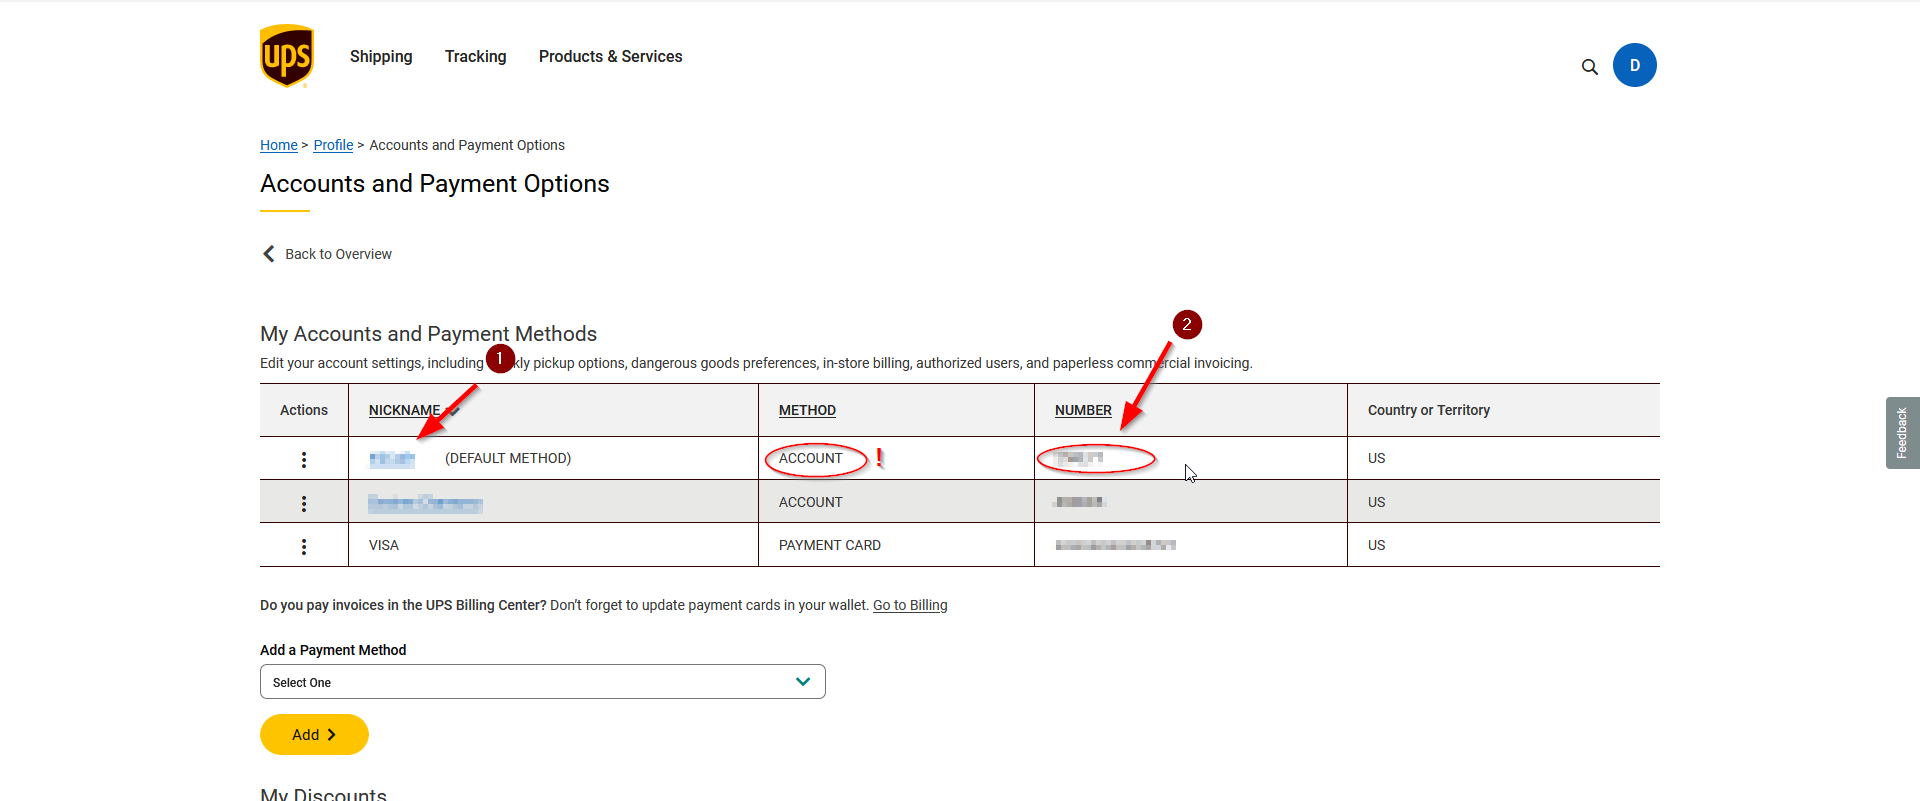
5. Retrieve Account Information: Locate your nickname and account number under the "Accounts and Payment Methods" table. Ensure that "Account" is indicated as the method.


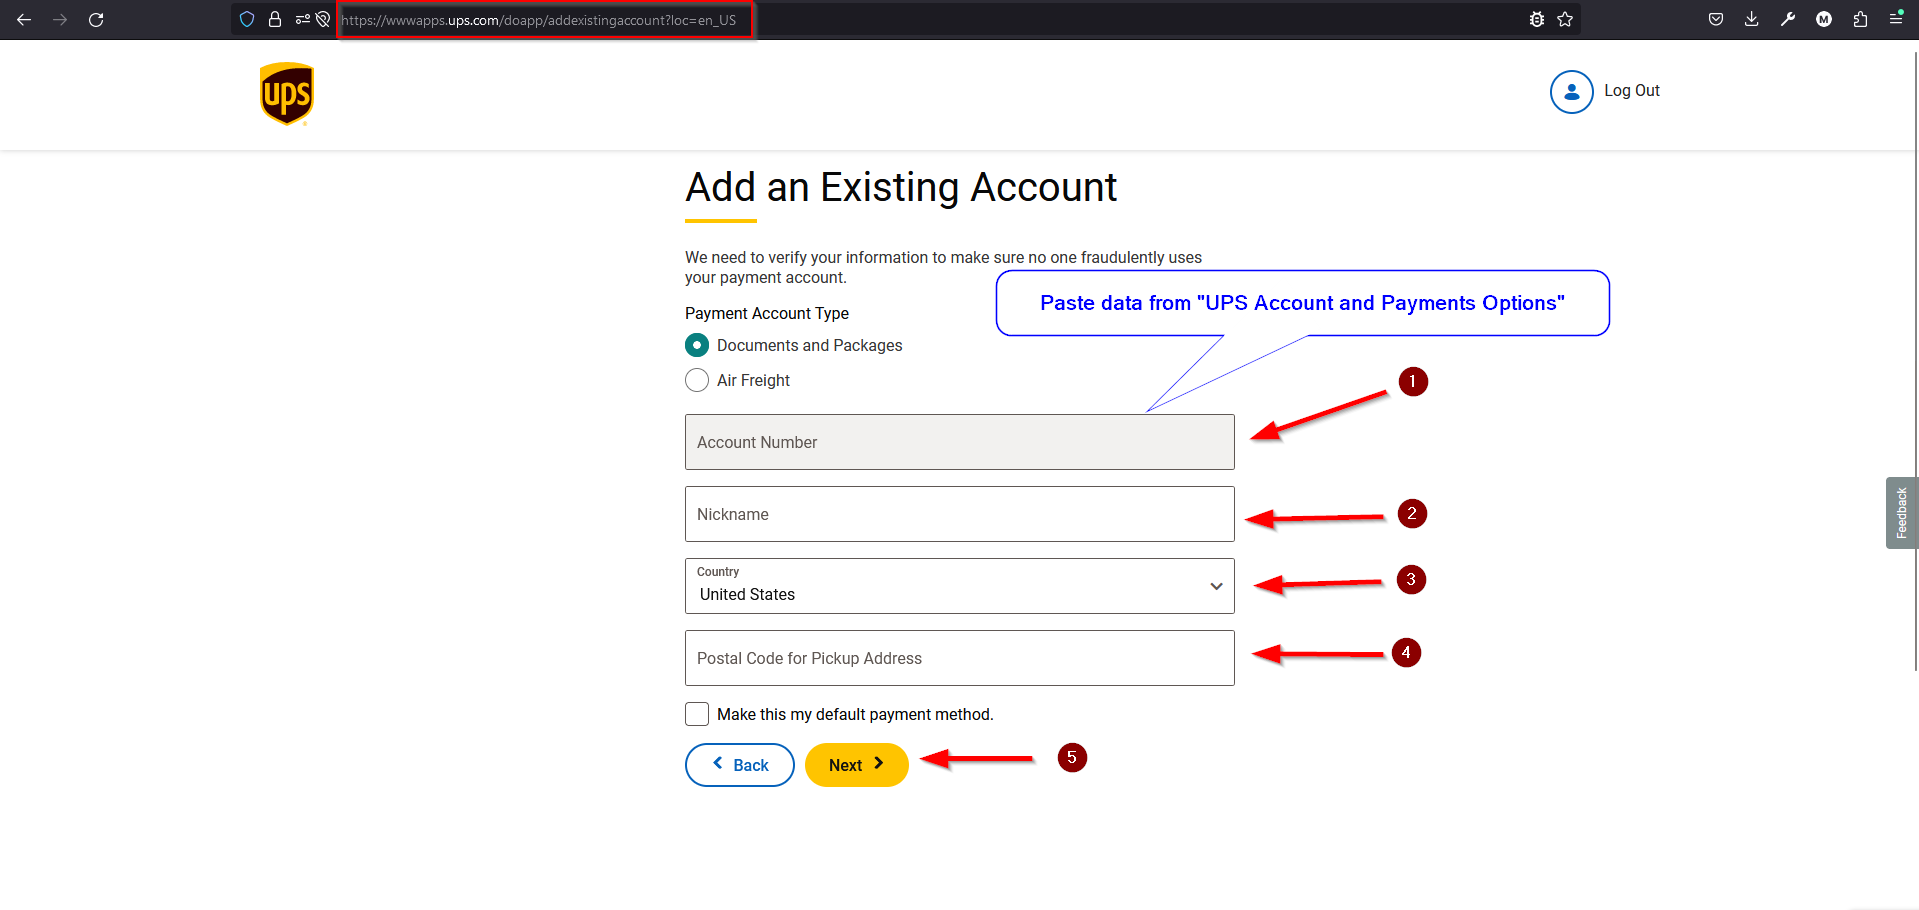
6. Create UPS Application: Proceed to create your UPS application by visiting this link. Fill in the required fields such as "Account Number," "Nickname," "Country," and "Postal Code for Pickup Address," then click "Next."


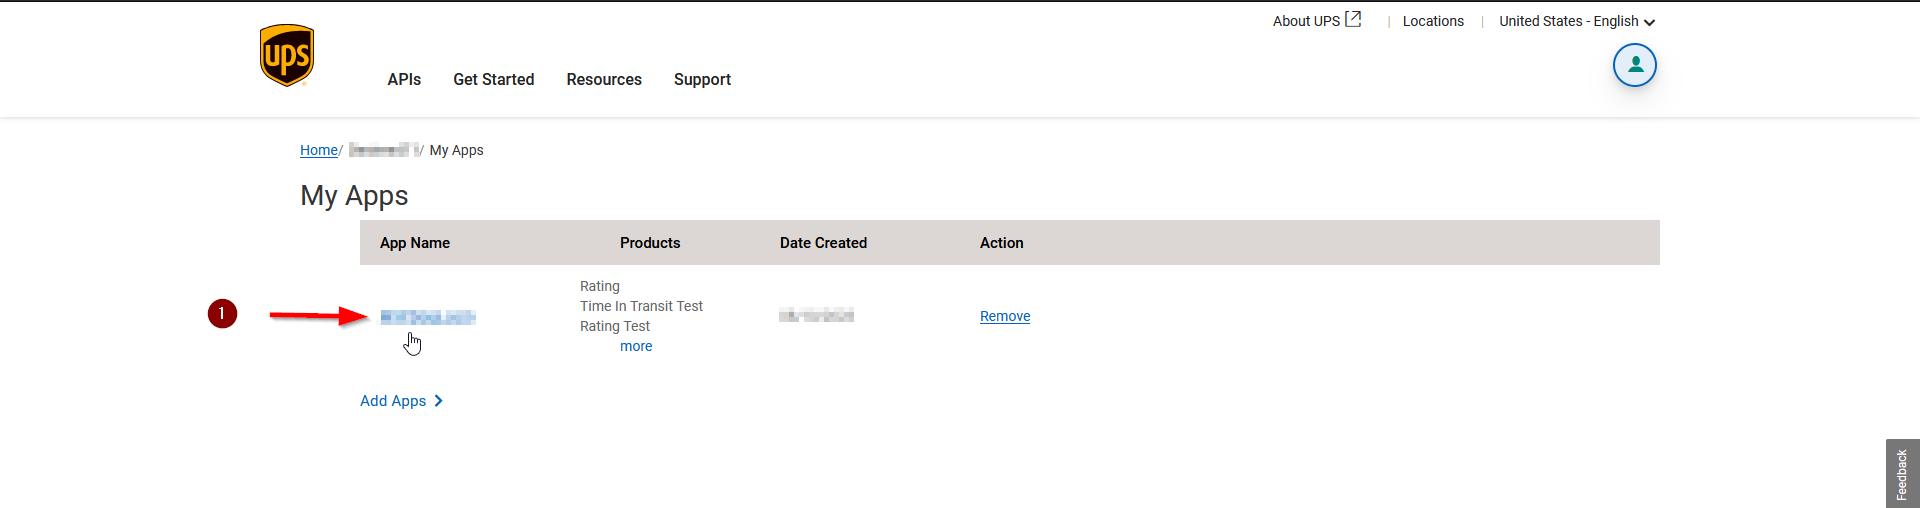
7. Access Application Details: On the "My Apps" page, find and click on your App link for editing.


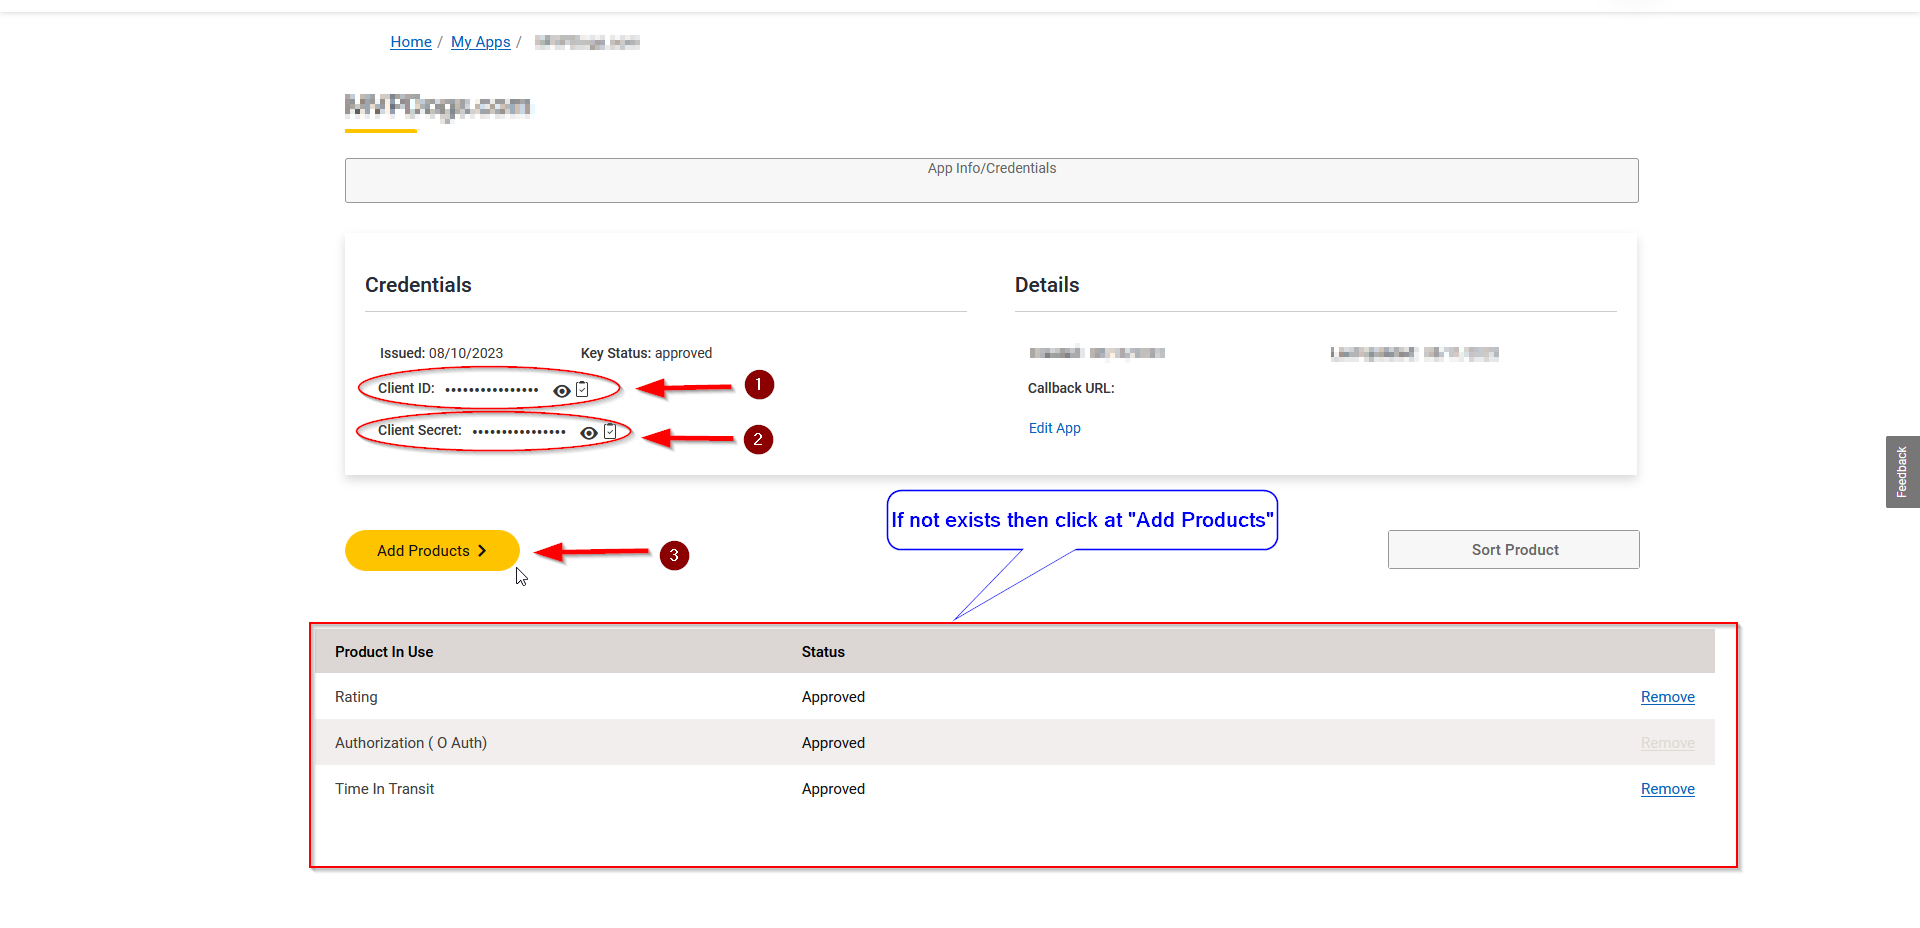
8. Retrieve Credentials: In the "Credentials" section, you'll find your Client ID and Client Secret. Below "Credentials," check if your product is listed. If not, click "Add Products."


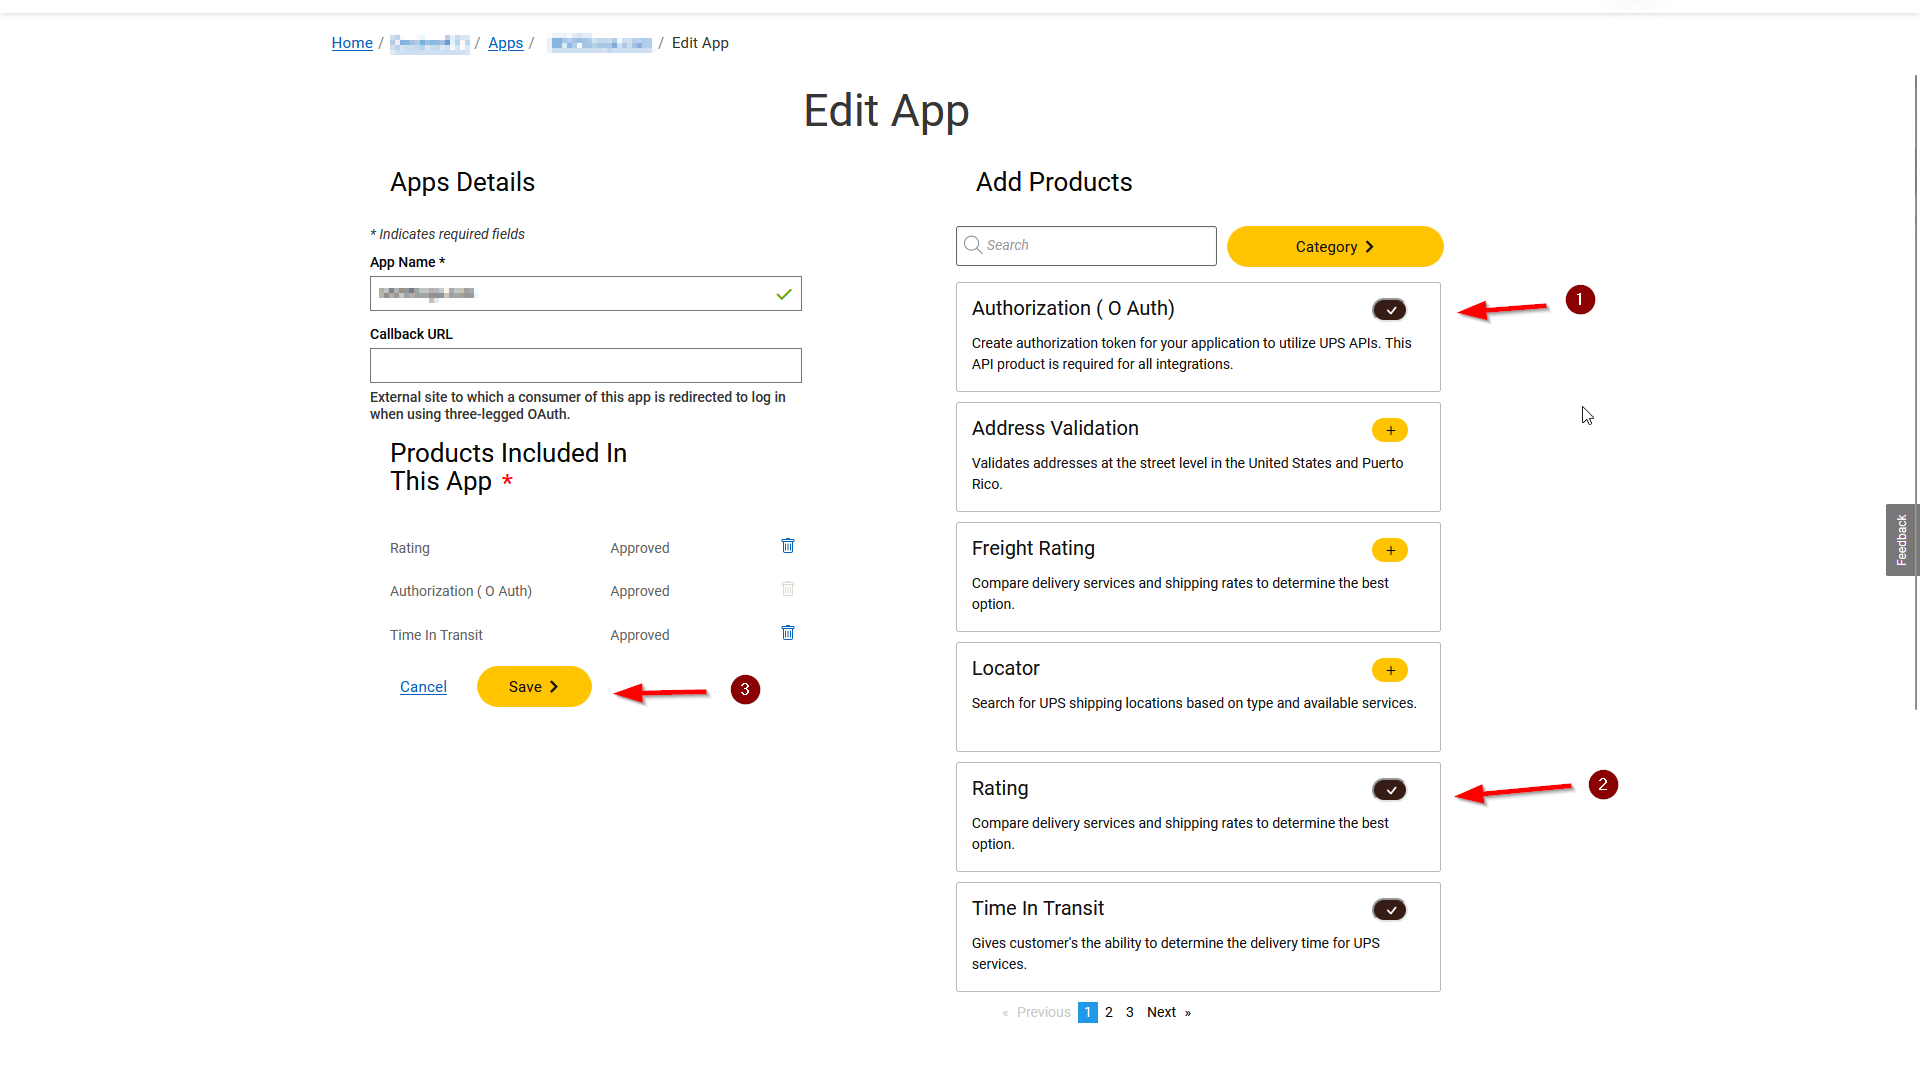
9. Edit Application: On the "Edit App" page, in the "Add Products" section, select "Authorization," "Rating," and "Time In Transit," then click "Save."


By following these steps, you'll successfully obtain the necessary UPS credentials for configuring your UPS Shipping module.

Thank you for choosing UPS Shipping as your preferred shipping solution! You're well on your way to streamlining your shipping process and providing excellent service to your customers.

You can further discuss it on our Forum